All settings are project-level. If you need different configurations for different funnels create separate projects.
Quick navigation
General
Project identity and branding
Team
User access and permissions
Domains
Custom domains and hosting
Webhooks
Real-time events from your funnels
Usage
AI token quota and consumption
General
The General settings page lets you configure your project’s basic information and branding.Project information
Your unique project identifier. This is useful for developers working
with multiple projects or using the FunnelFox API.
Your project name (typically your app or brand name). This appears
throughout the dashboard for easy identification but isn’t shown
to your funnel visitors.
Your project icon that appears in:
- Dashboard navigation
- Browser tabs when viewing funnels
Archive project
Archive a project when you no longer need it and all its data in your dashboard. To hide a project from the dashboard, go to Settings > General and click Archive in the Danger zone. Type the project’s exact name to confirm.Only project Owners and members with the Archive projects permission
can access this option.
Usage
The Usage tab shows resource usage across your organization for the current month. Quotas reset on the 1st of each month. Each organization gets 1,000,000 tokens per month, shared across all projects. Tokens are consumed by AI context analysis, chat, and image generation. Learn more in the Agentic solution overview.Team
The Team page controls who can access your project and what they can do. It lists every member of your organization, so the people you add here can be given access to this project and any others in the same organization.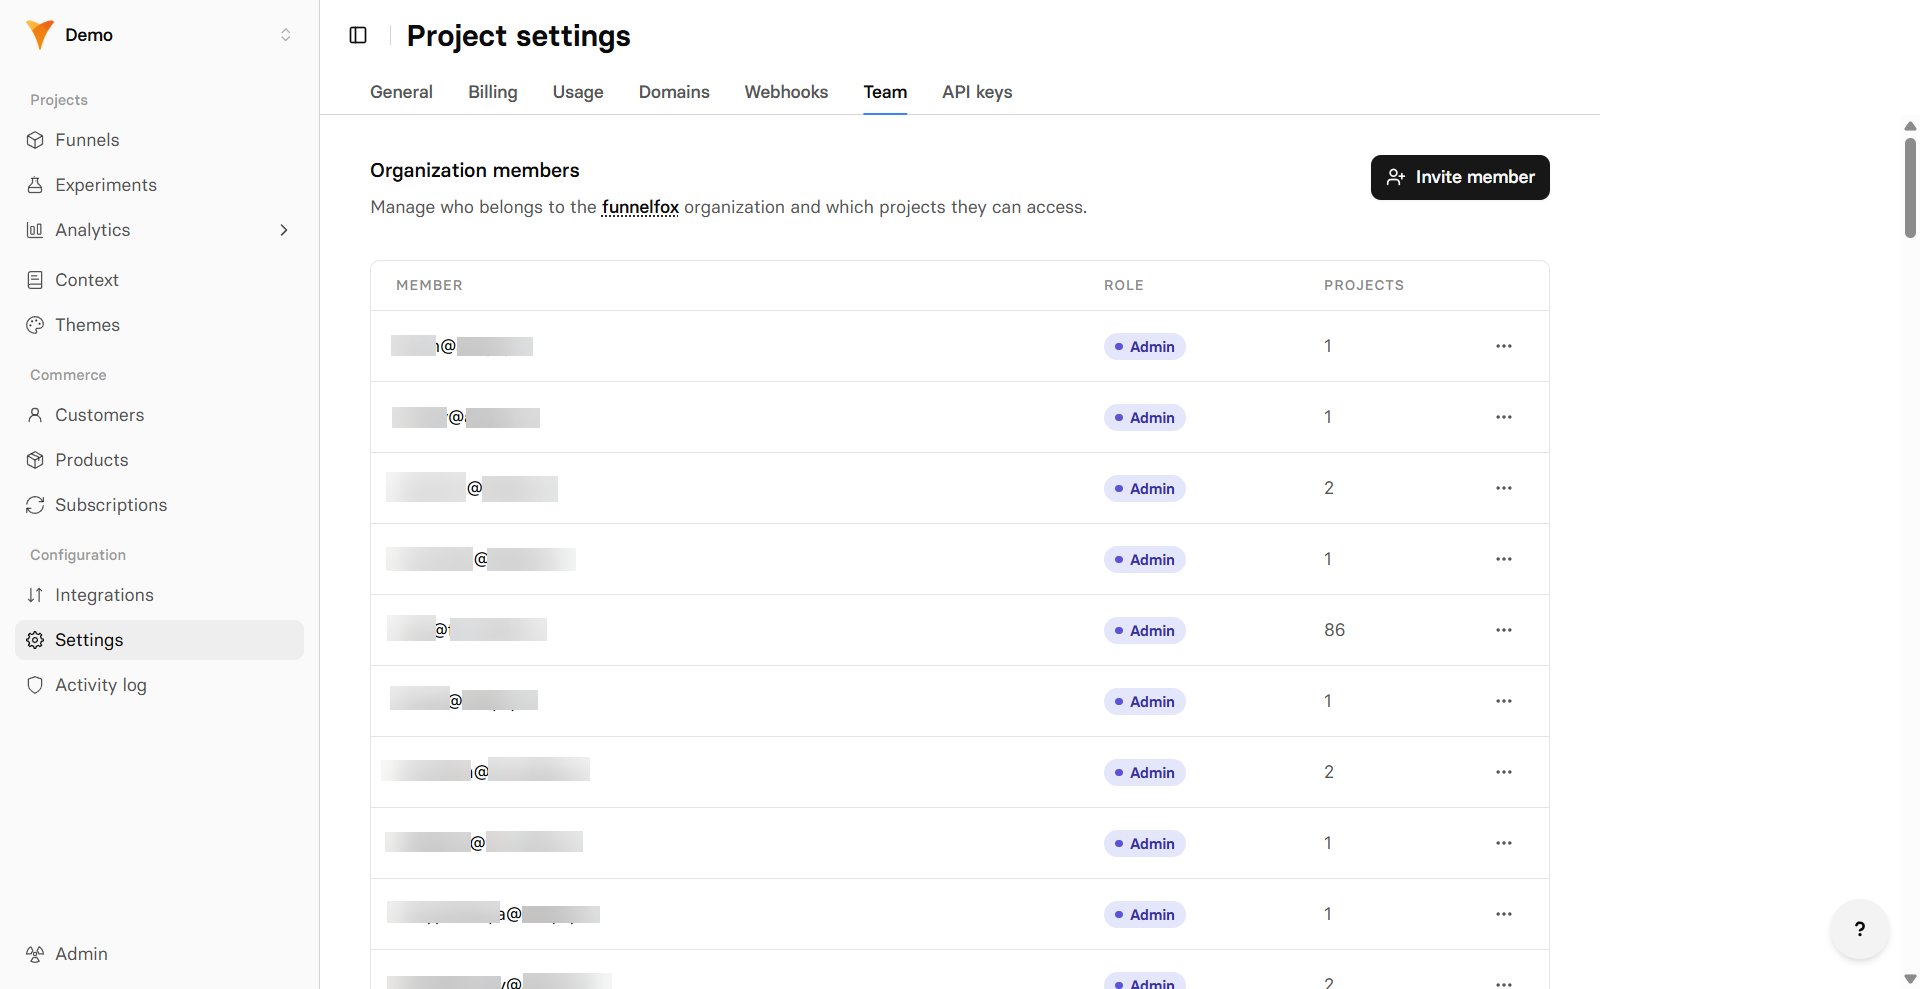
Manage team members
The Team tab shows each member with their email, assigned role, and the number of projects they can see. From here you can:- View members: See everyone in your organization at a glance.
- Edit a member: Click the three-dot menu on the right of a row and choose Edit to change their role, permissions, or project access.
- Remove a member: Click the three-dot menu and choose Remove. This removes the person from the whole organization, not just this project.
- Add a member: Click Invite member to bring someone new in.
You can’t grant permissions you don’t hold yourself. Only an Owner can assign the
Owner role, and you can’t edit your own access.
Team roles
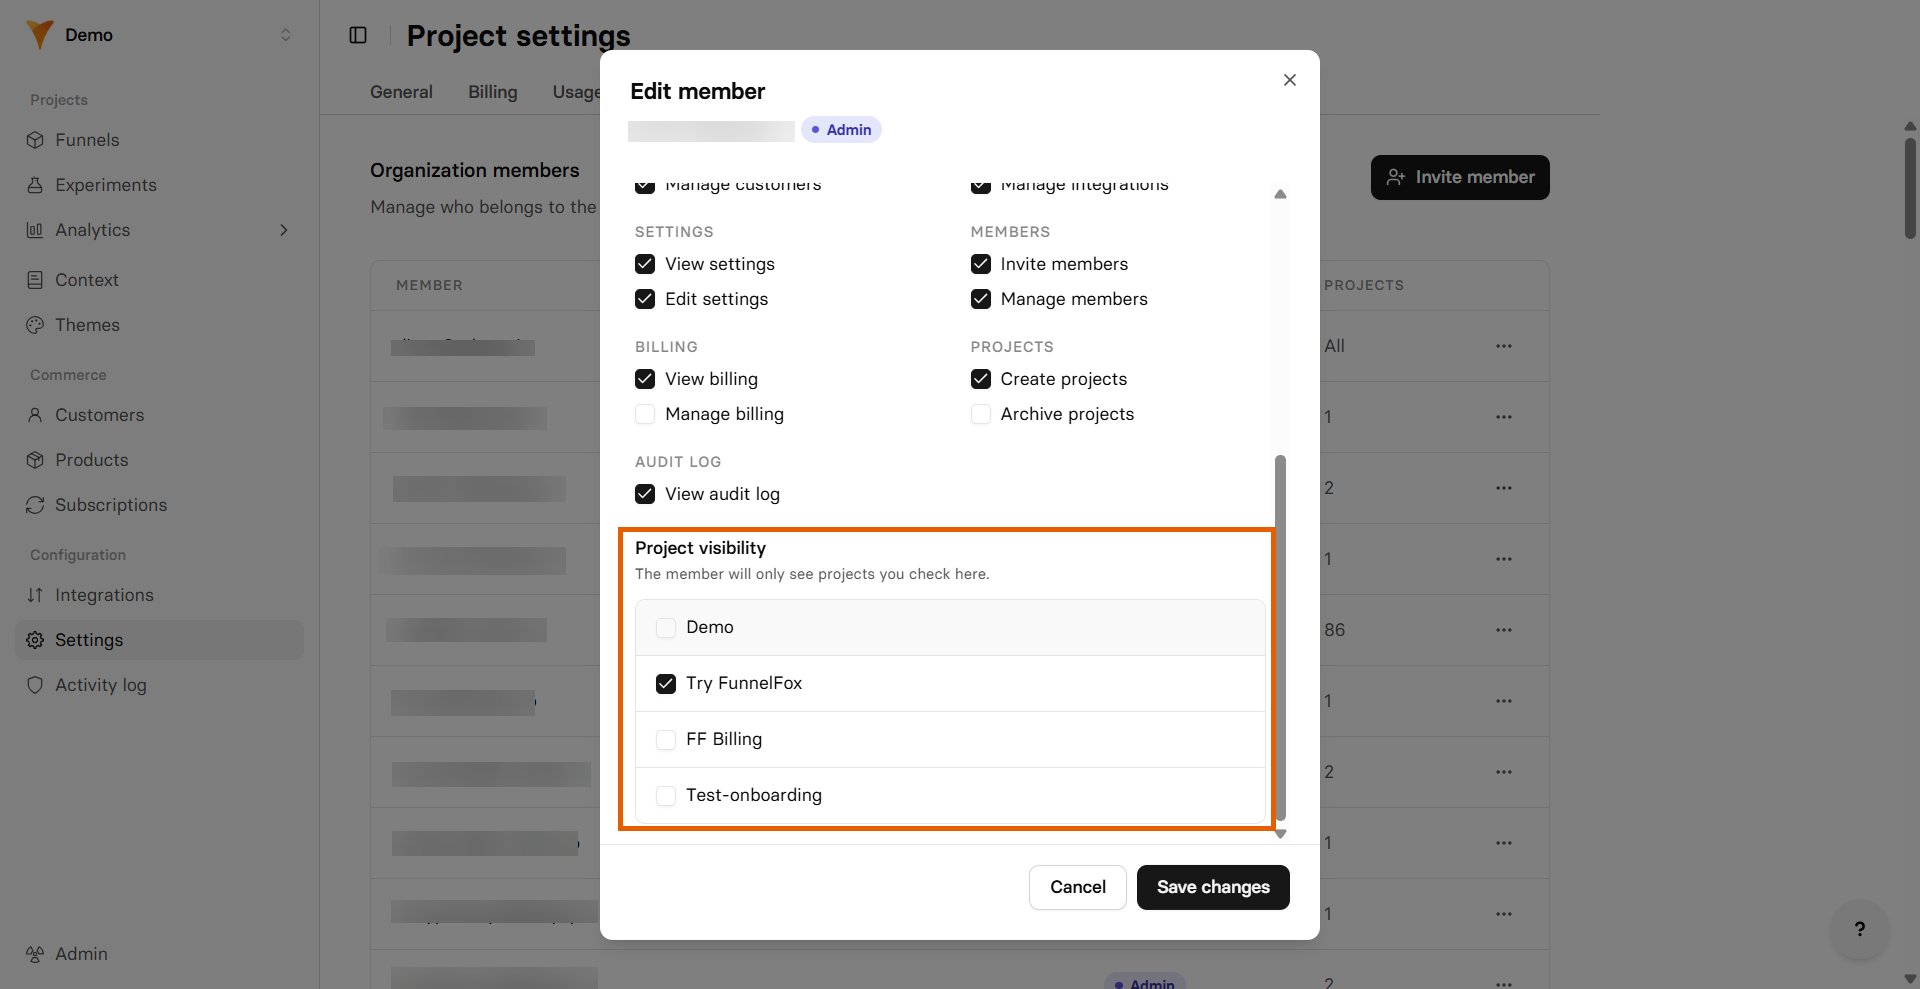
A role is a starting set of permissions. Pick a role to apply its permissions in one step, then fine-tune individual access rights if you need to.Permissions reference
Permissions reference
Each role is made up of individual permissions. You can grant or revoke
any of these when inviting or editing a member.
- View funnels / Edit funnels: See and change funnels.
- View products / Edit products: See and change products.
- View experiments / Edit experiments : See and change experiments.
- View analytics / Export reports: Open analytics and export reports.
- View customers / Manage customers: See and manage customers.
- View integrations / Manage integrations: See and configure integrations.
- View settings / Edit settings: Open and change project settings.
- Invite members / Manage members: Invite new members and edit or remove existing ones from this Team tab.
- View billing / Manage billing: See and manage billing for the organization.
- Create projects / Archive projects: Create new projects and archive existing ones.
- View audit log: Open the activity log.
Add team members
1
Click Invite member
On the Settings > Team page, click
Invite member.
2
Enter the email address
Add the email address of the person you want to invite.
3
Choose a role
Pick one of the team roles to apply its permissions as a
starting point.
4
Select permissions
Adjust the individual permissions if the member needs more or less
access than the role provides. When the permissions no longer match the
role, it’s labeled Custom.
5
Set project visibility
Choose which projects the member can see. Owners always see every
project in the organization.
Project access
To add project access to existing team members:- Click the three dots to the right of the team member.
- Select Edit.
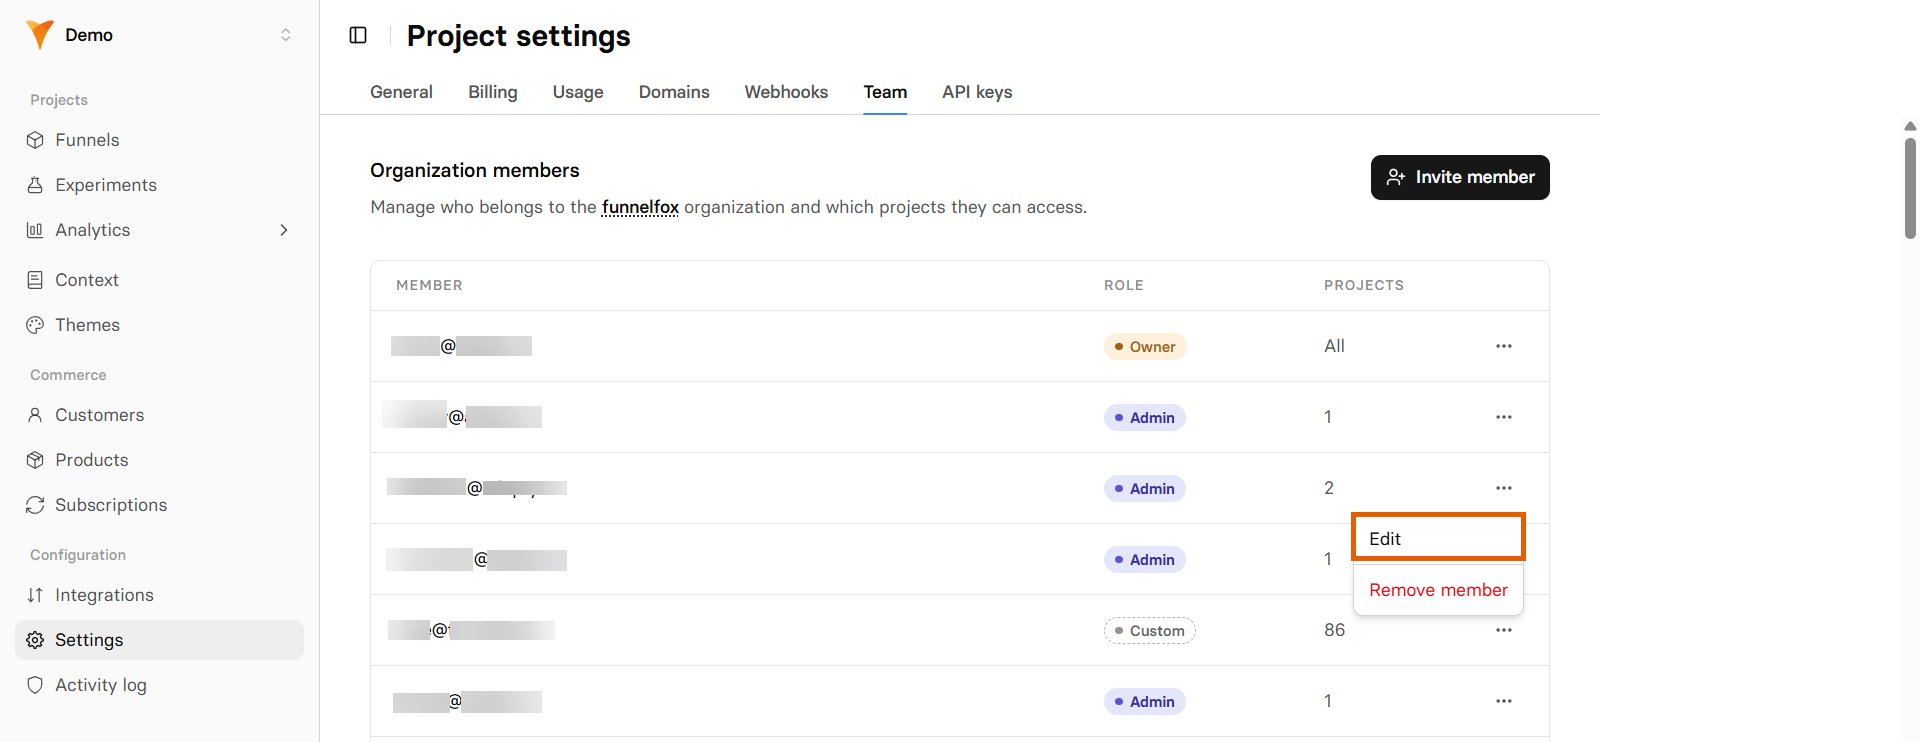
- Select projects to share under Project visibility and save changes.
Domains
The Domains page controls where your funnels are hosted. You can use FunnelFox subdomains, add a custom domain, or use both simultaneously.How domains work
Important: When you add a custom domain, both domains remain active
Your funnels will be accessible at both:
your-project.fnlfx.com/funnel-name(FunnelFox subdomain)get.yourbrand.com/funnel-name(your custom domain)
Domain options
- FunnelFox Subdomain
- Custom Domain
Always available: Your project automatically gets a subdomain like
your-project.fnlfx.com. This is perfect for:- Quick testing and development
- Smaller campaign testing
- Backup access if custom domain has issues
your-project.fnlfx.com/funnel-nameThis subdomain remains active even after adding a custom domain,
so existing links will continue to work.
Setting up a custom domain
Let’s configurequiz.mysite.com as an example:
1
Access your DNS settings
Log into your domain registrar or DNS provider:
2
Create a CNAME record
Add a new DNS record with these settings:
DNS changes can take up to 48 hours to propagate globally,
though it’s usually much faster (5-30 minutes).
3
Configure in FunnelFox
Each custom domain can be connected to only one project.
- Go to Settings → Domains
- Enter your full domain (
quiz.mysite.com) in Custom domain - Click Save to activate
Apple Pay domain verification
If you’re using Apple Pay through your payment processor:Select the PSP merchant certificate to host on your domain.
This is required for Apple Pay to work with your custom domain.
Webhooks
The Webhooks page lets you receive real-time events from your funnels to your backend systems.Webhook endpoints
Endpoint for receiving events from preview/test funnels.
Use this for development and testing without affecting production data.
Endpoint for receiving events from live, published funnels.
This should point to your production backend systems.
Fonts
The Fonts page lets you upload and manage custom fonts for your funnels, ensuring brand consistency across all your campaigns.Supported formats
- WOFF/WOFF2 (recommended for web performance)
- TTF/OTF (standard font formats)
- Variable fonts for advanced typography control
Custom fonts are automatically optimized and served through our
global CDN for fast loading times worldwide.
API keys
The API Keys page provides access credentials for programmatic access to your FunnelFox project. Learn more about using the FunnelFox API in our developer guide.Frequently asked questions
Can I use different settings for different funnels?
Can I use different settings for different funnels?
No, all settings apply project-wide to ensure consistency. If you
need different configurations (like separate payment providers or
tracking codes), create separate projects for each configuration.
Can I change my project subdomain?
Can I change my project subdomain?
Yes, but be careful — changing your subdomain will break all existing
funnel links. Only do this if you haven’t launched any campaigns yet.