> ## Documentation Index
> Fetch the complete documentation index at: https://funnelfox.com/docs/llms.txt
> Use this file to discover all available pages before exploring further.
# How to set up X (Twitter) Pixel
> Add X (Twitter) Pixel to your FunnelFox funnels. Track conversions, build audiences, and optimize your X ad campaigns.
The [X Pixel integration](/integrations/tracking/x-pixel) sends events like `Purchase` and `CompleteRegistration` to X Events Manager, helping you optimize your ads on X (formerly Twitter).
Conversion API sends events directly from FunnelFox servers to X, bypassing browser limitations. This guide walks you through the complete setup process.
We strongly recommend using Conversion API. If you're unsure whether you need it, read our guide on
[why use Conversion API](/integrations/tracking/x-pixel#use-conversion-api).
## Setup
To proceed with this setup, make sure you have:
* An X Ads Manager account with the Tools tab available. [X locks the Tools tab](https://business.x.com/en/help/campaign-measurement-and-analytics/conversion-tracking-for-websites) until a credit card is added to your X account.
* Ads API access to set up the Conversion API. Learn more in the [X documentation about Ads API](https://developer.x.com/en/docs/x-ads-api/getting-started).
Follow these steps to create an X Pixel, get your Pixel ID, and connect it to FunnelFox.
### 1. Add event source
1. Go to **Tools > Event manager** in your [X Ads Manager](https://ads.x.com).
If your X Pixel was already created for your ad campaigns, you can skip steps 2 and 3 in this subsection.
2. Click **Add event source** at the top right.
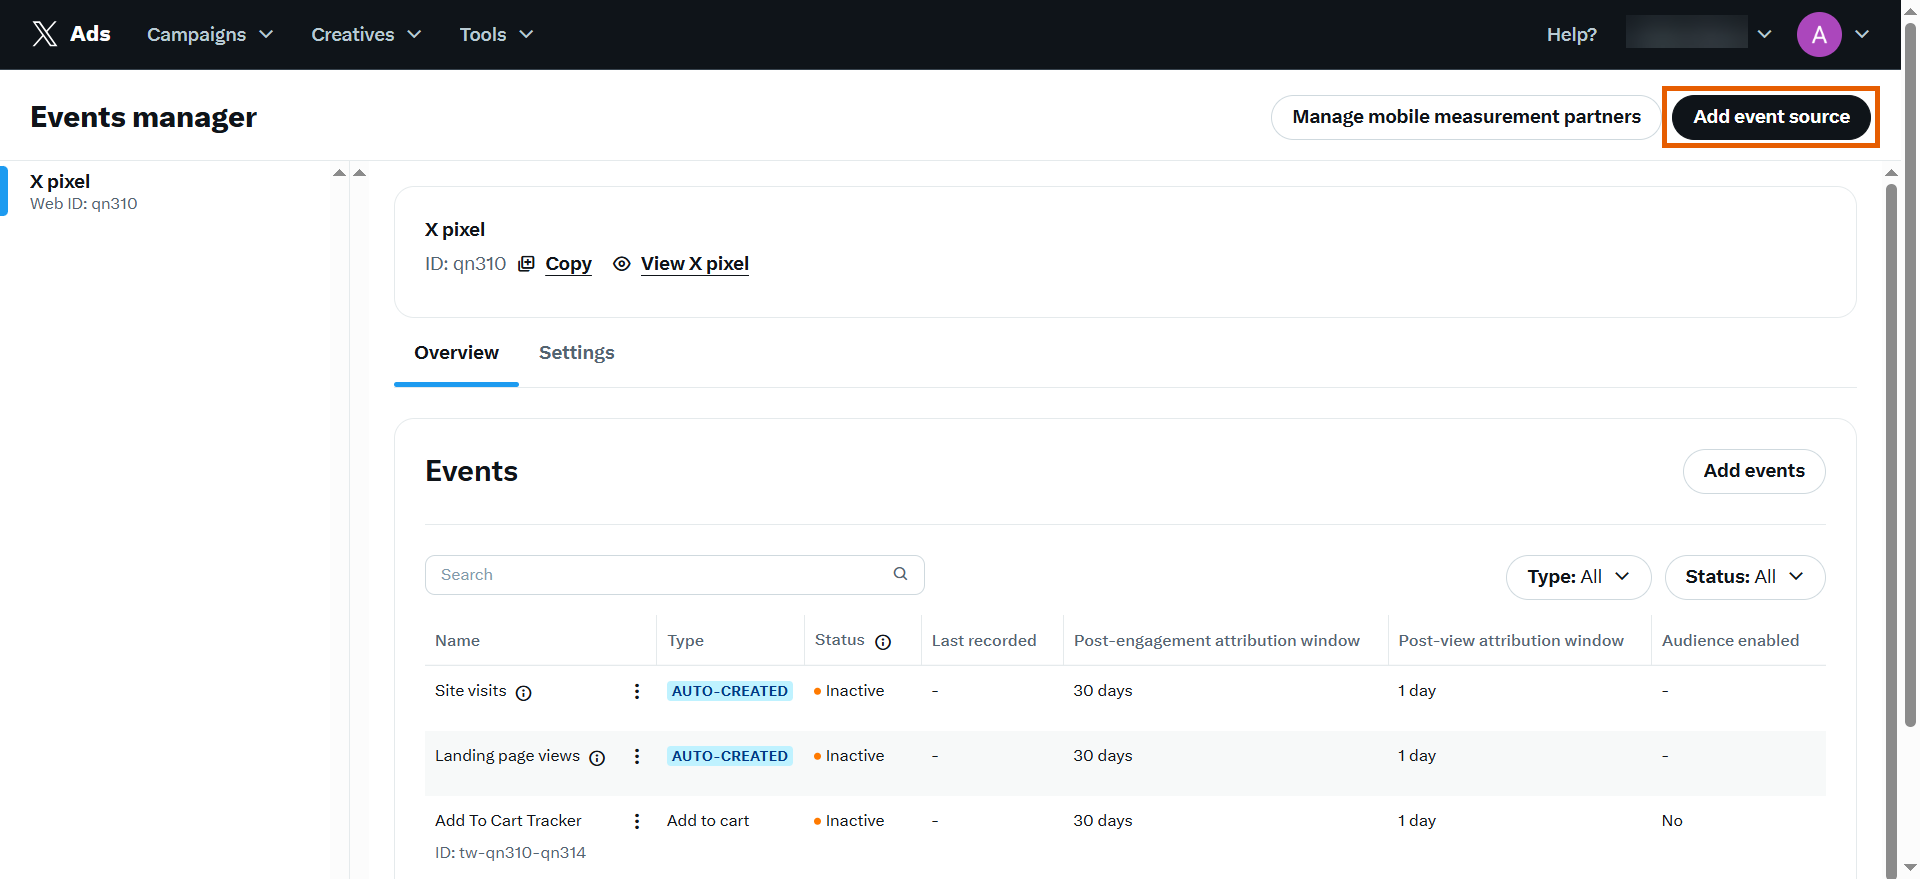 3. Save the event source.
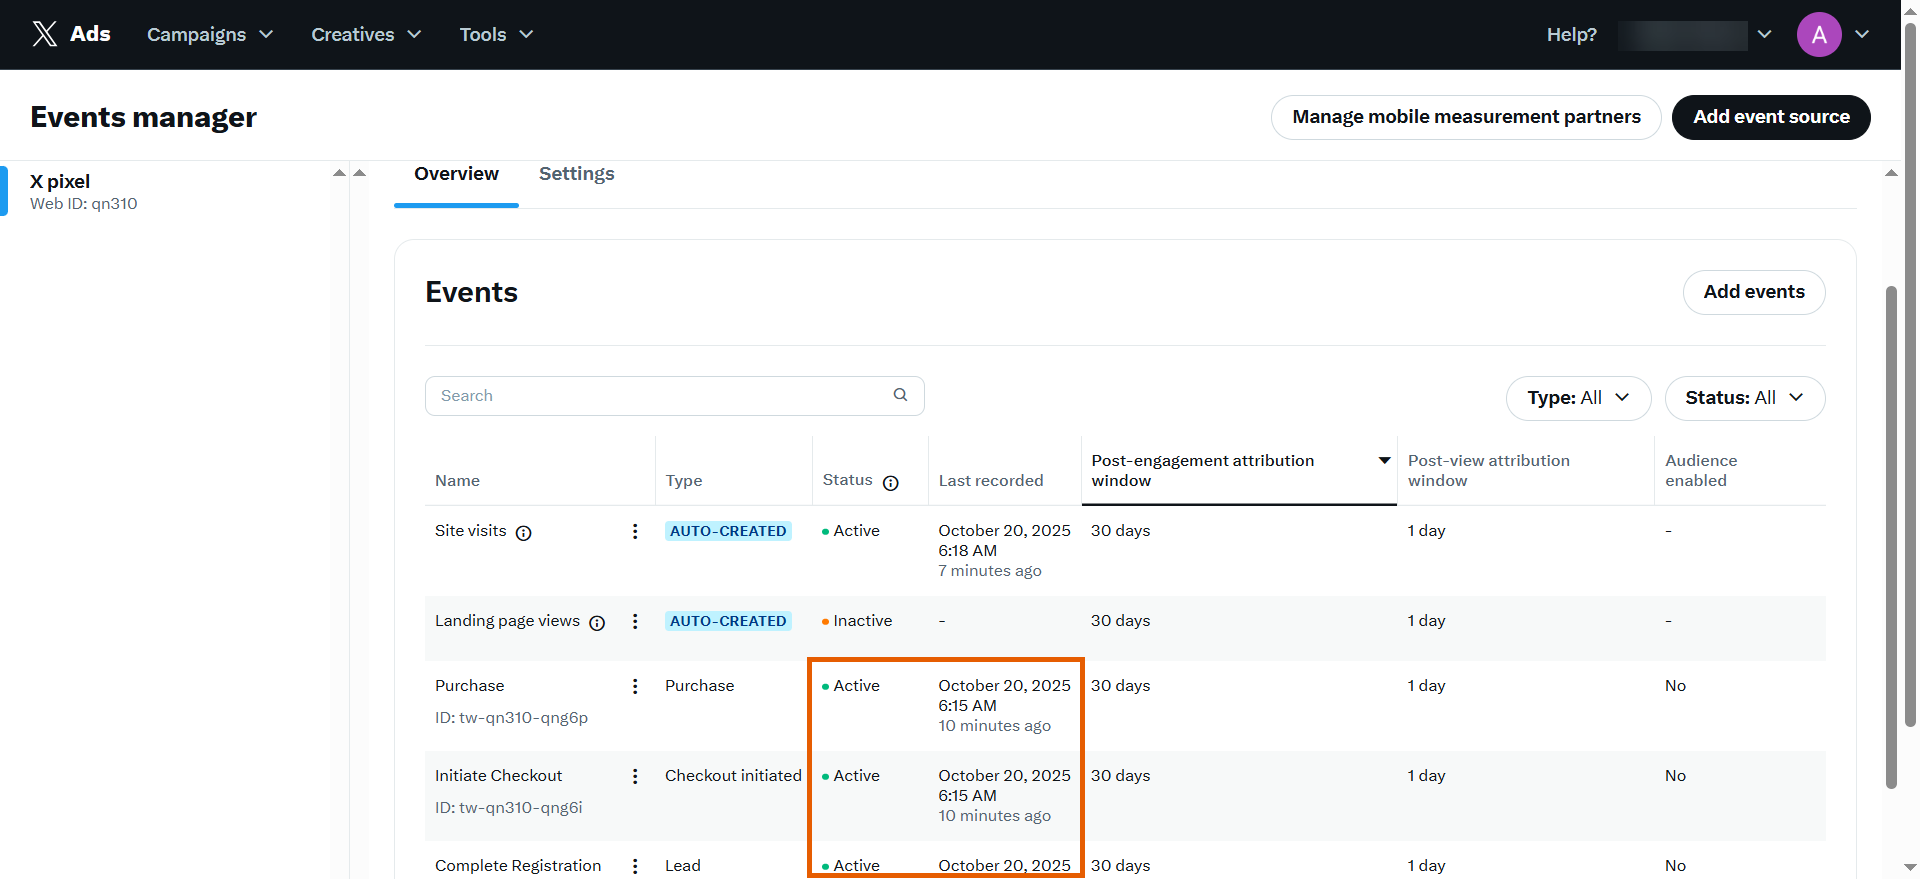
### 2. Add events
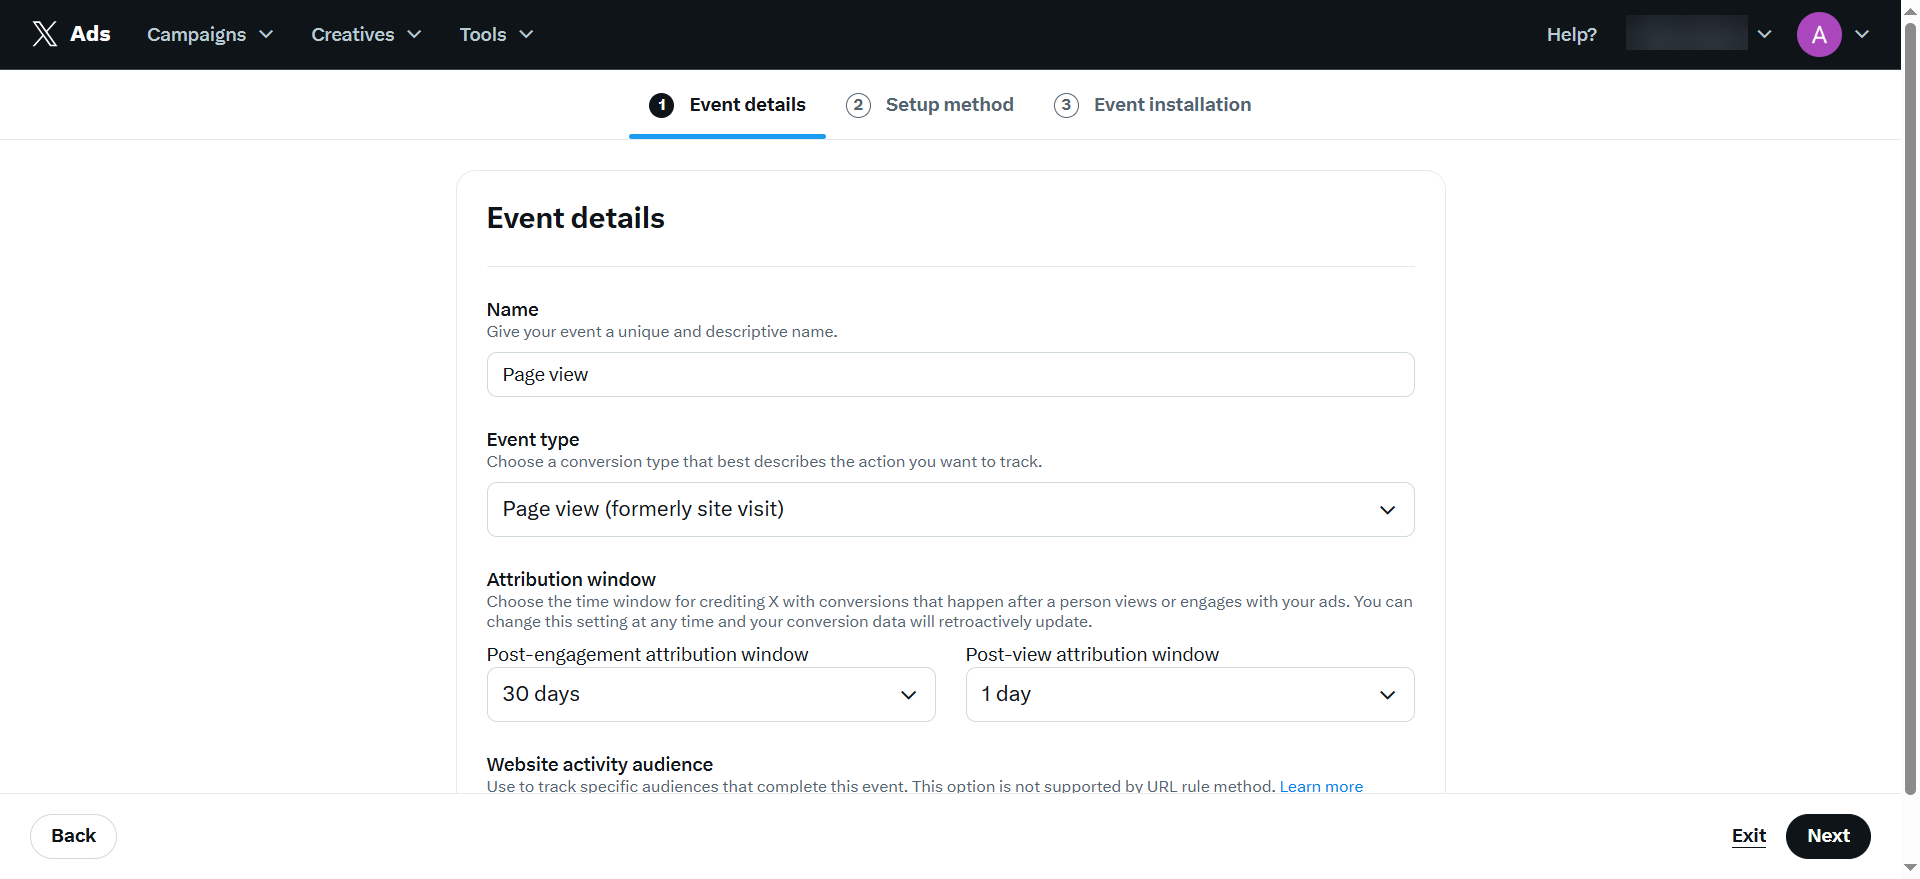
1. Click **Add events** on the right.
3. Save the event source.
### 2. Add events
1. Click **Add events** on the right.
 2. Enter event details and click **Next**:
* **Name**: Page view
* **Event type**: Page view (formerly site visit)
* **Post-engagement attribution window**: 30 days (default)
* **Post-view attribution window**: 1 day (default)
2. Enter event details and click **Next**:
* **Name**: Page view
* **Event type**: Page view (formerly site visit)
* **Post-engagement attribution window**: 30 days (default)
* **Post-view attribution window**: 1 day (default)
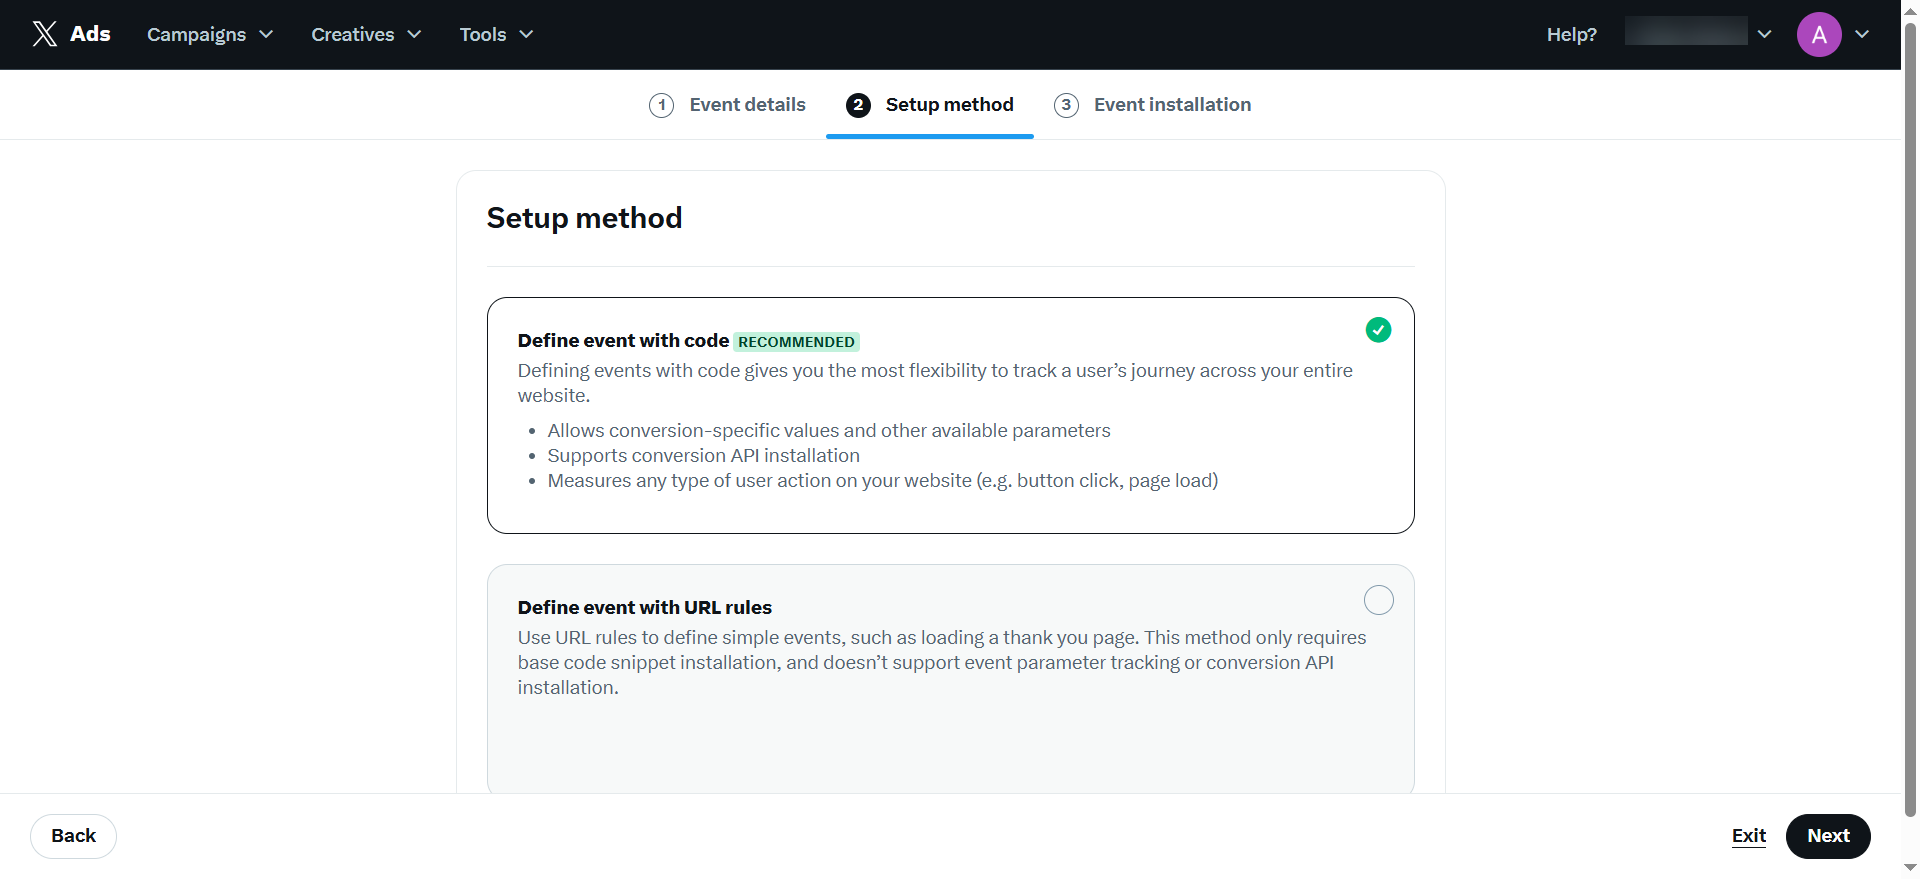
 3. Keep the default **Define event with code** as setup method and click **Next**.
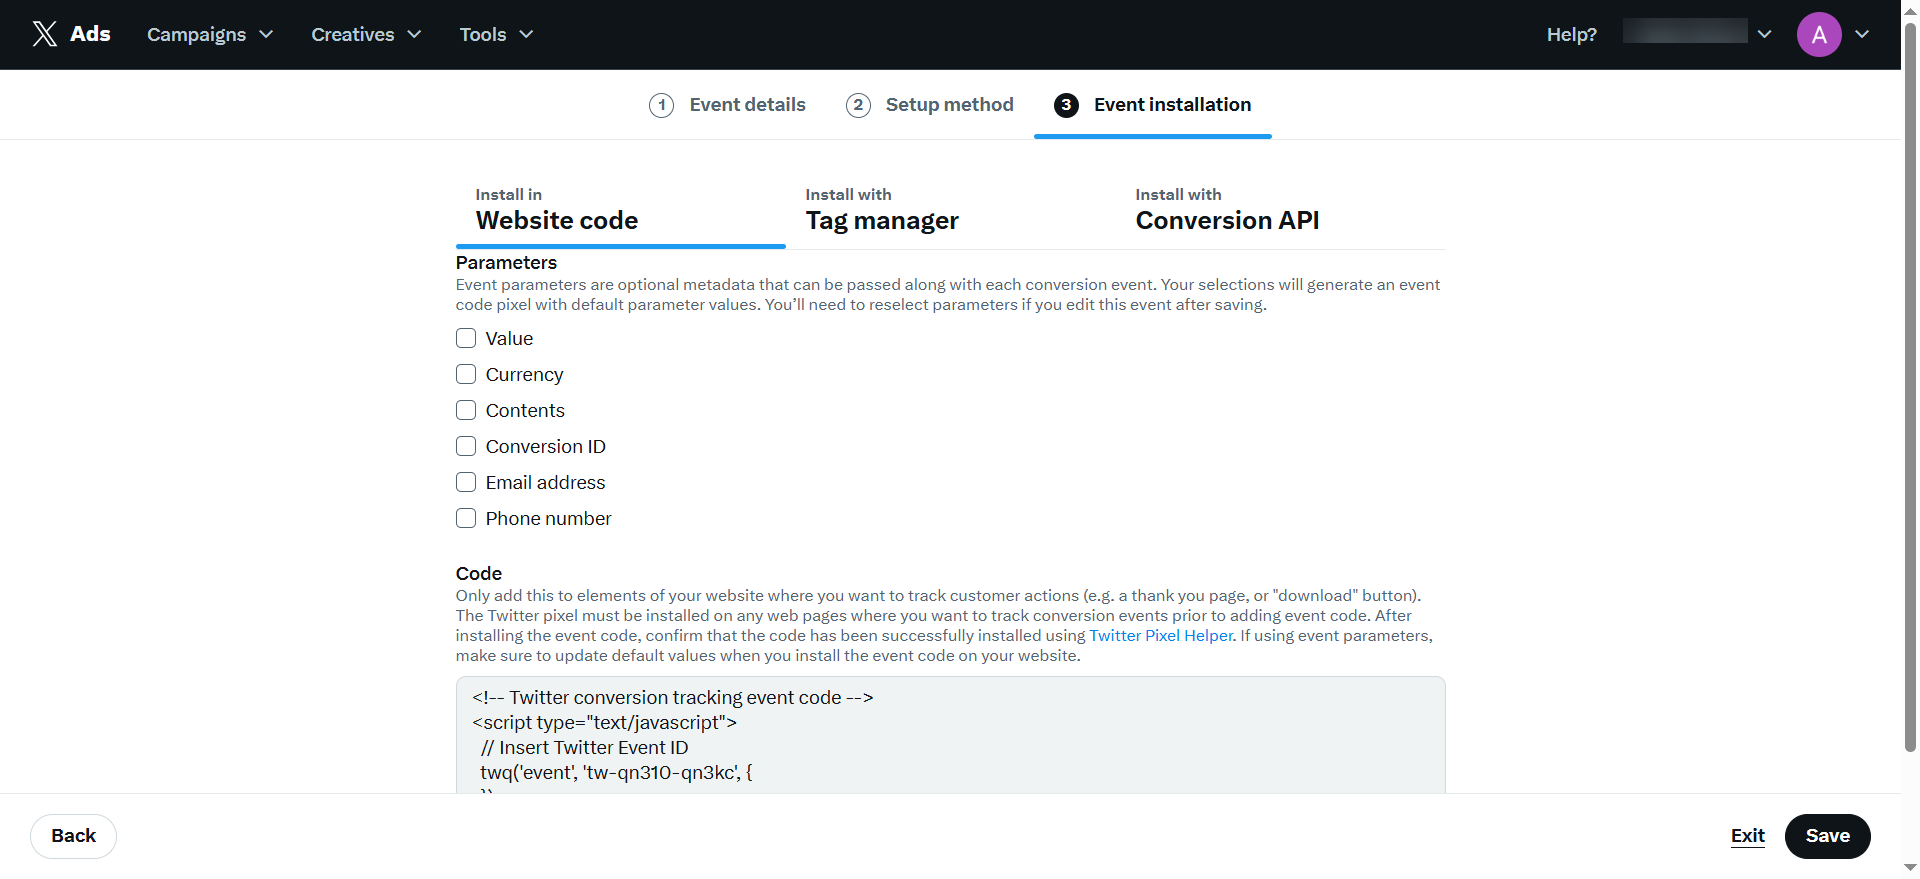
 4. Click **Save** under **Event installation** as you don't have to set up anything here.
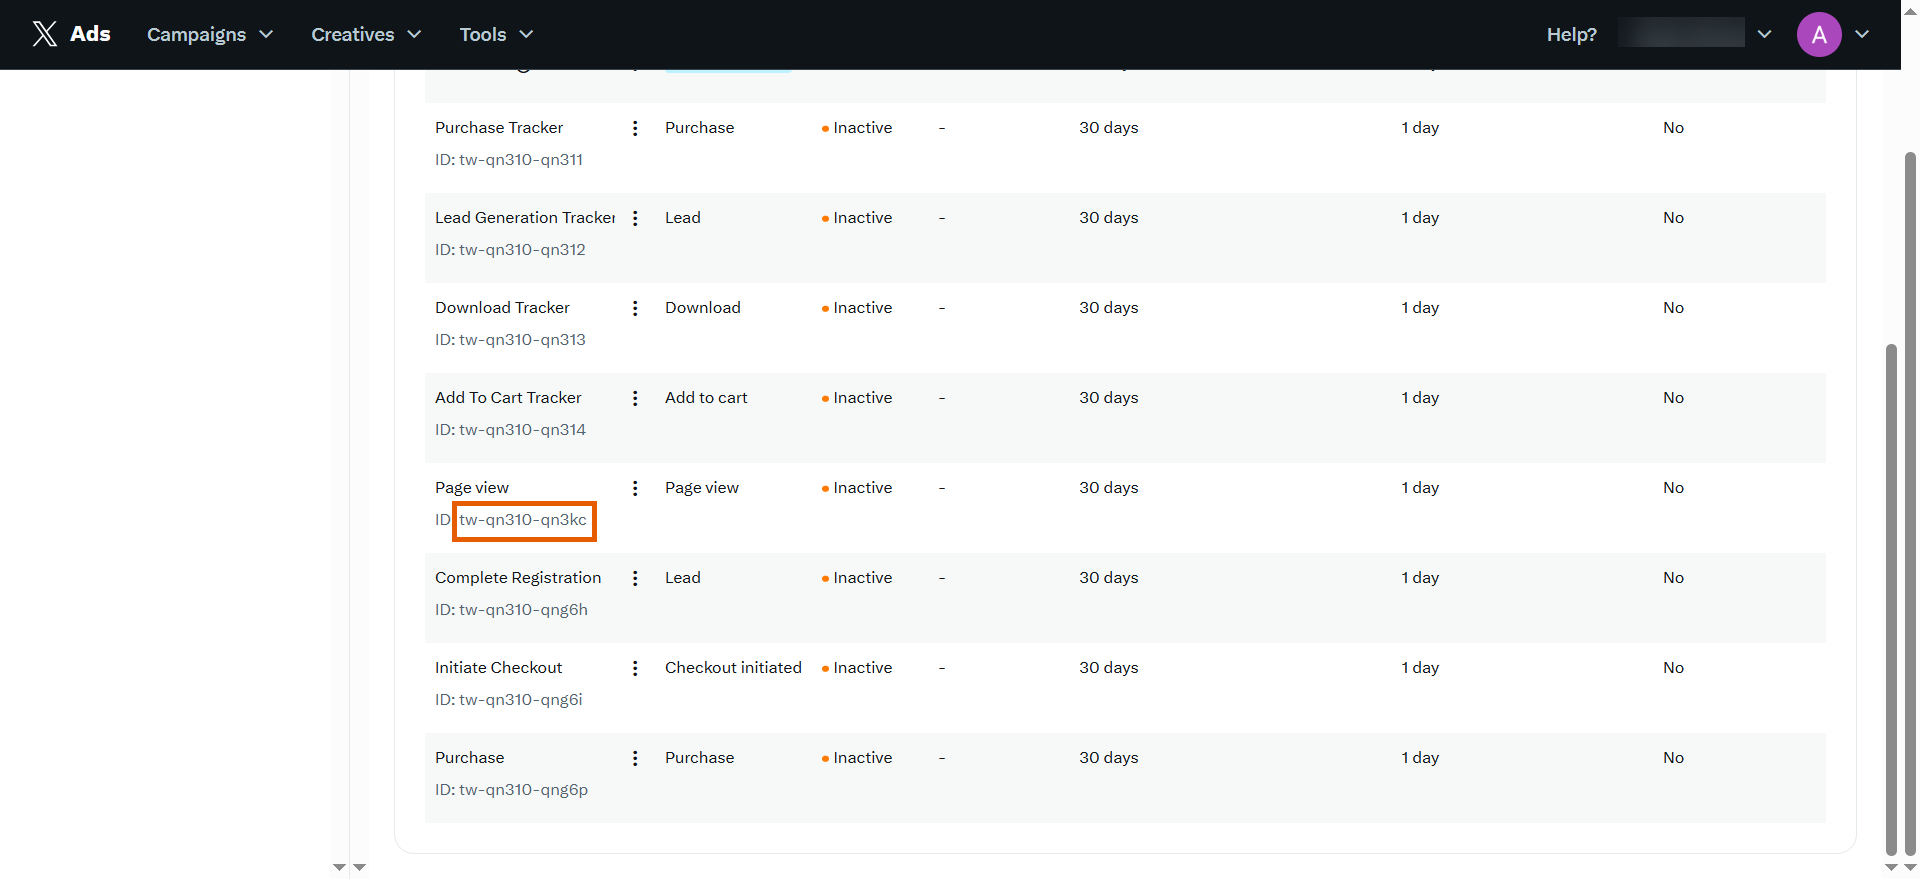
 5. Repeat to add the following three events:
**Complete Registration**
* **Name**: Complete Registration
* **Event type**: Lead (formerly sign up)
* **Post-engagement attribution window**: 30 days (default)
* **Post-view attribution window**: 1 day (default)
**Initiate Checkout**
* **Name**: Initiate Checkout
* **Event type**: Checkout initiated
* **Post-engagement attribution window**: 30 days (default)
* **Post-view attribution window**: 1 day (default)
**Purchase**
* **Name**: Purchase
* **Event type**: Purchase
* **Post-engagement attribution window**: 30 days (default)
* **Post-view attribution window**: 1 day (default)
Each created event gets a unique ID. Use these event IDs when configuring the next step.
Keep this page open since you’ll need to copy and paste multiple values into FunnelFox.
5. Repeat to add the following three events:
**Complete Registration**
* **Name**: Complete Registration
* **Event type**: Lead (formerly sign up)
* **Post-engagement attribution window**: 30 days (default)
* **Post-view attribution window**: 1 day (default)
**Initiate Checkout**
* **Name**: Initiate Checkout
* **Event type**: Checkout initiated
* **Post-engagement attribution window**: 30 days (default)
* **Post-view attribution window**: 1 day (default)
**Purchase**
* **Name**: Purchase
* **Event type**: Purchase
* **Post-engagement attribution window**: 30 days (default)
* **Post-view attribution window**: 1 day (default)
Each created event gets a unique ID. Use these event IDs when configuring the next step.
Keep this page open since you’ll need to copy and paste multiple values into FunnelFox.
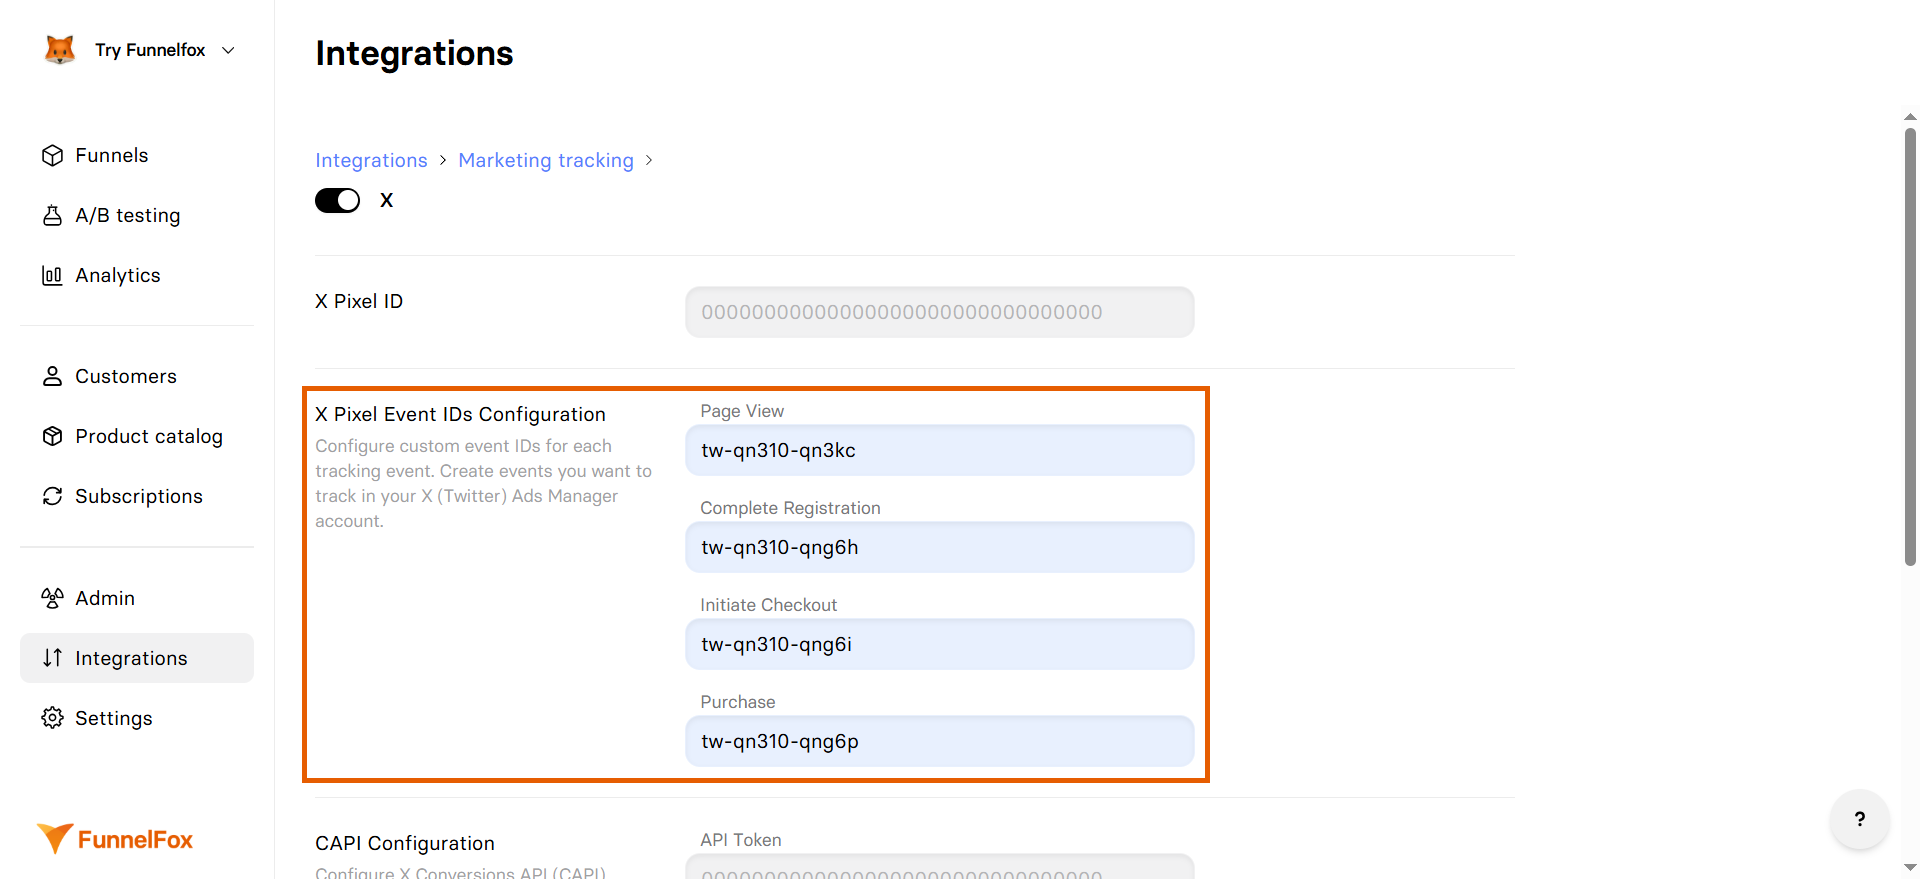
 ### 3. Configure events
1. Go to [Integrations > X](https://app.funnelfox.com/integrations/x) in FunnelFox.
2. Insert your event IDs into the corresponding fields under **X Pixel Event IDs Configuration**.
### 3. Configure events
1. Go to [Integrations > X](https://app.funnelfox.com/integrations/x) in FunnelFox.
2. Insert your event IDs into the corresponding fields under **X Pixel Event IDs Configuration**.
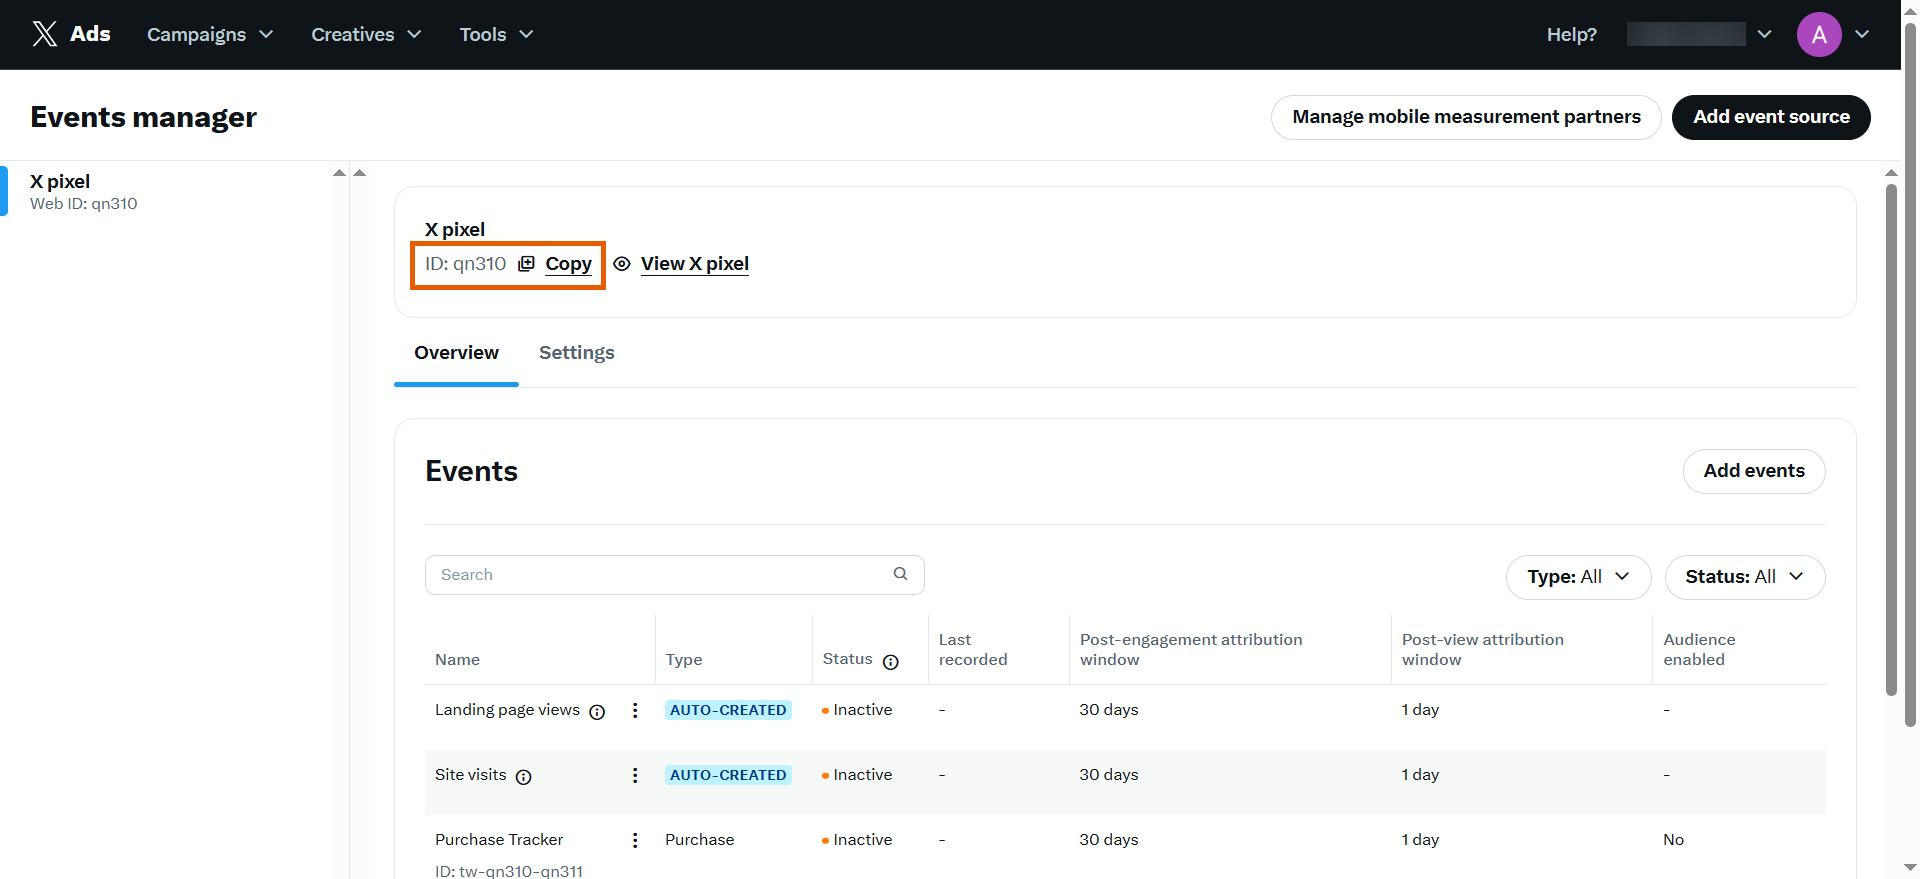
 ### 4. Configure Pixel ID
1. Go back to Events manager in X and copy your 5-character **Pixel ID**.
### 4. Configure Pixel ID
1. Go back to Events manager in X and copy your 5-character **Pixel ID**.
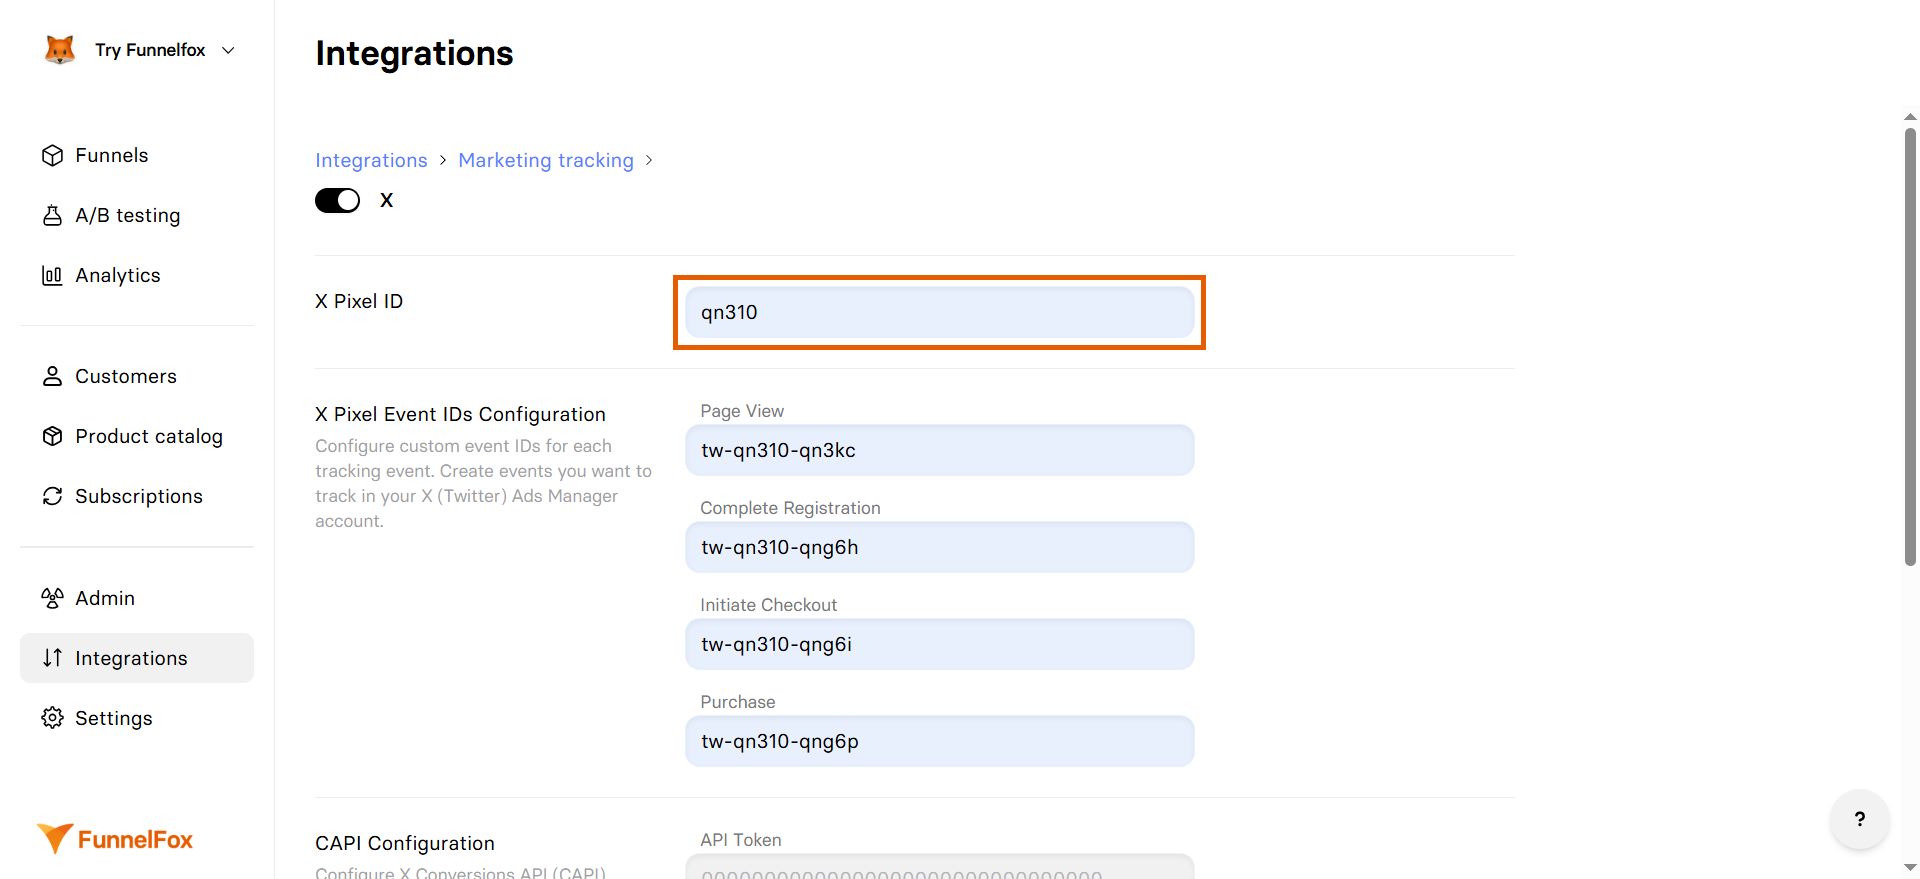
 2. Go to X Pixel integration in FunnelFox and paste the Pixel ID under the **X Pixel ID**.
 ### 5. Configure Conversion API
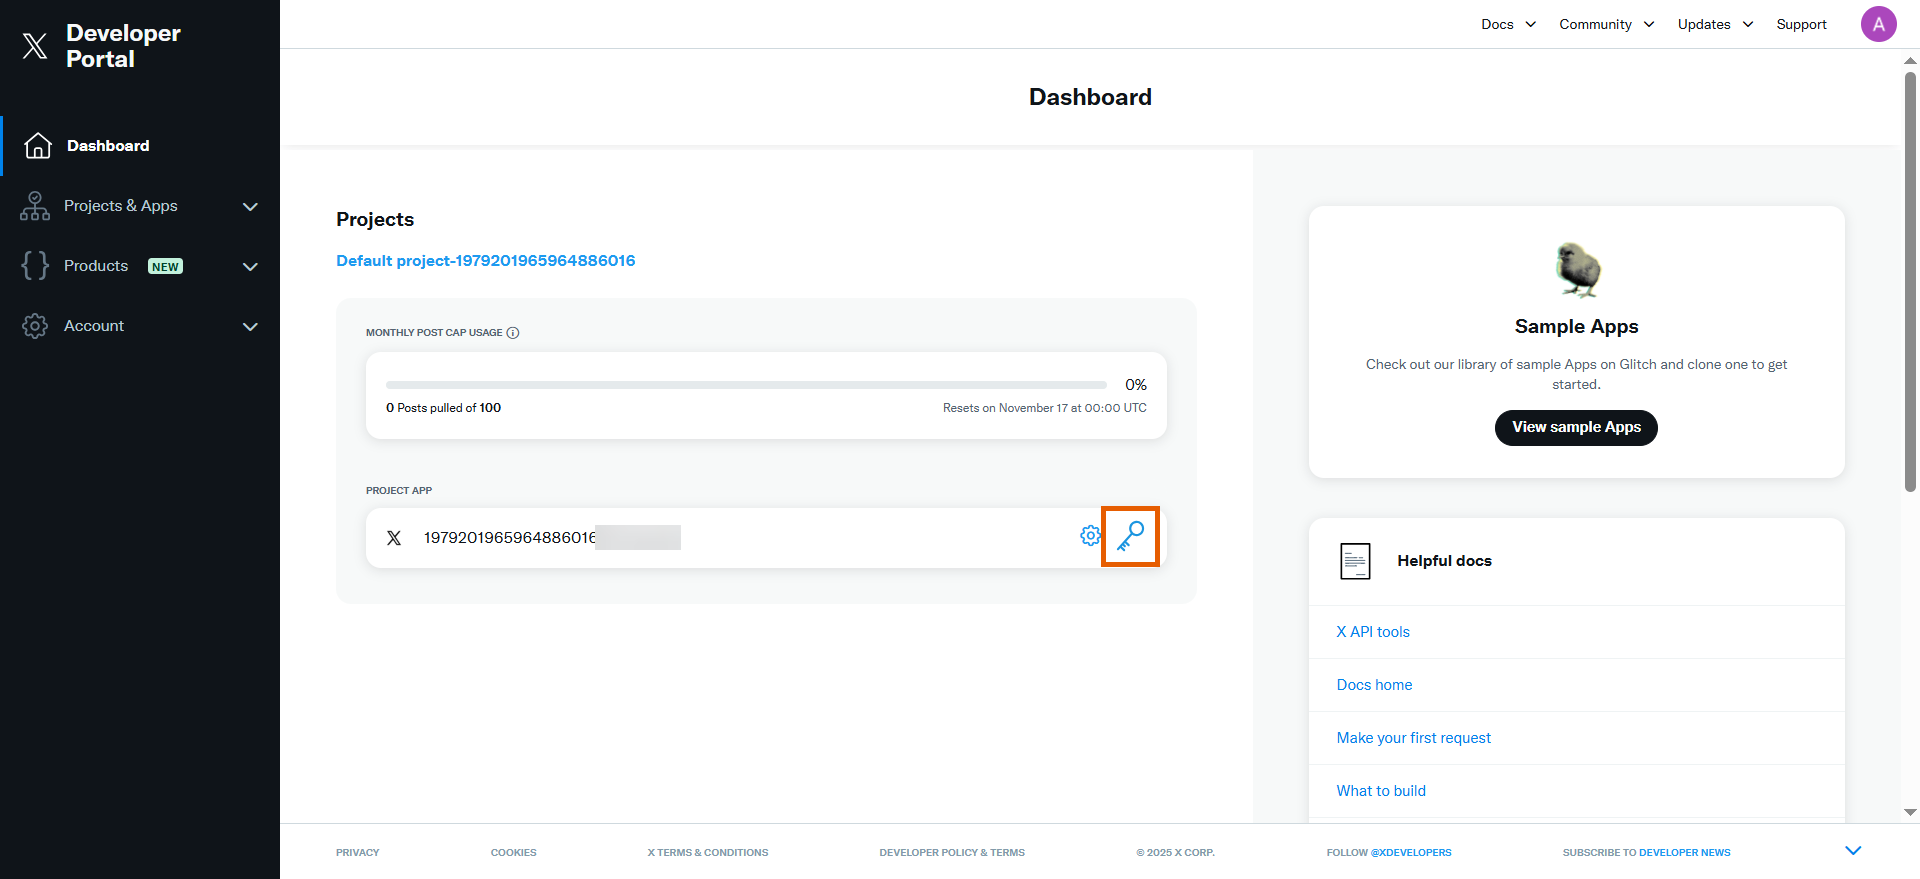
1. Go to your [X Developer Portal](https://developer.x.com/en/portal/dashboard) and click the key icon under your project.
### 5. Configure Conversion API
1. Go to your [X Developer Portal](https://developer.x.com/en/portal/dashboard) and click the key icon under your project.
 2. Click **Regenerate** for your **API key and Secret**.
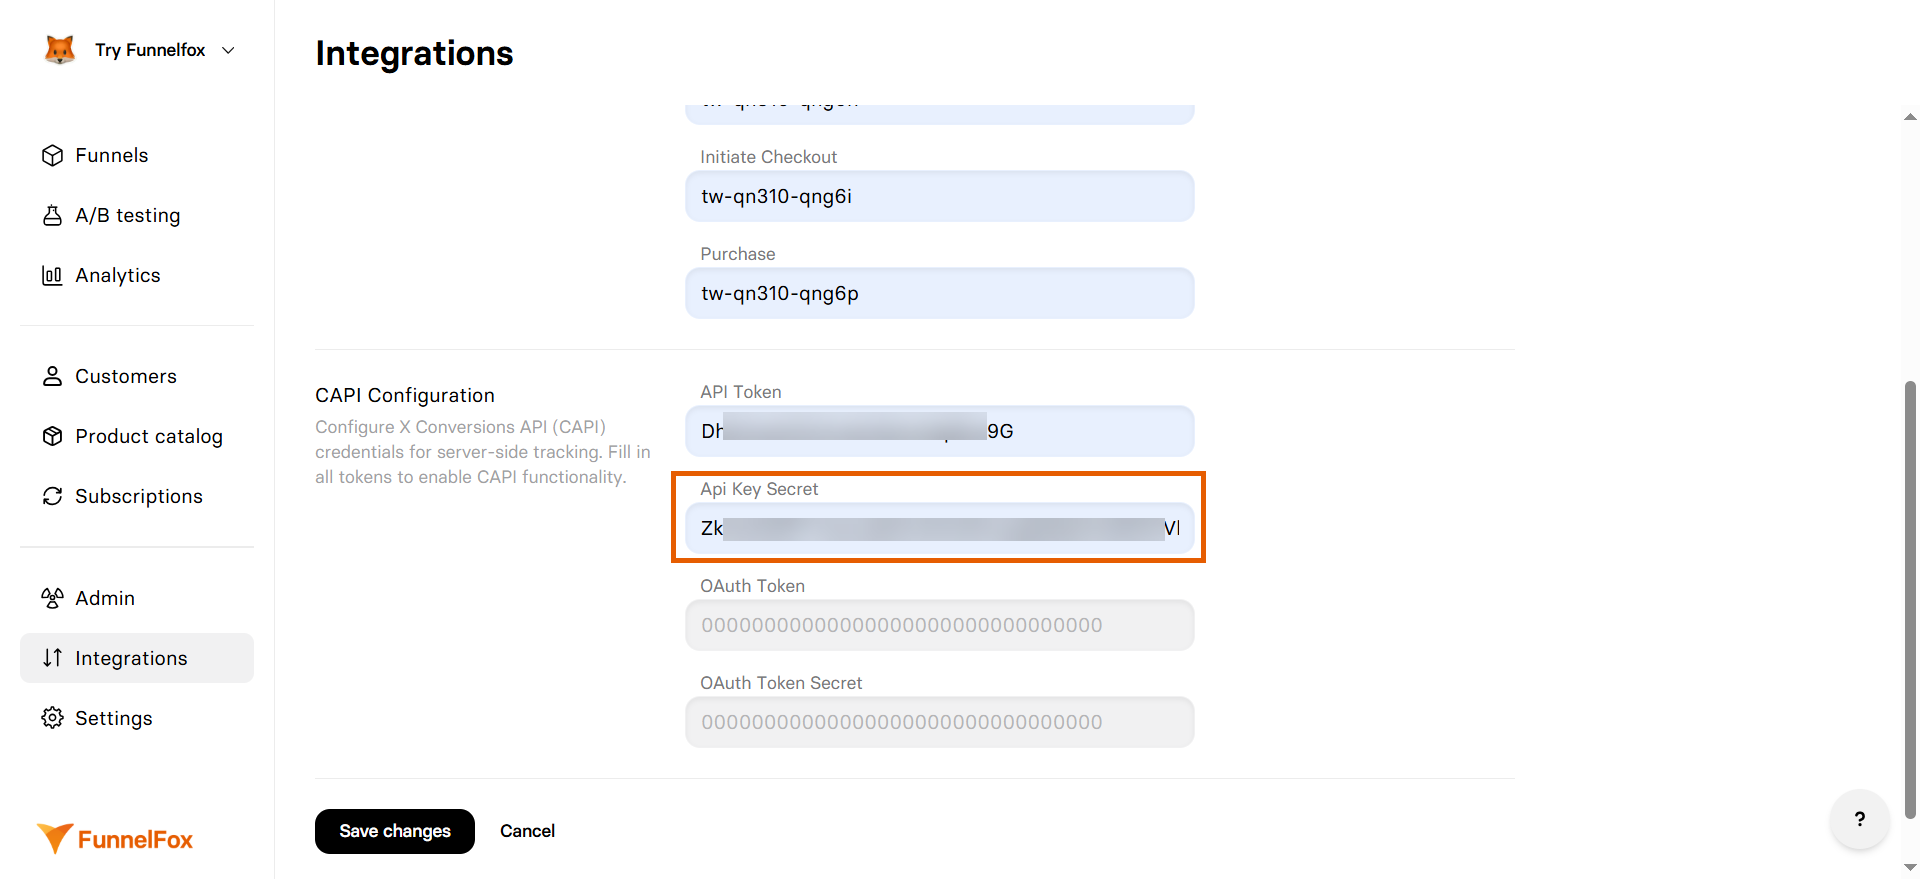
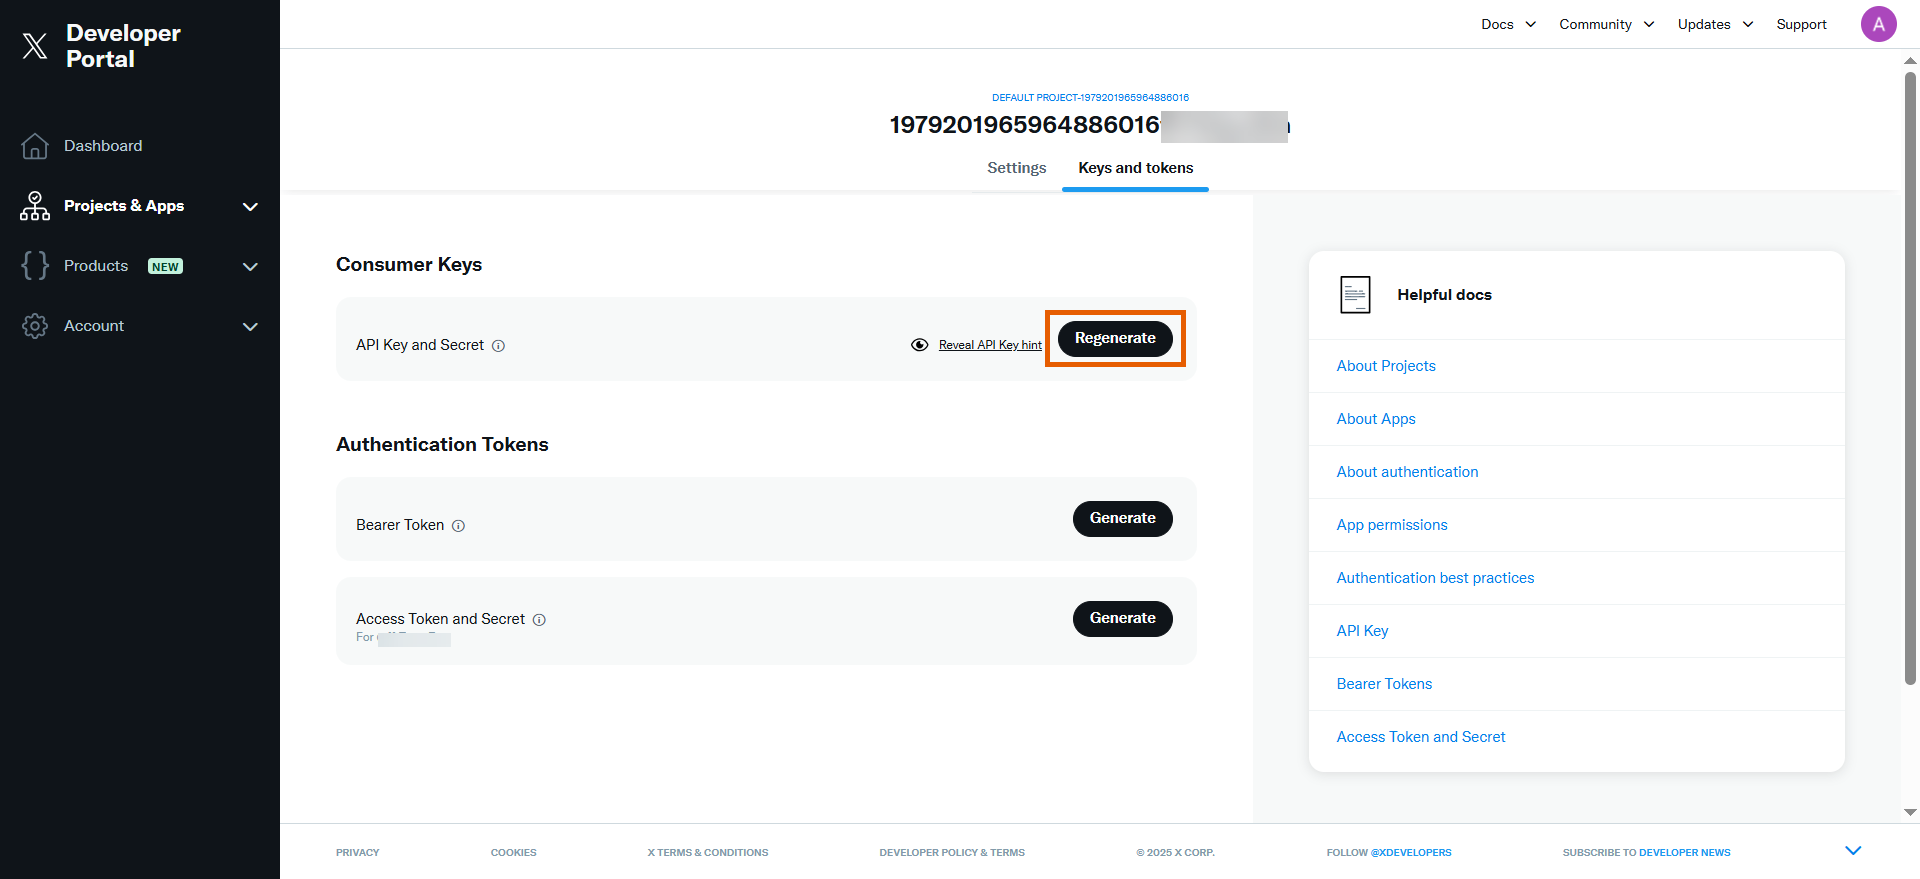 3. Copy the **API Key**.
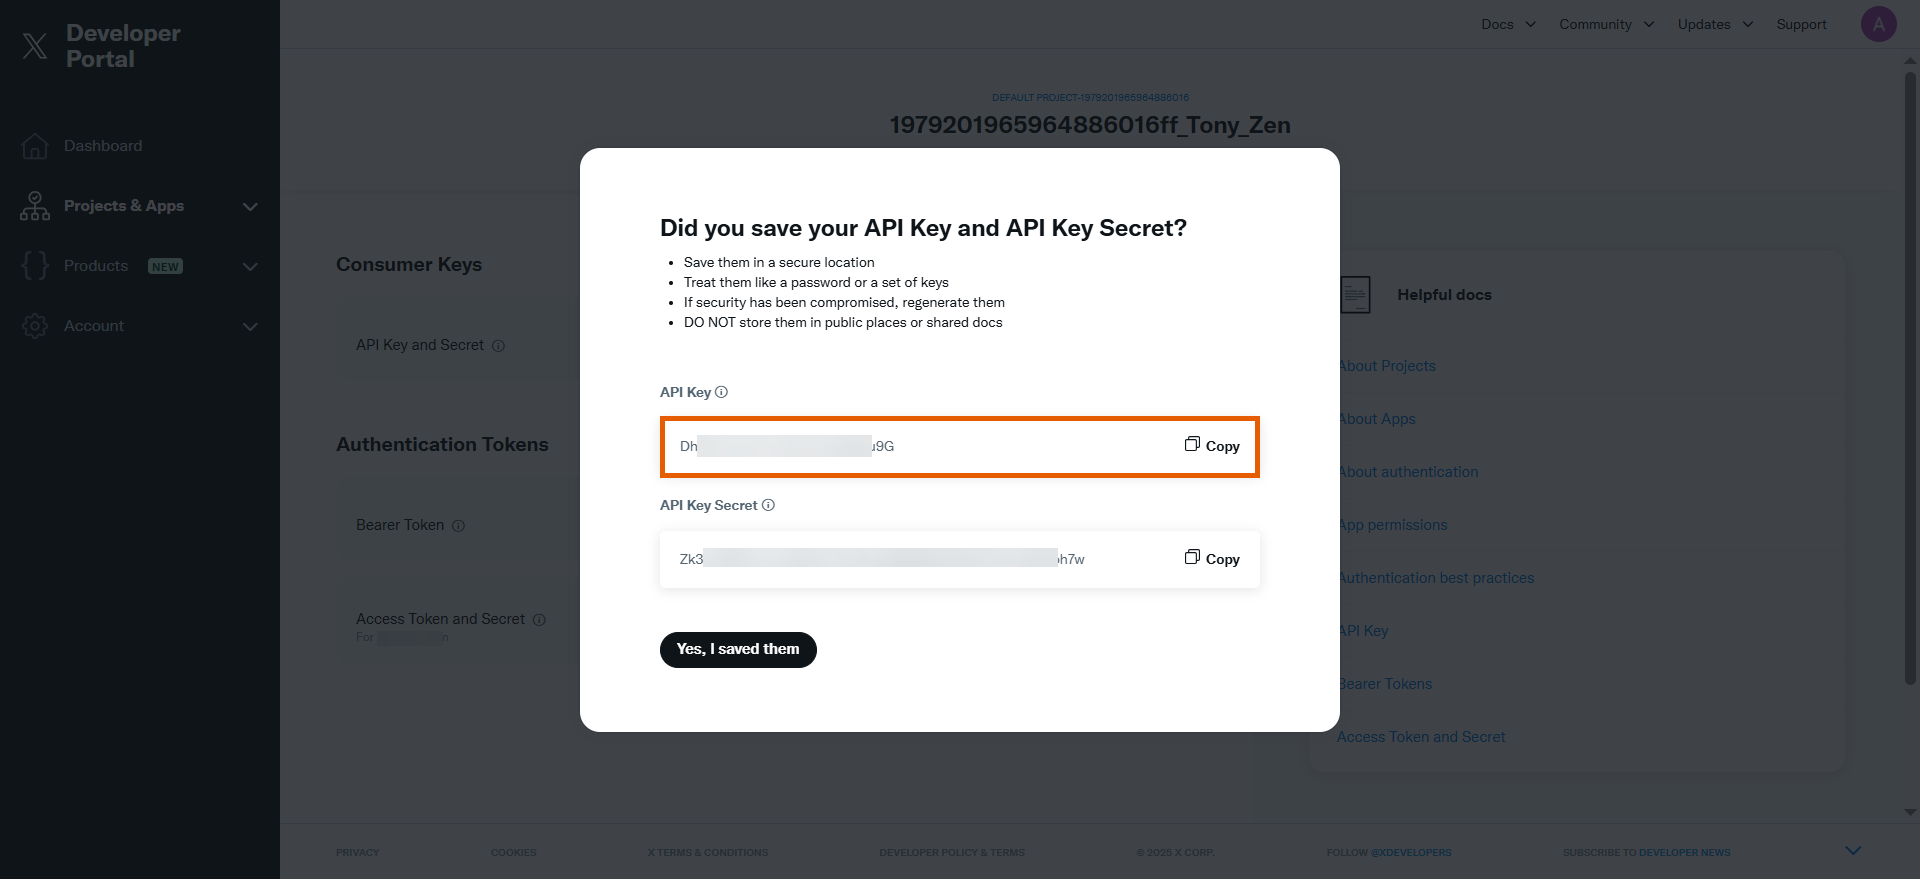 4. Go back to X Pixel integration in FunnelFox and paste the API key into the **API Token** field.
 5. Copy the **API Key Secret** in X Developer Portal and click **Yes, I saved them**.
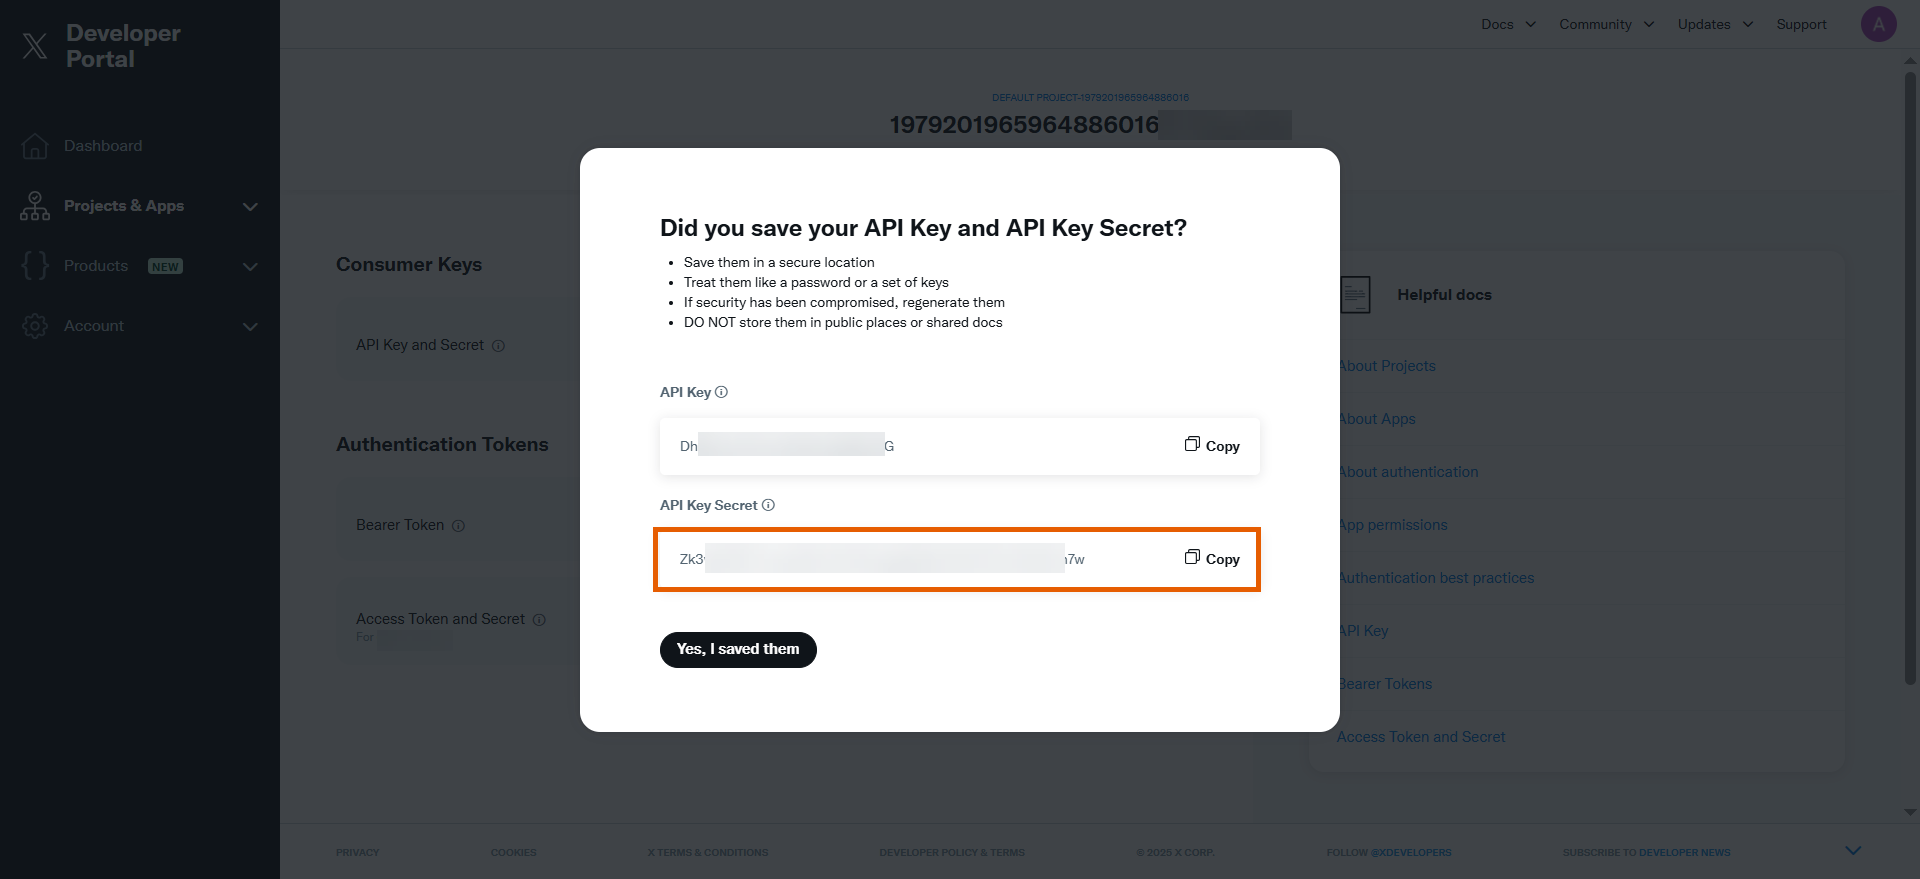 6. Paste the API Key Secret into the **Api Key Secret** field in FunnelFox.
 7. Go back to X Developer Portal and click **Generate** for your **Access Token and Secret**.
 8. Copy the **Access Token**.
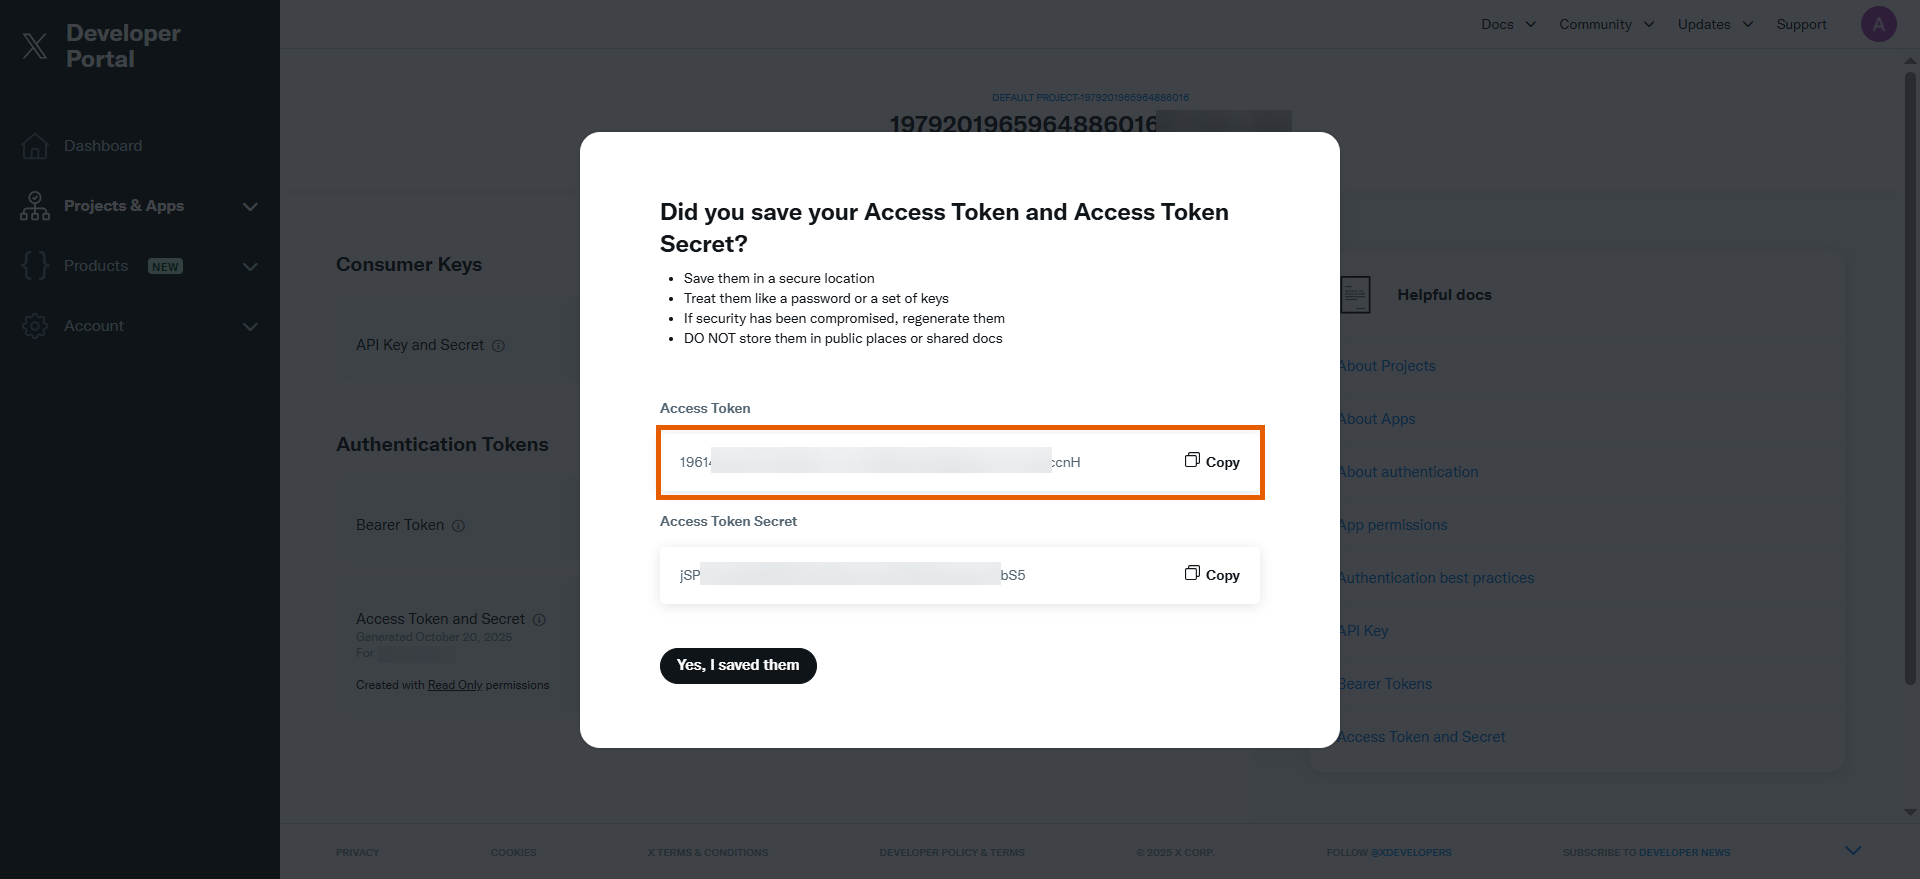 9. Paste the Access Token into the **OAuth Token** field in FunnelFox.
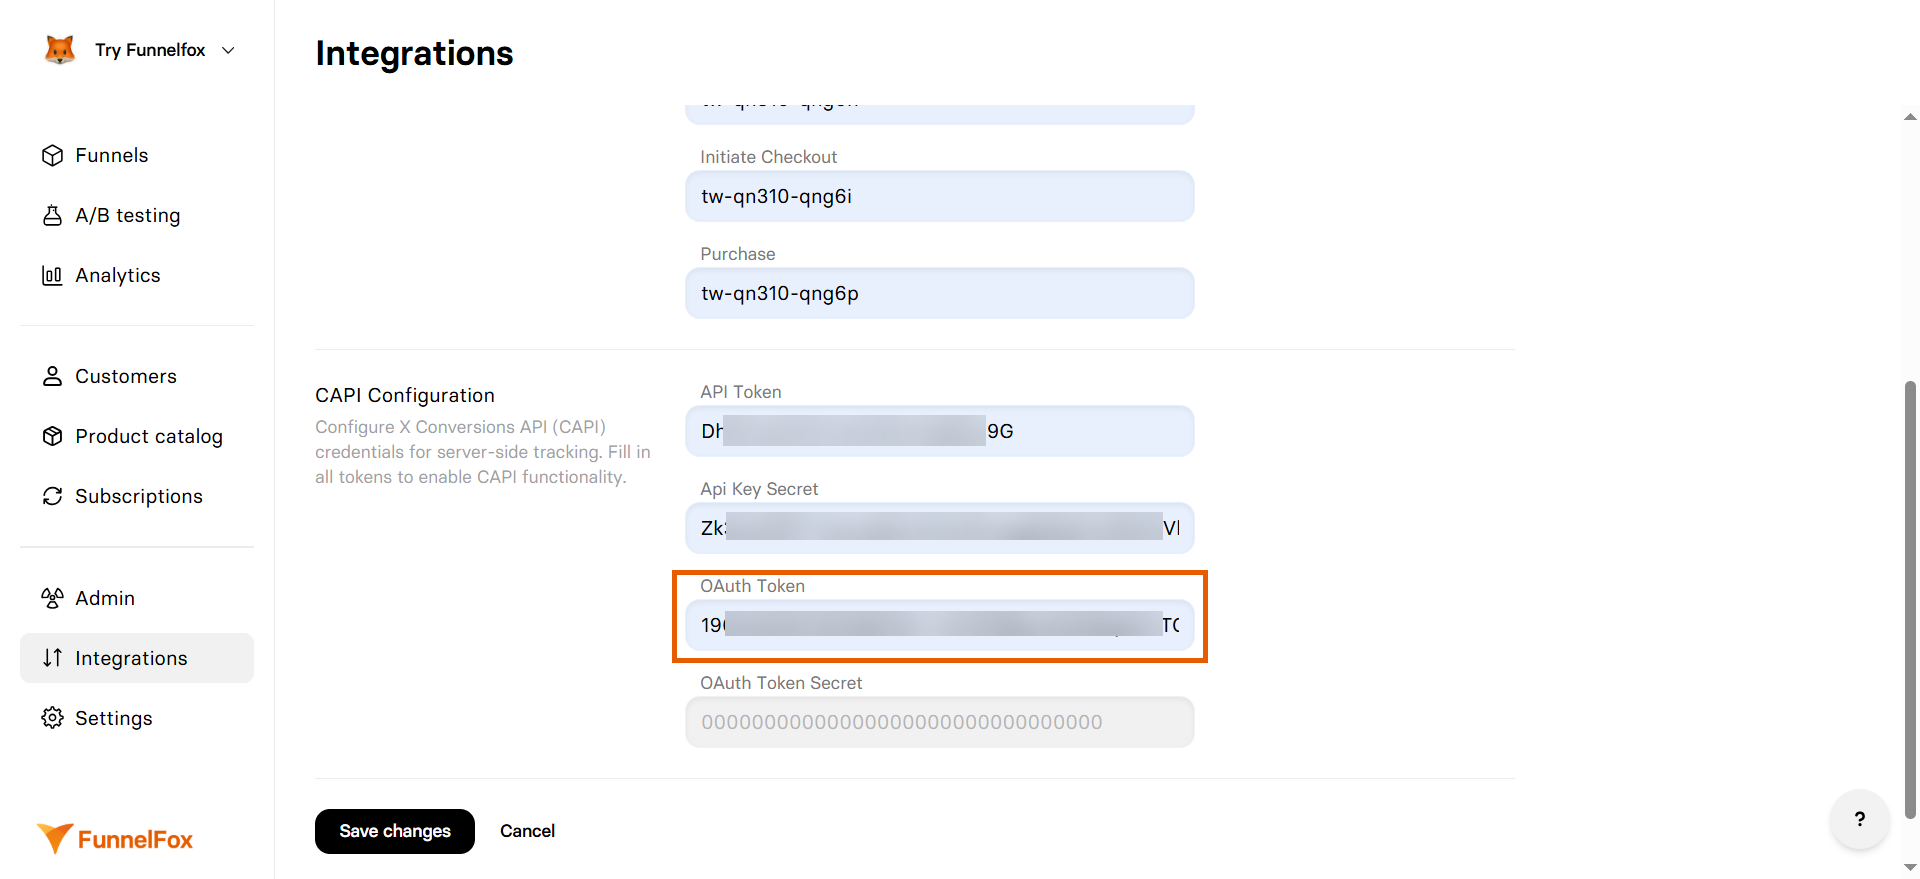 10. Copy the **Access Token Secret** in X Developer Portal and click **Yes, I saved them**.
 11. Paste the Access Token Secret into the **OAuth Token Secret** field in FunnelFox.
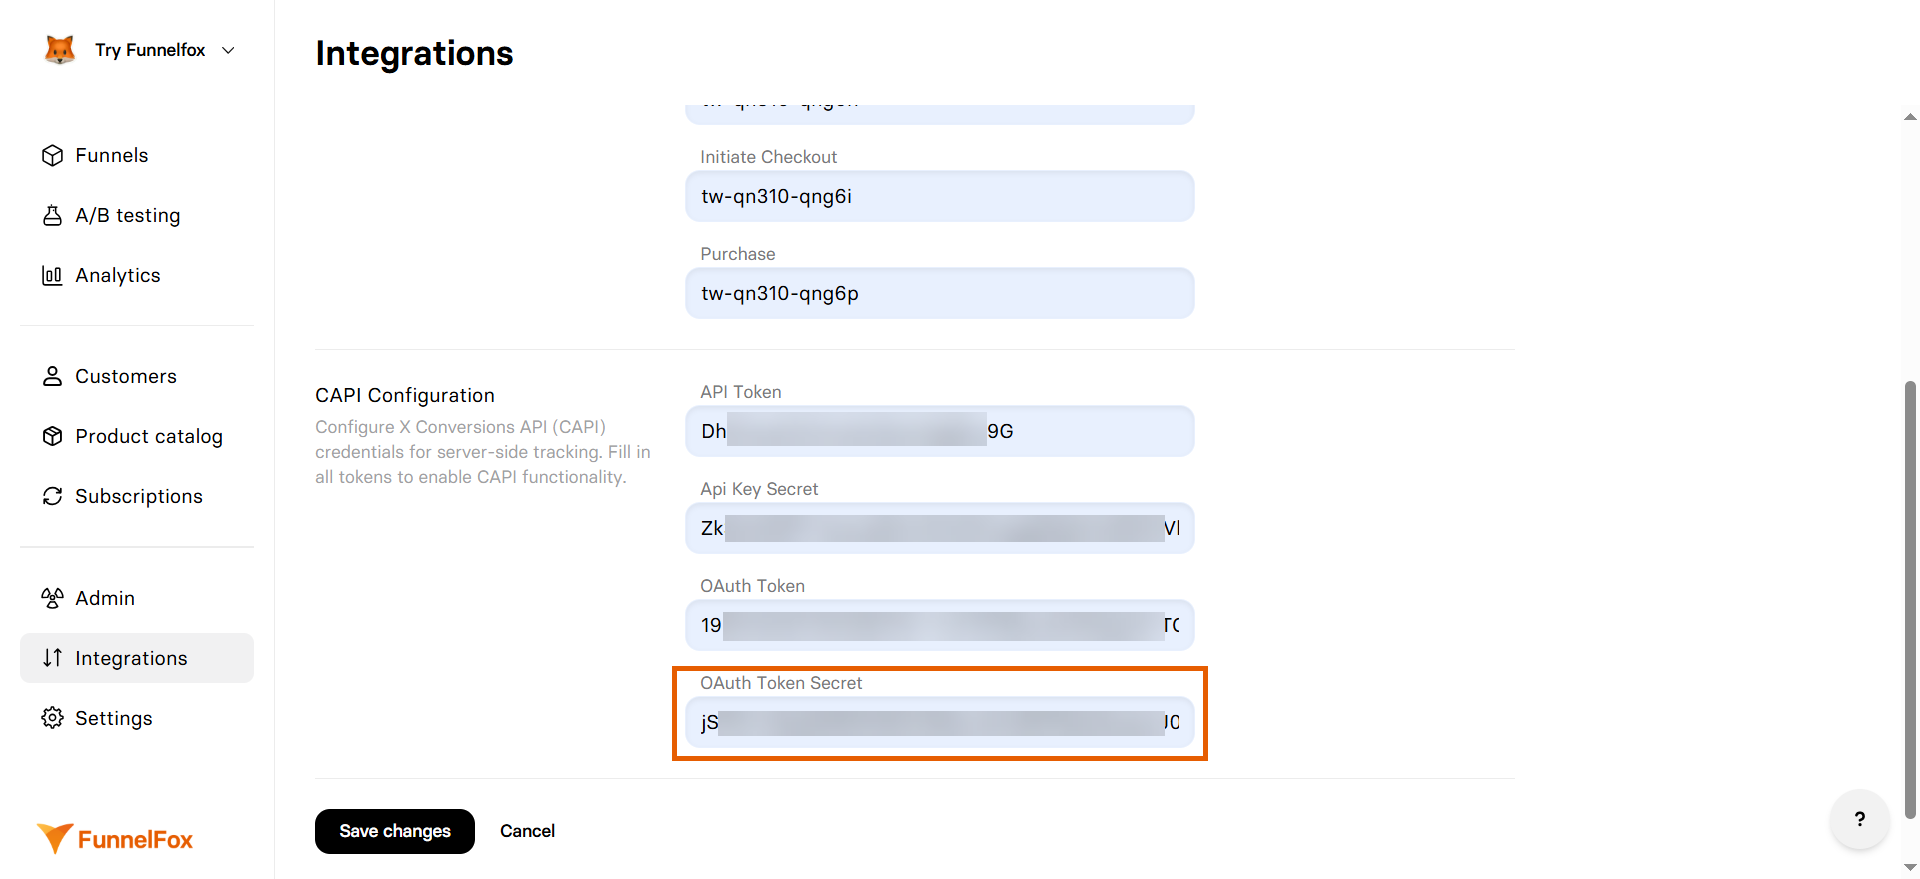 12. Click **Save changes**.
X Pixel and Conversion API are now active! Republish your funnels to start tracking.
## Test your integration
Test that your event tracking works by sending test events from your funnel:
1. Open your published funnel in a browser.
2. Interact with your funnel (view checkout, complete registration, or make a purchase).
12. Click **Save changes**.
X Pixel and Conversion API are now active! Republish your funnels to start tracking.
## Test your integration
Test that your event tracking works by sending test events from your funnel:
1. Open your published funnel in a browser.
2. Interact with your funnel (view checkout, complete registration, or make a purchase).
 3. Open your pixel in X Events Manager. Events should show as **Active** and appear in the **Last recorded** column.
 If events aren't appearing, make sure you've republished your funnel after adding the X Pixel credentials.