> ## Documentation Index
> Fetch the complete documentation index at: https://funnelfox.com/docs/llms.txt
> Use this file to discover all available pages before exploring further.
# Paddle payment integration
> Integrate Paddle as your payment provider in FunnelFox. Step-by-step setup for web subscriptions, checkouts, and recurring billing.
Paddle is a payment integration for FunnelFox that provides global
payment processing, advanced subscription management, and
support for multiple payment methods.
## Key features
The FunnelFox integration with Paddle supports multiple payment methods and transaction types:
| Transaction type | Cards | Apple Pay | Google Pay | PayPal |
| ------------------------------ | :---: | :-------: | :--------: | :----: |
| **Subscriptions** | | | | |
| Subscriptions | ✅ | ✅ | ✅ | ✅ |
| Free & paid trials | ✅ | ✅ | ✅ | ✅ |
| **Upsells** | | | | |
| One-time products | ✅ | ✅ | ✅ | ✅ |
| Subscription upsells (2nd sub) | ❌ | ❌ | ❌ | ❌ |
| Subscription upsells (upgrade) | ✅ | ✅ | ✅ | ✅ |
| **Offers** | | | | |
| Intro offers | ✅ | ✅ | ✅ | ✅ |
| Discount codes | ✅ | ✅ | ✅ | ✅ |
Learn more about [configuring each transaction type](/integrations/payments/paddle#subscription-configuration) in your funnel.
### Additional features
* **Cancellation funnels**: Full support for [cancellation flows](/dashboard/funnels#cancellation-funnels) with options to offer discounted subscriptions, gifts, or pauses instead of losing customers completely.
* **Apple Pay Express Checkout**: Seamless one-click payment experience similar to a wallet button.
* **Failed payment recovery**: When payment fails for automatically-collected subscriptions, [Paddle automatically retries](https://developer.paddle.com/build/retain/set-up-retain-profitwell) the saved payment method.
## Setup
To simplify Paddle account verification, use your FunnelFox project subdomain `[your project].fnlfx.com` as the domain in Paddle.
The following steps are for production setup using your verified live Paddle account. If you need to configure a sandbox environment for testing, the process is identical, but:
* Create a Paddle Sandbox account at [https://sandbox-vendors.paddle.com/signup](https://sandbox-vendors.paddle.com/signup).
* Use the Sandbox fields instead of Production fields when pasting keys in FunnelFox.
Learn more about [Sandbox in Paddle](https://developer.paddle.com/build/tools/sandbox).
### 1. API key
1. Go to [Developer Tools > Authentication](https://vendors.paddle.com/authentication-v2) in Paddle.
2. Click **+ New API key**.
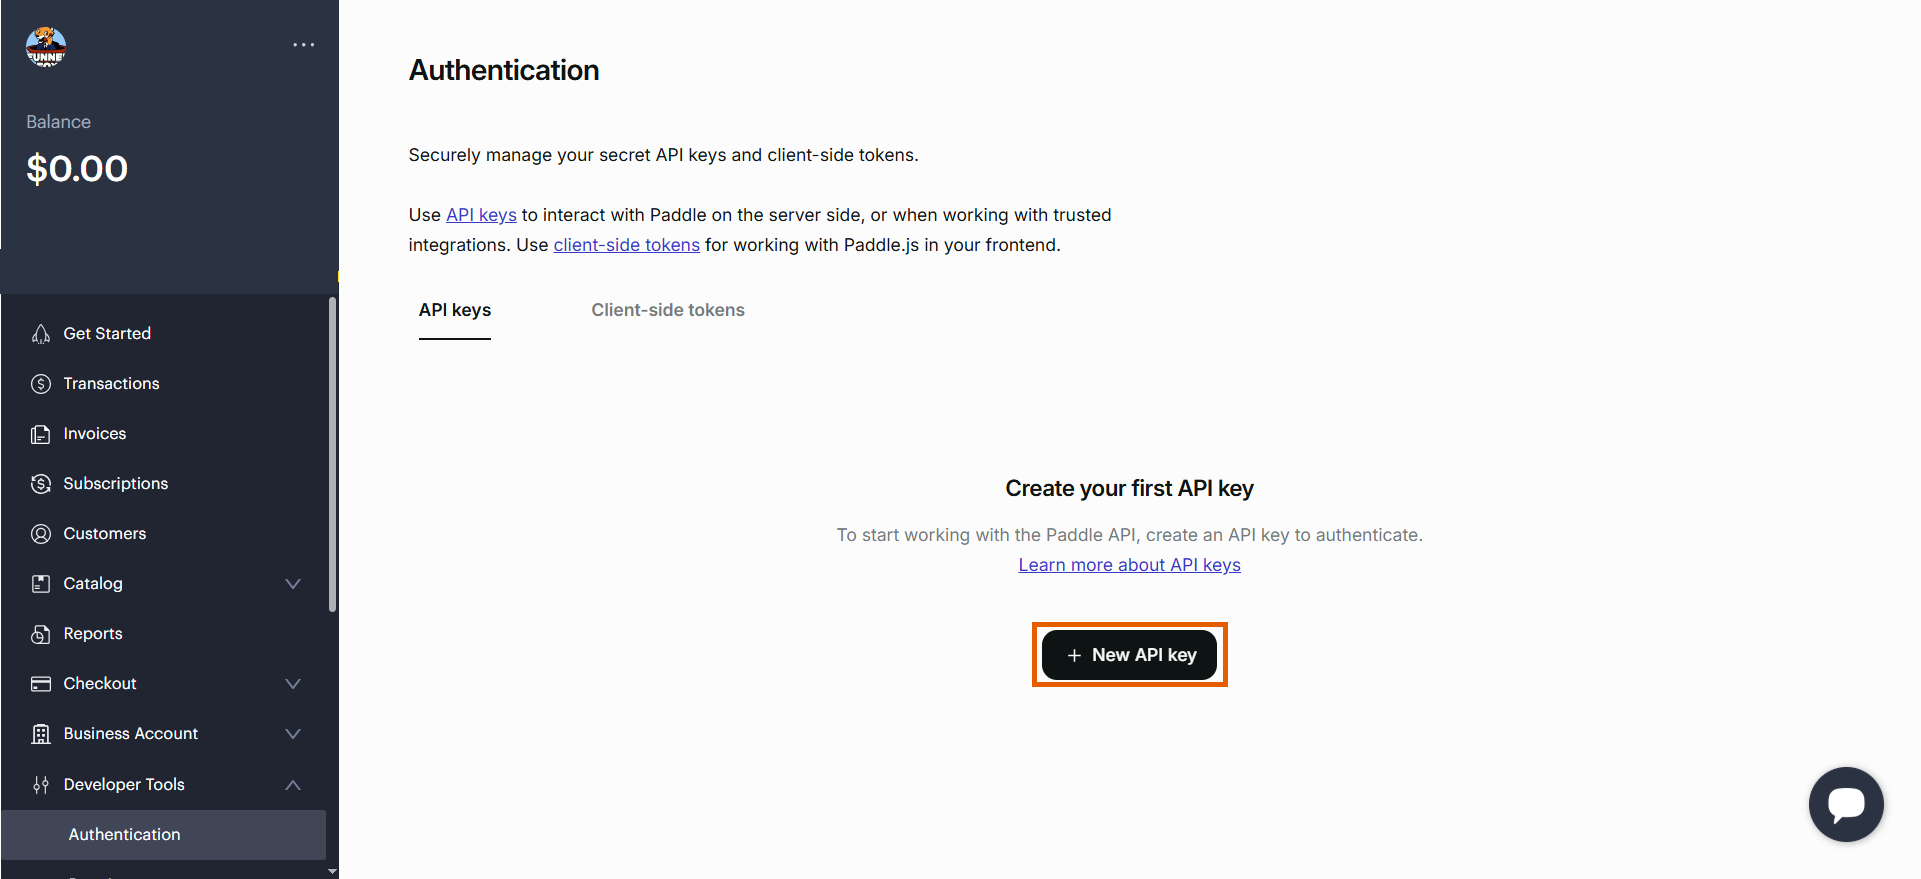 3. Configure your API key with the following details, then click **Save**:
* **Name**: FunnelFox
* **Expires at**: Never expires
* **Permissions**: Set the permissions as shown in the table below
| Permission | Read | Write |
| ------------------------------ | ---- | ----- |
| Addresses | ✅ | |
| Adjustments | ✅ | |
| Businesses | ✅ | |
| Client-side tokens | | ✅ |
| Customer portal sessions | | |
| Customer authentication tokens | | ✅ |
| Customers | | ✅ |
| Discounts | | ✅ |
| Notification settings | | ✅ |
| Notifications | | ✅ |
| Notification simulations | ✅ | |
| Payment methods | | ✅ |
| Prices | | ✅ |
| Products | | ✅ |
| Reports | | ✅ |
| Subscriptions | | ✅ |
| Transactions | | ✅ |
3. Configure your API key with the following details, then click **Save**:
* **Name**: FunnelFox
* **Expires at**: Never expires
* **Permissions**: Set the permissions as shown in the table below
| Permission | Read | Write |
| ------------------------------ | ---- | ----- |
| Addresses | ✅ | |
| Adjustments | ✅ | |
| Businesses | ✅ | |
| Client-side tokens | | ✅ |
| Customer portal sessions | | |
| Customer authentication tokens | | ✅ |
| Customers | | ✅ |
| Discounts | | ✅ |
| Notification settings | | ✅ |
| Notifications | | ✅ |
| Notification simulations | ✅ | |
| Payment methods | | ✅ |
| Prices | | ✅ |
| Products | | ✅ |
| Reports | | ✅ |
| Subscriptions | | ✅ |
| Transactions | | ✅ |
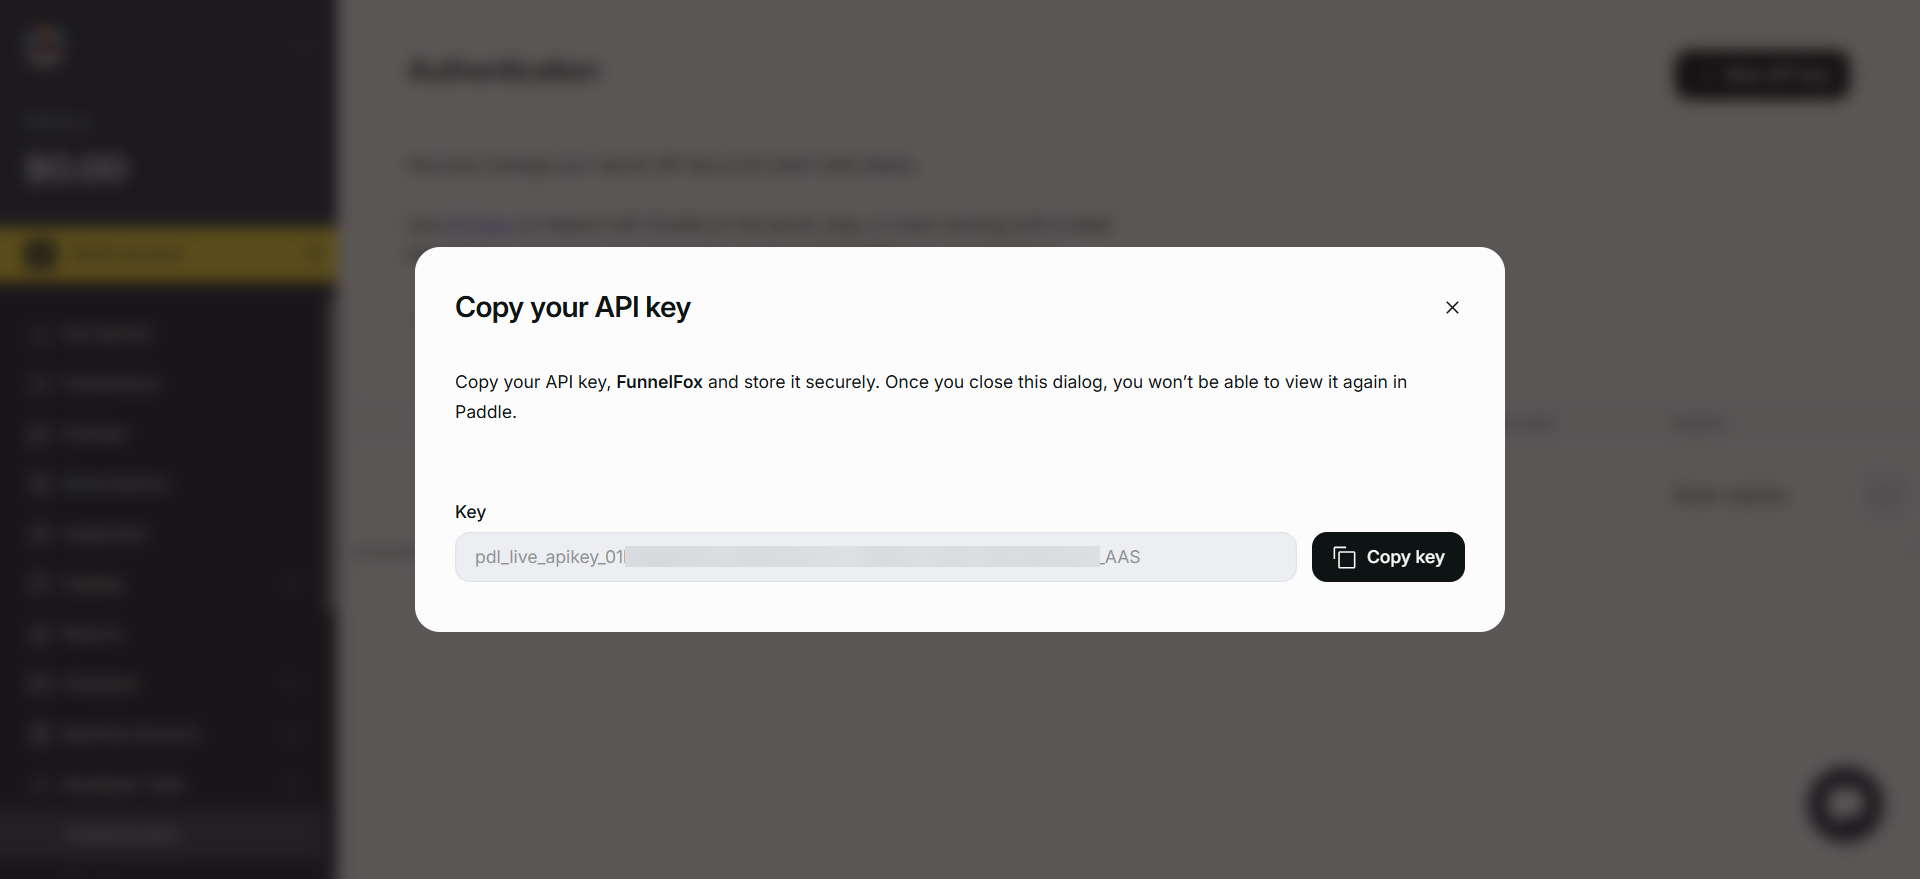
 4. Copy your API key.
You won't be able to view the API key again in Paddle.
4. Copy your API key.
You won't be able to view the API key again in Paddle.
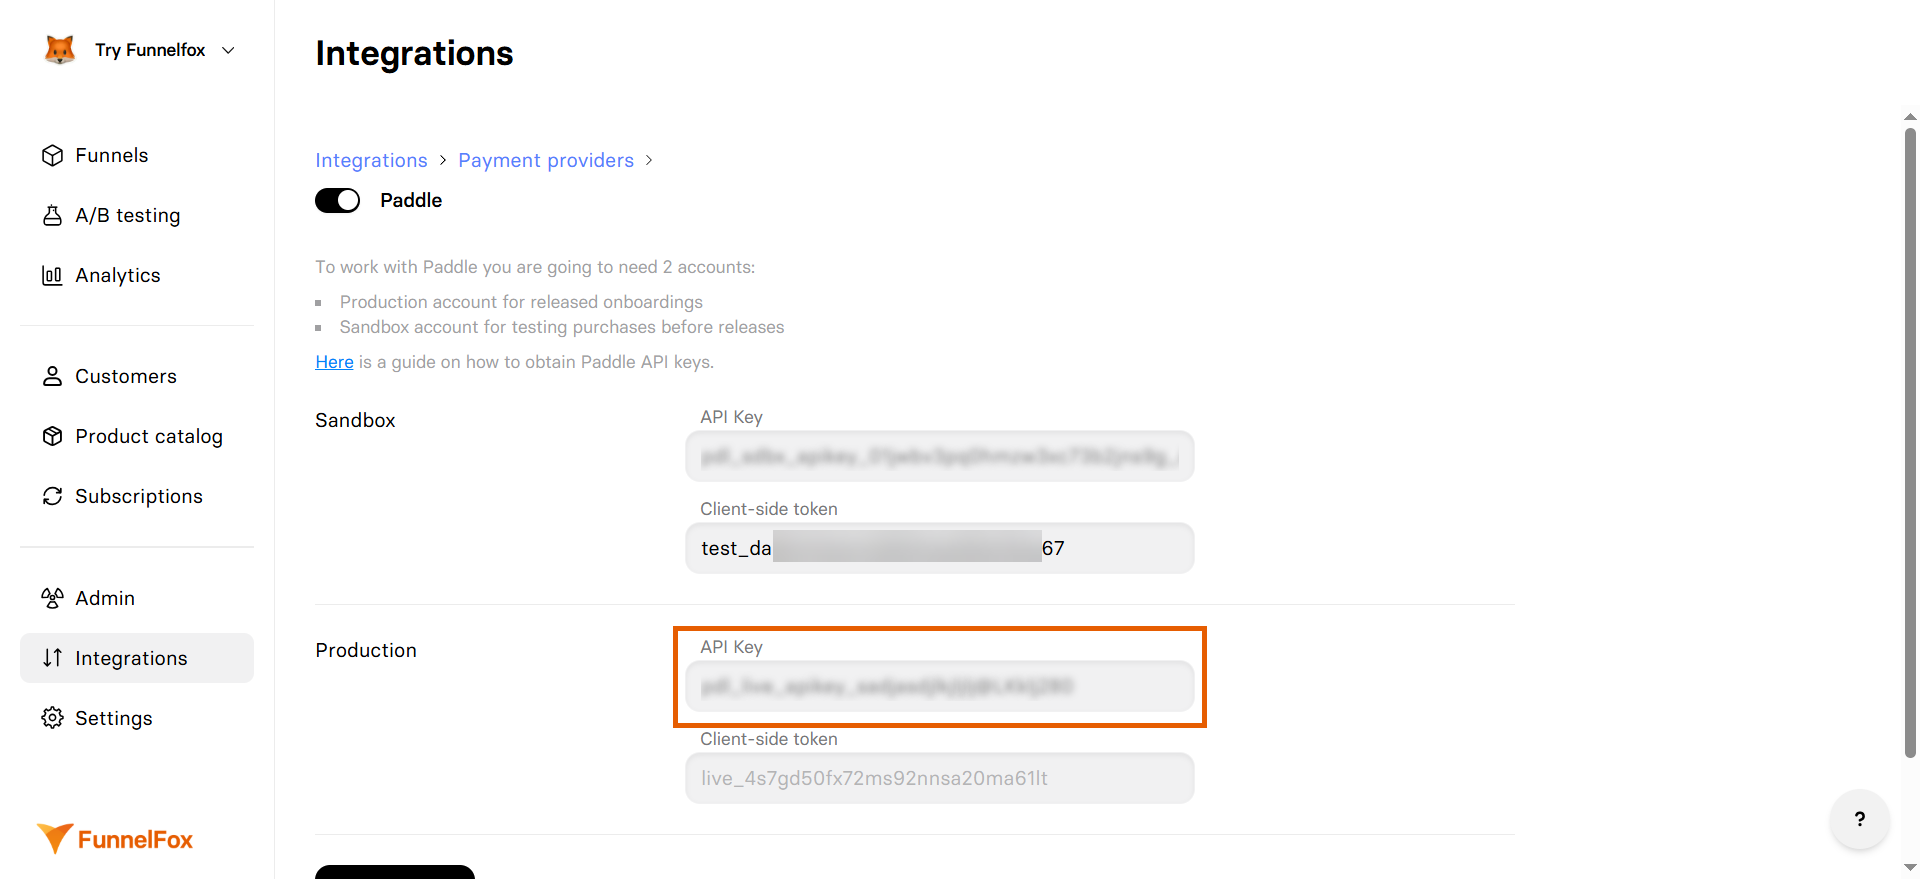
 5. Go to [Integrations > Paddle](https://app.funnelfox.com/integrations/paddle) in FunnelFox.
6. Paste the API key into the **API key** field under the **Production** section.
Don't close your Paddle integration settings in FunnelFox and proceed with the next section.
5. Go to [Integrations > Paddle](https://app.funnelfox.com/integrations/paddle) in FunnelFox.
6. Paste the API key into the **API key** field under the **Production** section.
Don't close your Paddle integration settings in FunnelFox and proceed with the next section.
 ### 2. Client-side token
1. Go to the **Client-side tokens** tab of [Developer Tools > Authentication](https://vendors.paddle.com/authentication-v2) in Paddle.
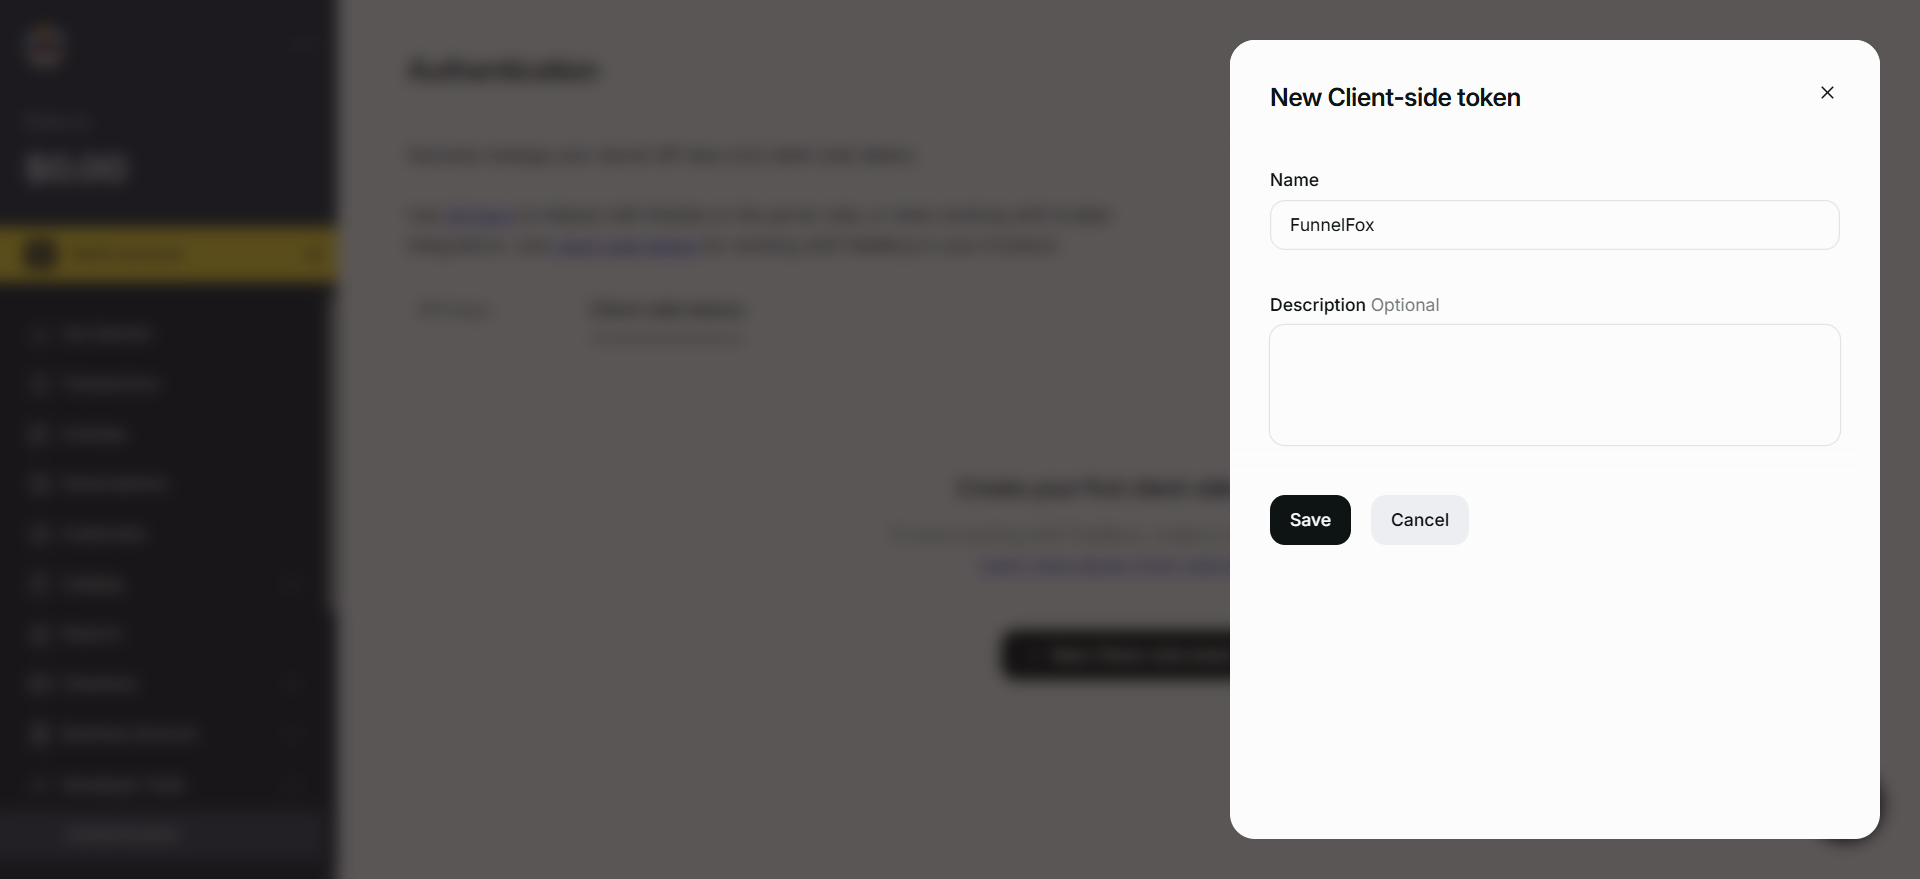
2. Click **+ New Client-side token**.
### 2. Client-side token
1. Go to the **Client-side tokens** tab of [Developer Tools > Authentication](https://vendors.paddle.com/authentication-v2) in Paddle.
2. Click **+ New Client-side token**.
 3. Name your token and click **Save**.
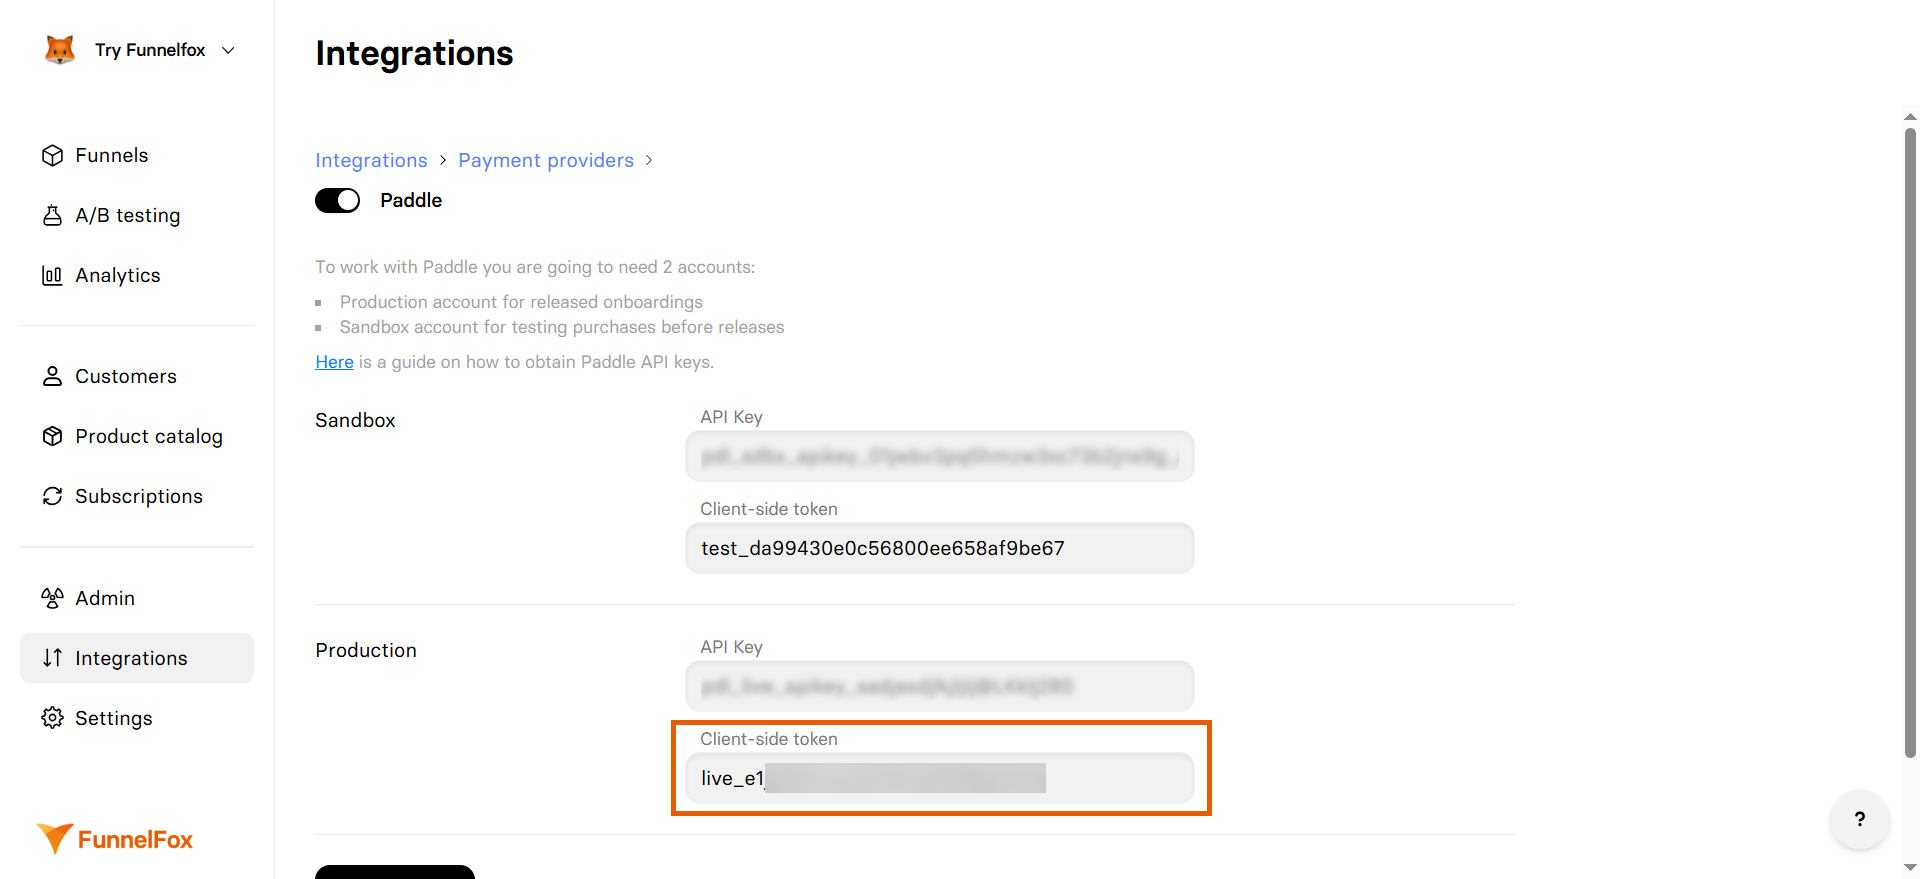
 4. Go back to [Integrations > Paddle](https://app.funnelfox.com/integrations/paddle) in FunnelFox.
5. Paste the client-side token into the **Client-side token** field under the **Production** section.
4. Go back to [Integrations > Paddle](https://app.funnelfox.com/integrations/paddle) in FunnelFox.
5. Paste the client-side token into the **Client-side token** field under the **Production** section.
 6. Click **Save changes**.
### 3. Payment link
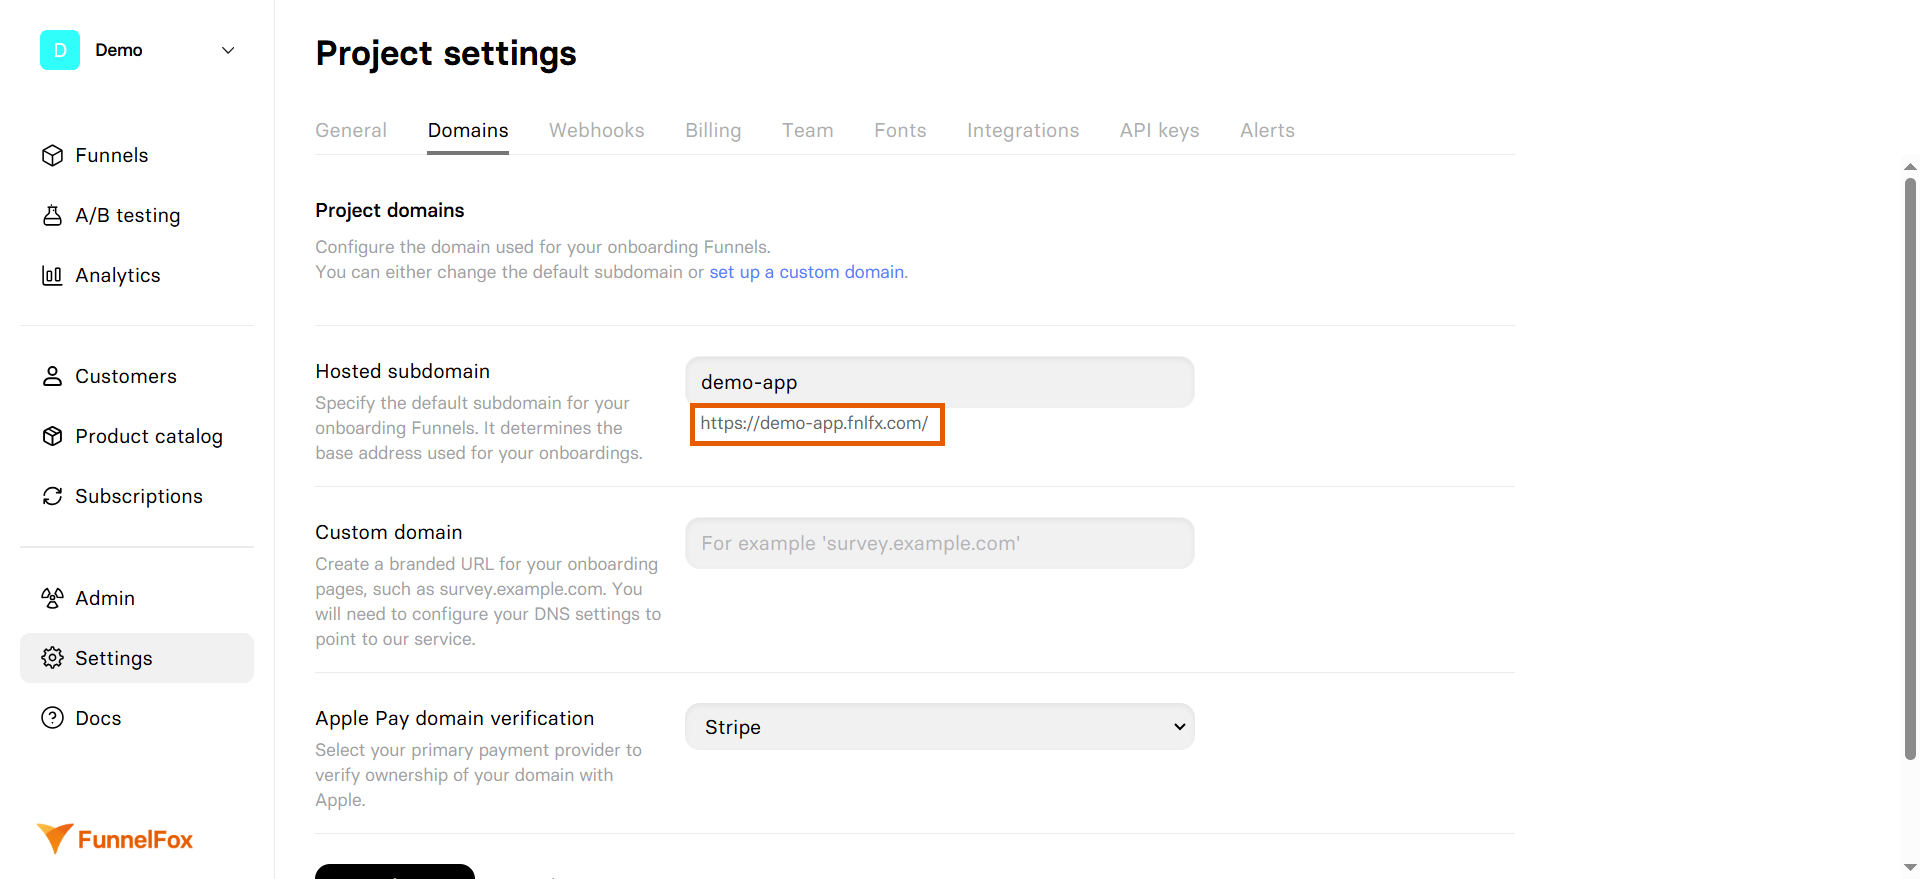
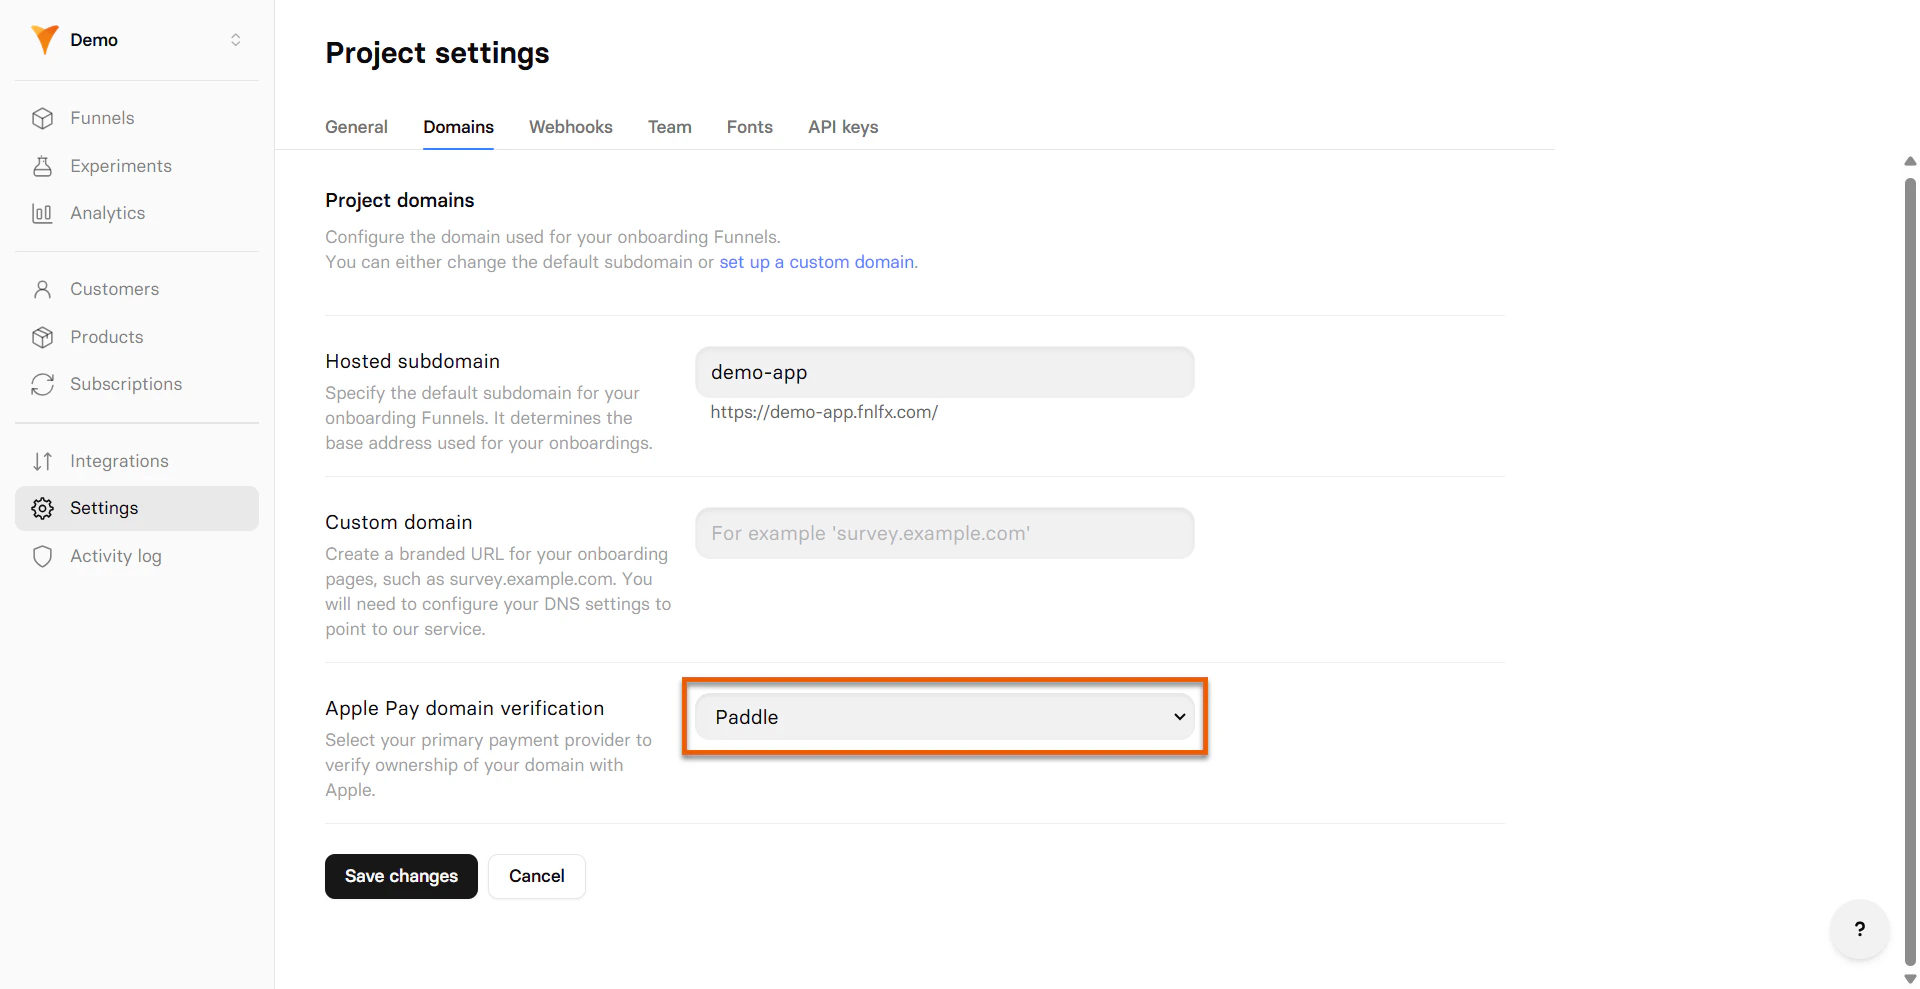
1. Go to [Settings > Domains](https://app.funnelfox.com/settings/domains) in FunnelFox.
2. Copy your project subdomain from the **Hosted subdomain** section (for example: `https://demo-app.fnlfx.com/`).
6. Click **Save changes**.
### 3. Payment link
1. Go to [Settings > Domains](https://app.funnelfox.com/settings/domains) in FunnelFox.
2. Copy your project subdomain from the **Hosted subdomain** section (for example: `https://demo-app.fnlfx.com/`).
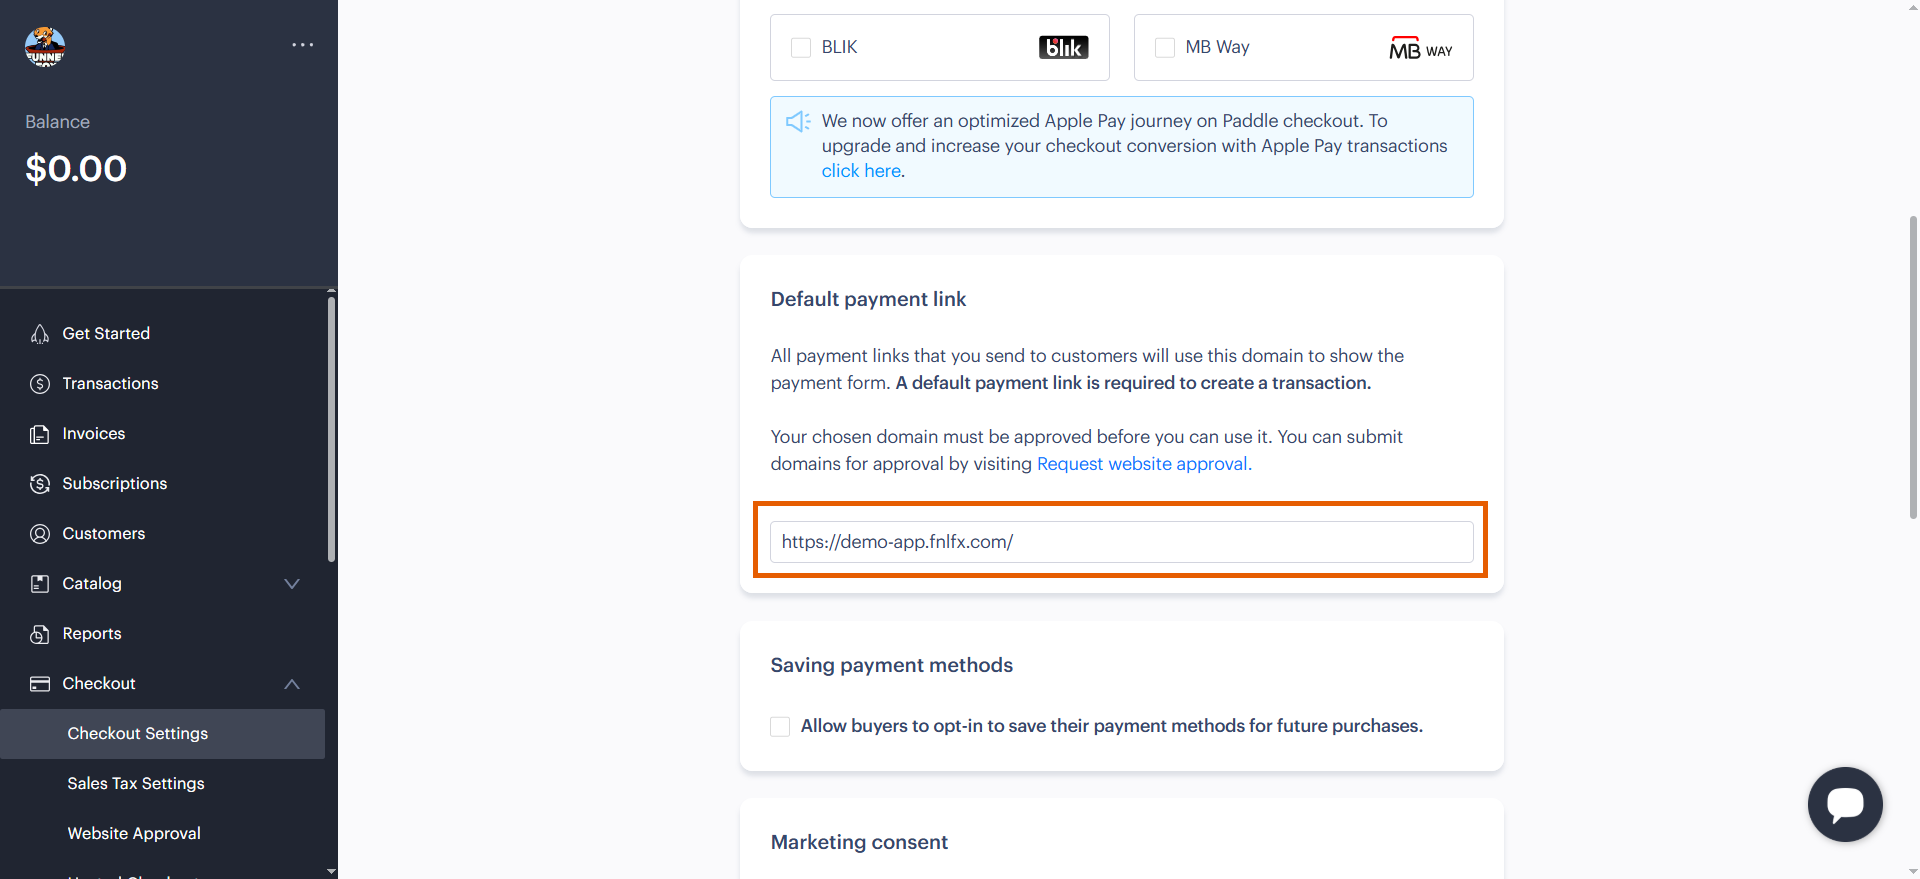
 3. Go to [Checkout > Checkout settings](https://vendors.paddle.com/checkout-settings) in Paddle.
4. Paste your subdomain into the **Default payment link** section.
3. Go to [Checkout > Checkout settings](https://vendors.paddle.com/checkout-settings) in Paddle.
4. Paste your subdomain into the **Default payment link** section.
 5. Click **Save** at the top right of the page.
Your Paddle integration is now active! Remember to republish your funnels to apply the changes.
5. Click **Save** at the top right of the page.
Your Paddle integration is now active! Remember to republish your funnels to apply the changes.
 ## Subscription configuration
After setup, FunnelFox automatically creates webhooks in your Paddle account and syncs your products.
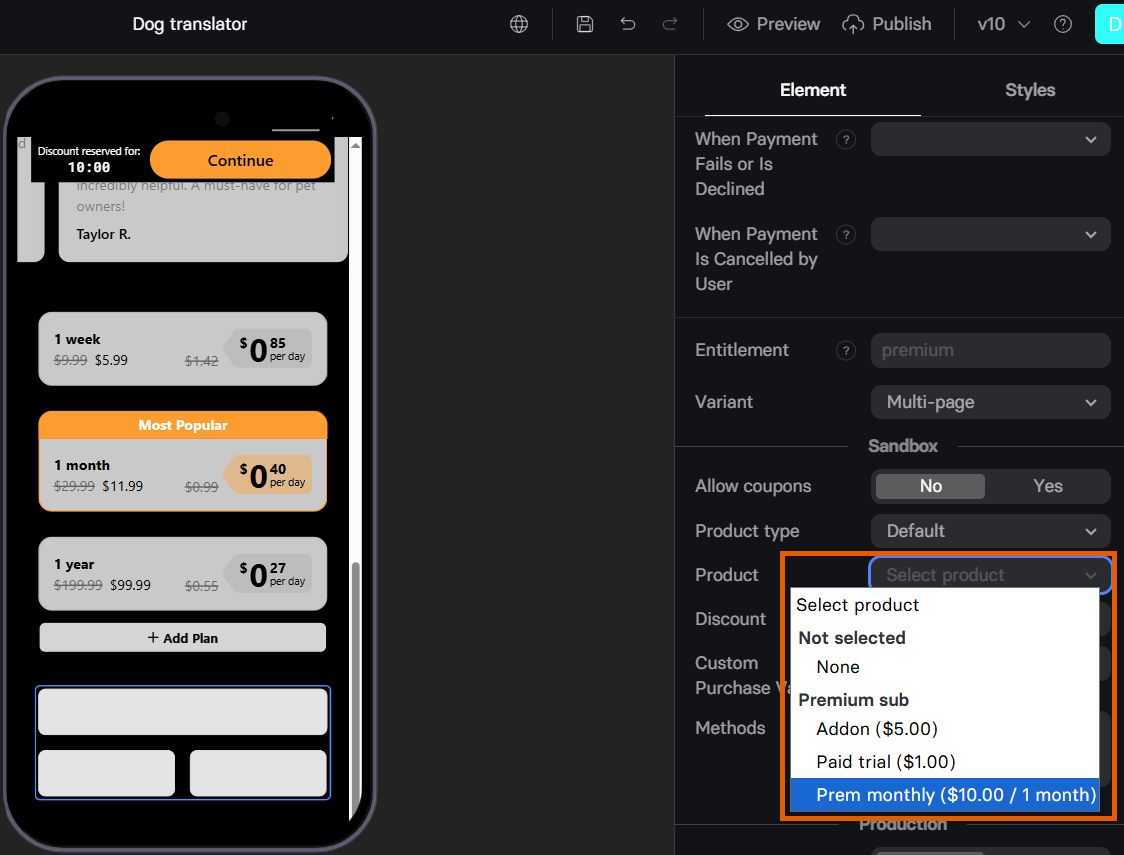
Products created in Paddle become available in the **Element** tab of your [Checkout element](/elements/checkout#subscription-configuration).
Configure Paddle products in your funnels:
* [Free trial](/elements/checkout#free-trial)
* [Paid trial](/elements/checkout#paid-trial)
* [Intro offers](/elements/checkout#offers)
* [Upsell](/elements/checkout#upsell)
## Subscription configuration
After setup, FunnelFox automatically creates webhooks in your Paddle account and syncs your products.
Products created in Paddle become available in the **Element** tab of your [Checkout element](/elements/checkout#subscription-configuration).
Configure Paddle products in your funnels:
* [Free trial](/elements/checkout#free-trial)
* [Paid trial](/elements/checkout#paid-trial)
* [Intro offers](/elements/checkout#offers)
* [Upsell](/elements/checkout#upsell)
 ## Digital wallets
FunnelFox supports Apple Pay and Google Pay with Paddle for
faster checkout.
Apple Pay requires verifying your domain enables a smoother one-click experience. Google Pay works by
default.
### Apple Pay
Paddle supports two ways to use Apple Pay:
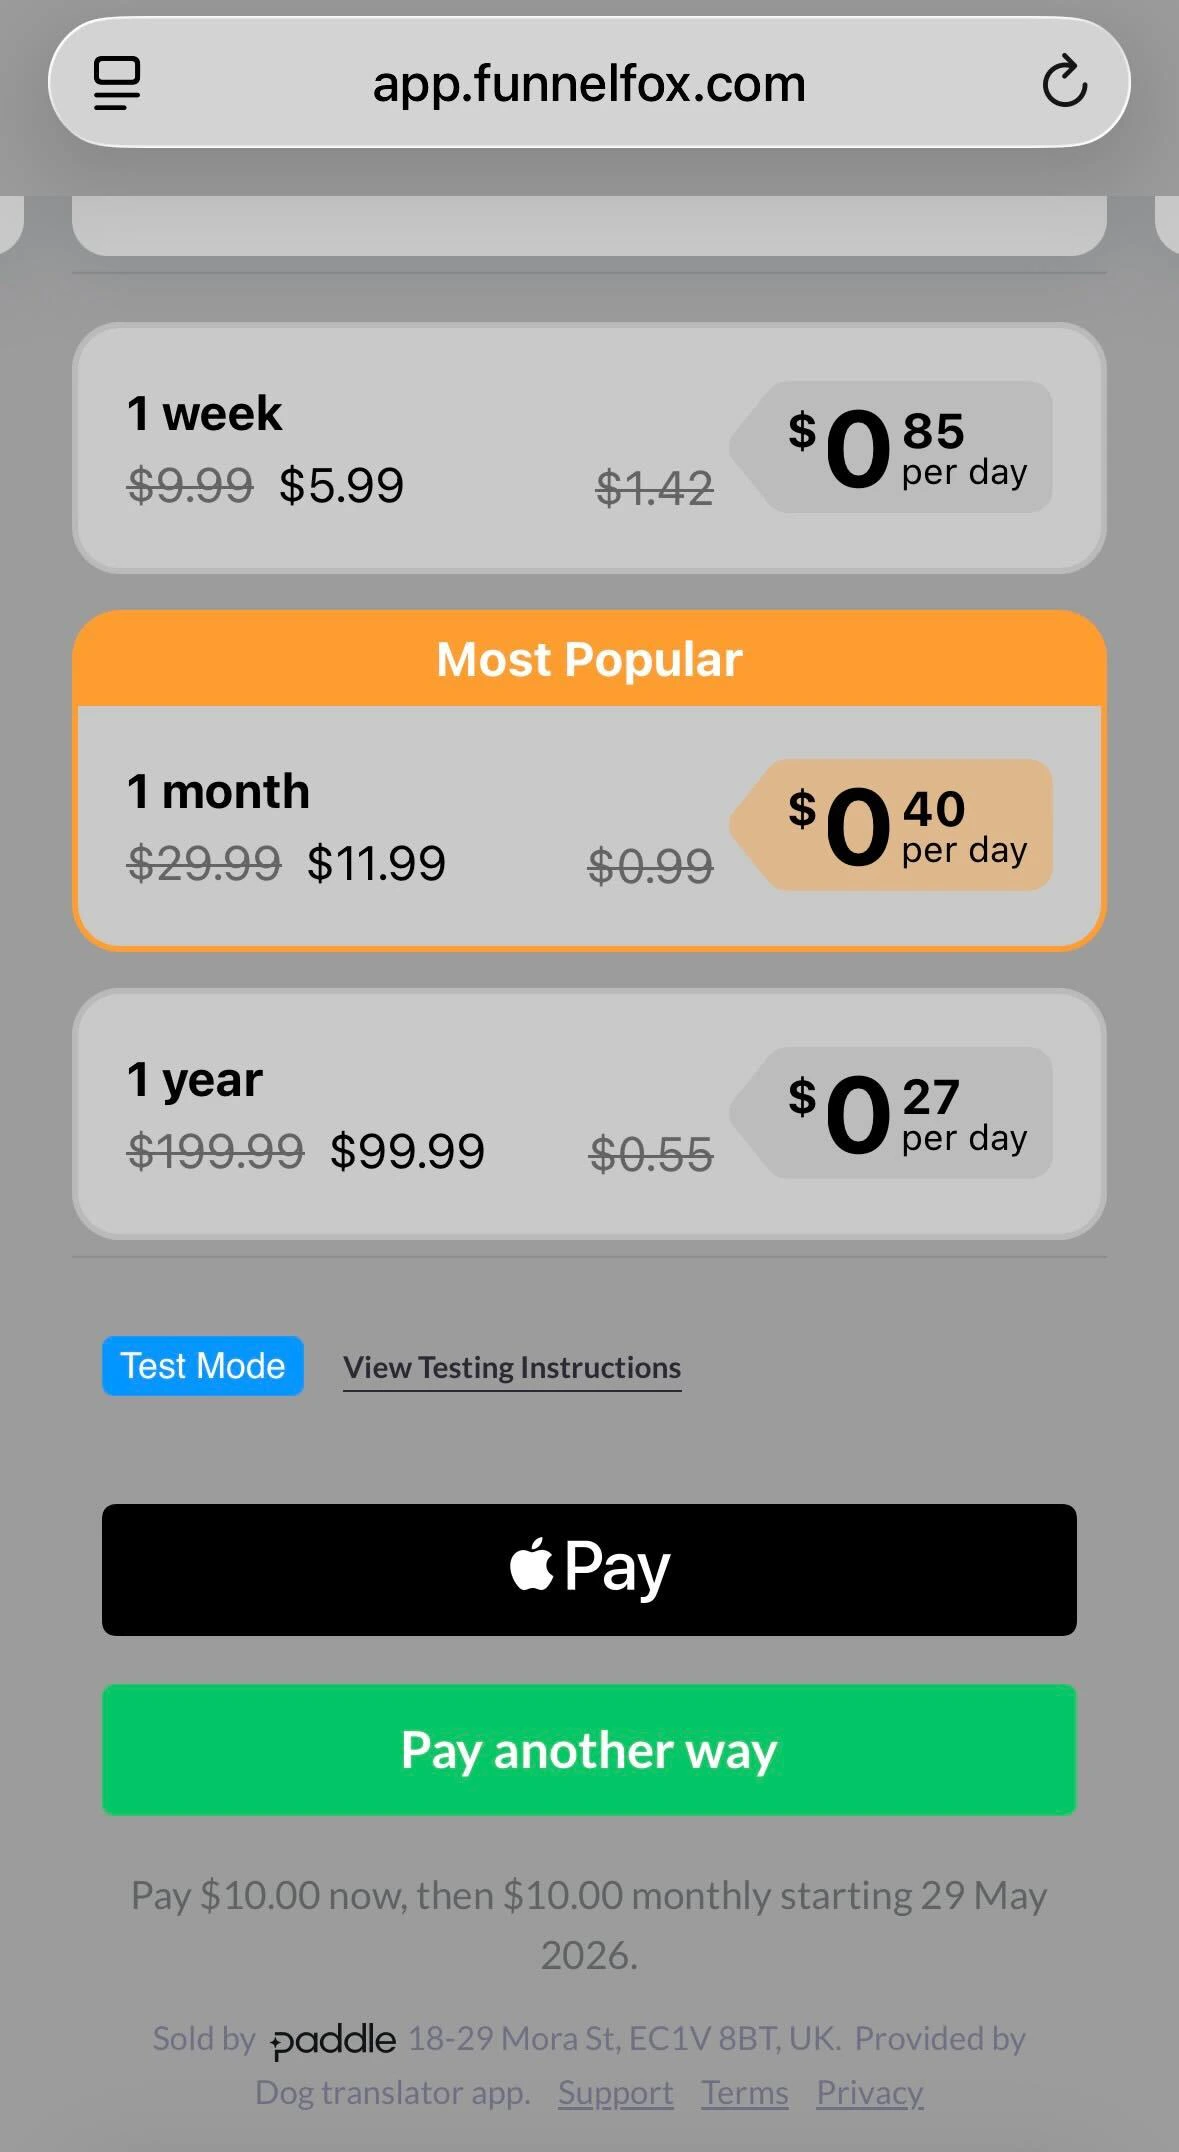
* [Apple Pay Express Checkout](/integrations/payments/paddle#apple-pay-express-checkout): Provides a seamless one-click payment experience similar to a wallet button. It prioritizes Apple Pay by showing it first to customers, while other payment methods are placed under the **Pay another way** button.
## Digital wallets
FunnelFox supports Apple Pay and Google Pay with Paddle for
faster checkout.
Apple Pay requires verifying your domain enables a smoother one-click experience. Google Pay works by
default.
### Apple Pay
Paddle supports two ways to use Apple Pay:
* [Apple Pay Express Checkout](/integrations/payments/paddle#apple-pay-express-checkout): Provides a seamless one-click payment experience similar to a wallet button. It prioritizes Apple Pay by showing it first to customers, while other payment methods are placed under the **Pay another way** button.
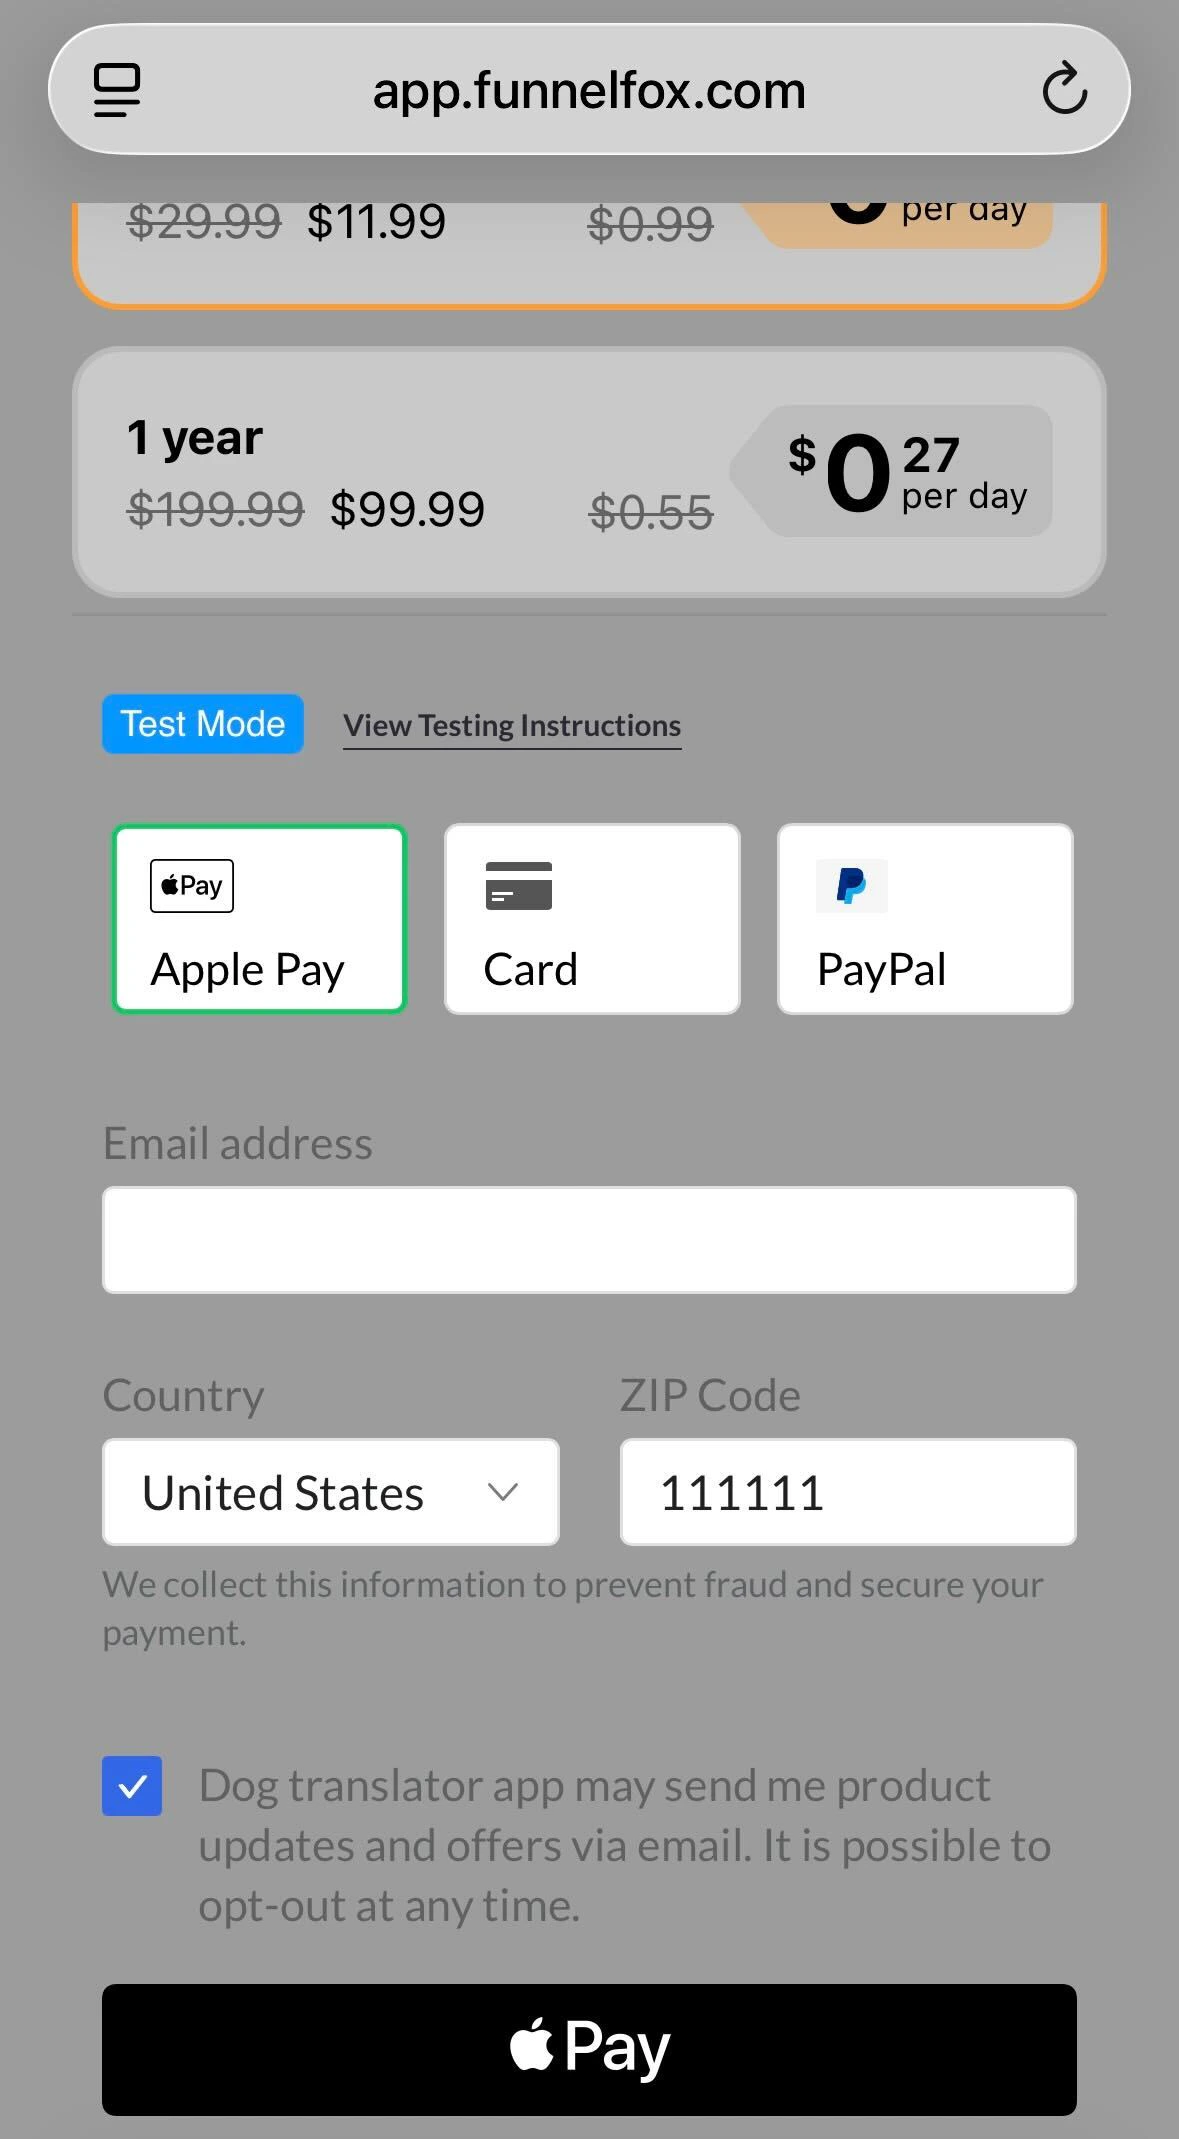
 * [One-page or multi-page checkout](/integrations/payments/paddle#one-page-or-multi-page-checkout): Shows Apple Pay alongside other payment methods during checkout.
 Apple Pay is shown in Paddle checkout only if the user has a card added
to their wallet.
#### Apple Pay Express Checkout
To enable a seamless one-click payment experience similar to a wallet button:
1. [Verify your domain](/integrations/payments/paddle#domain-verification) in order to offer the one-click experience in express checkout.
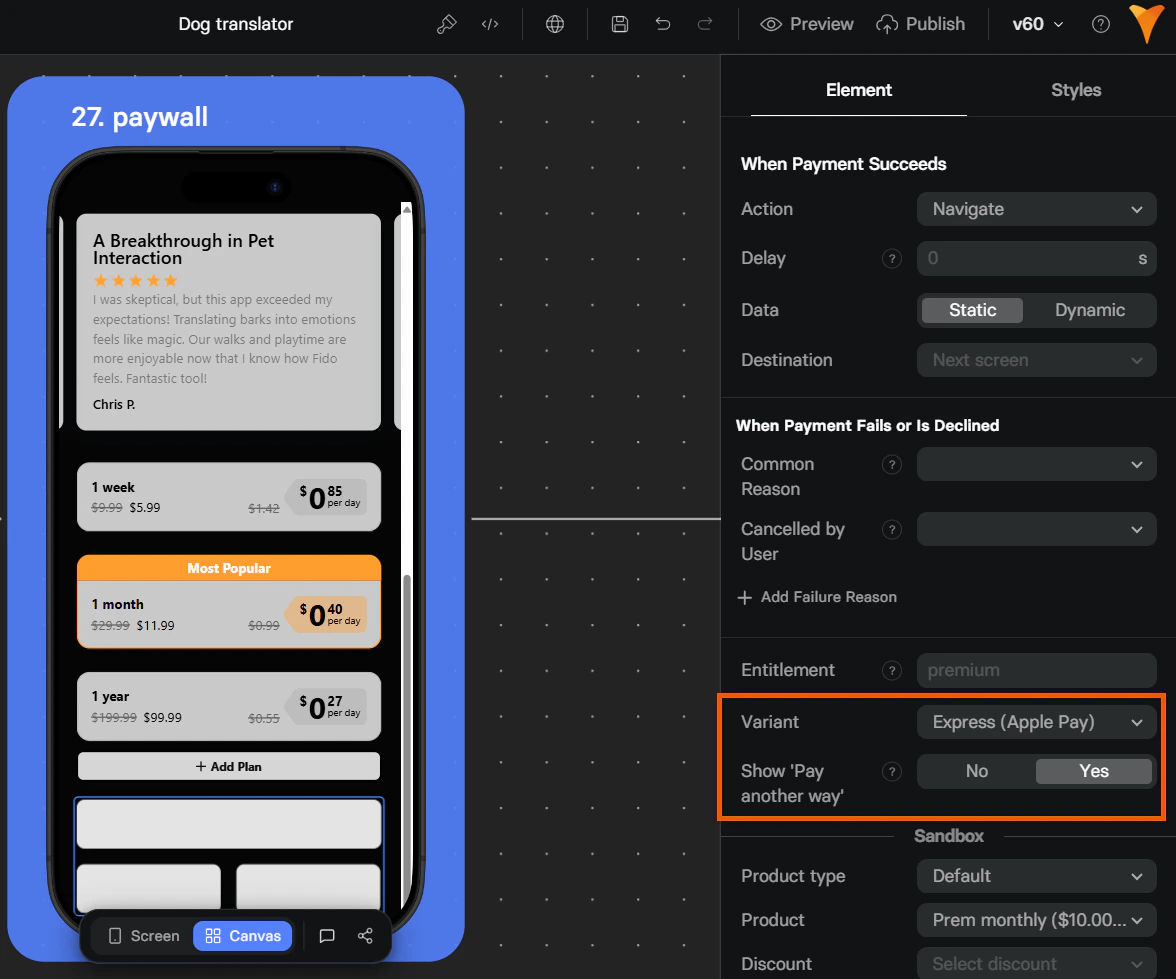
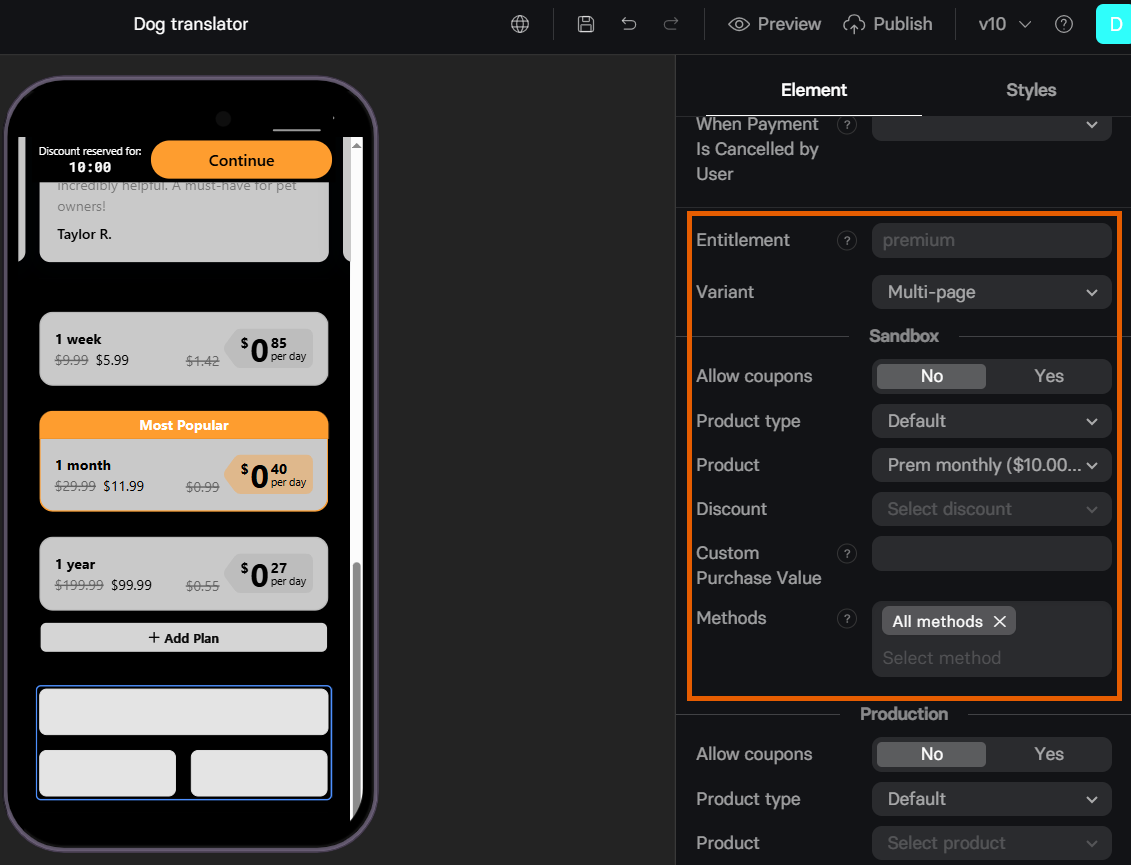
2. Configure your [Checkout element](/elements/checkout#paddle-2):
* **Variant**: Express (Apple Pay).
* **Show Pay another way**: Adds a button to select another payment method or use them as a fallback.
Apple Pay is shown in Paddle checkout only if the user has a card added
to their wallet.
#### Apple Pay Express Checkout
To enable a seamless one-click payment experience similar to a wallet button:
1. [Verify your domain](/integrations/payments/paddle#domain-verification) in order to offer the one-click experience in express checkout.
2. Configure your [Checkout element](/elements/checkout#paddle-2):
* **Variant**: Express (Apple Pay).
* **Show Pay another way**: Adds a button to select another payment method or use them as a fallback.
 Customer email is resolved differently depending on whether an email is collected before the Checkout element:
* **If no email is collected before your Checkout element**: Paddle creates the customer using
the email from the Apple Pay wallet settings.
* **If an email is collected before Checkout element**: That email
takes priority over the wallet email.
#### One-page or multi-page checkout
To show Apple Pay alongside other payment methods during checkout:
1. [Verify your domain](/integrations/payments/paddle#domain-verification) for a smooth one-click experience without
popups. On unverified domains, Paddle opens a
popup that launches the Apple
Pay modal.
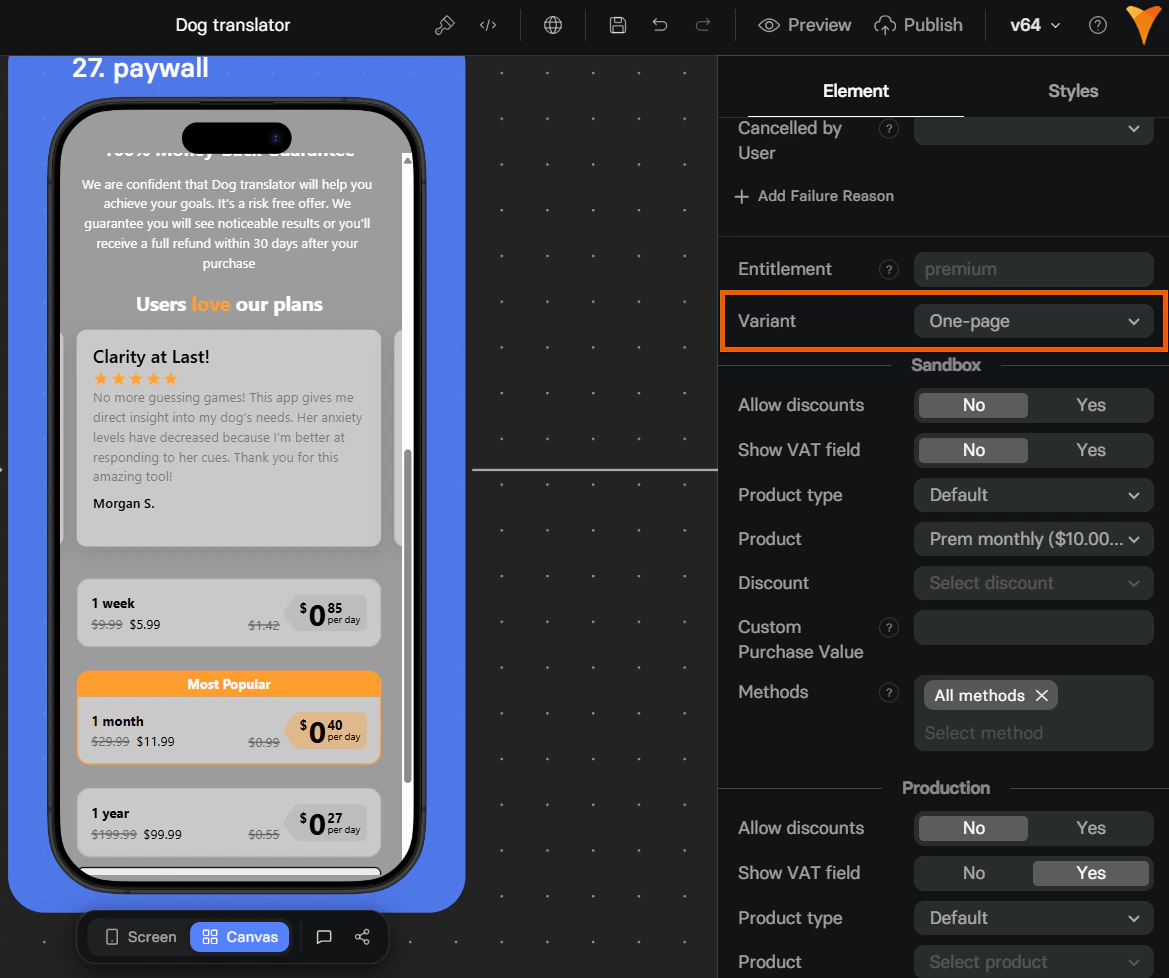
2. Configure the **Variant** field in your [Checkout element](/elements/checkout#paddle-2) as one-page or multi-page.
Customer email is resolved differently depending on whether an email is collected before the Checkout element:
* **If no email is collected before your Checkout element**: Paddle creates the customer using
the email from the Apple Pay wallet settings.
* **If an email is collected before Checkout element**: That email
takes priority over the wallet email.
#### One-page or multi-page checkout
To show Apple Pay alongside other payment methods during checkout:
1. [Verify your domain](/integrations/payments/paddle#domain-verification) for a smooth one-click experience without
popups. On unverified domains, Paddle opens a
popup that launches the Apple
Pay modal.
2. Configure the **Variant** field in your [Checkout element](/elements/checkout#paddle-2) as one-page or multi-page.
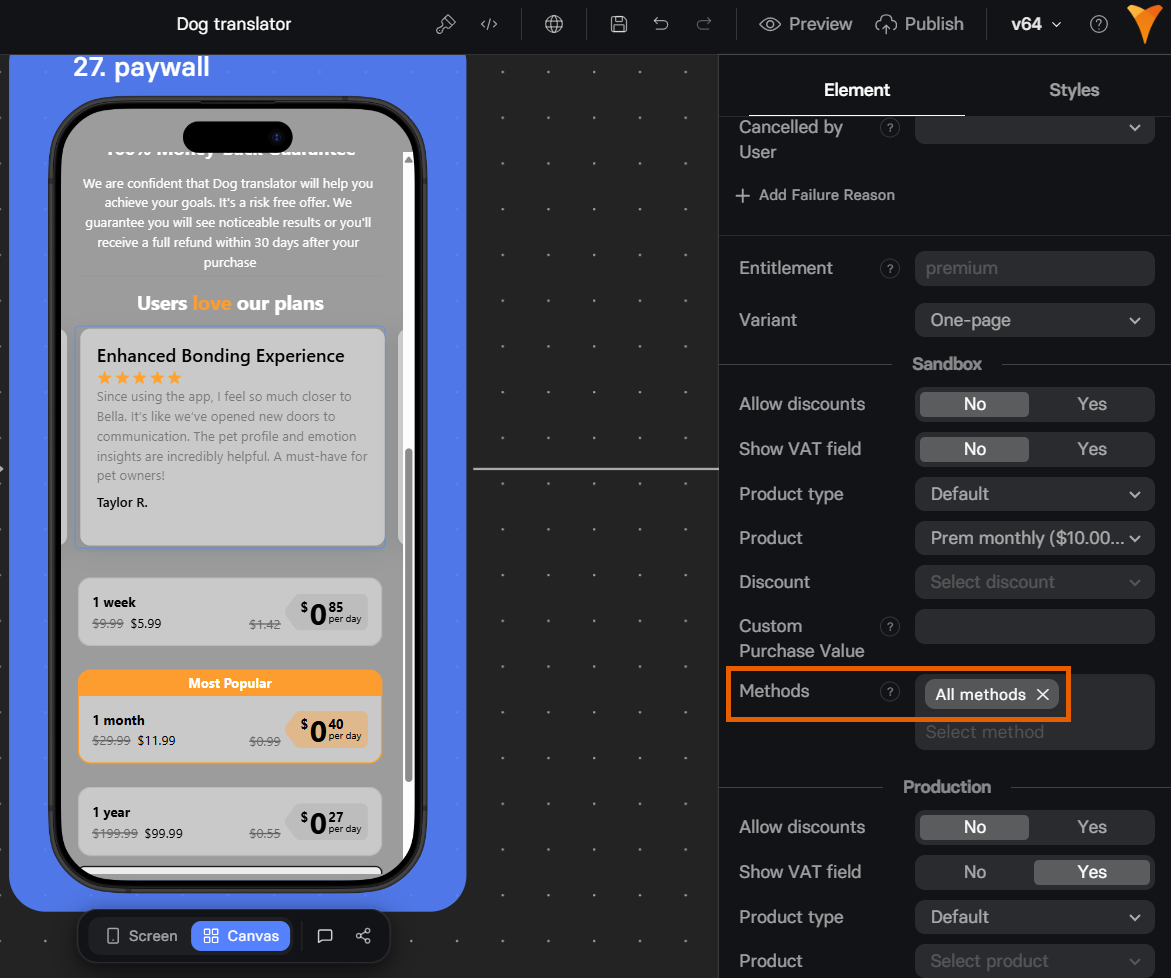
 3. Enable Apple Pay as a payment method in your Checkout element.
 #### Domain verification
To verify your domain:
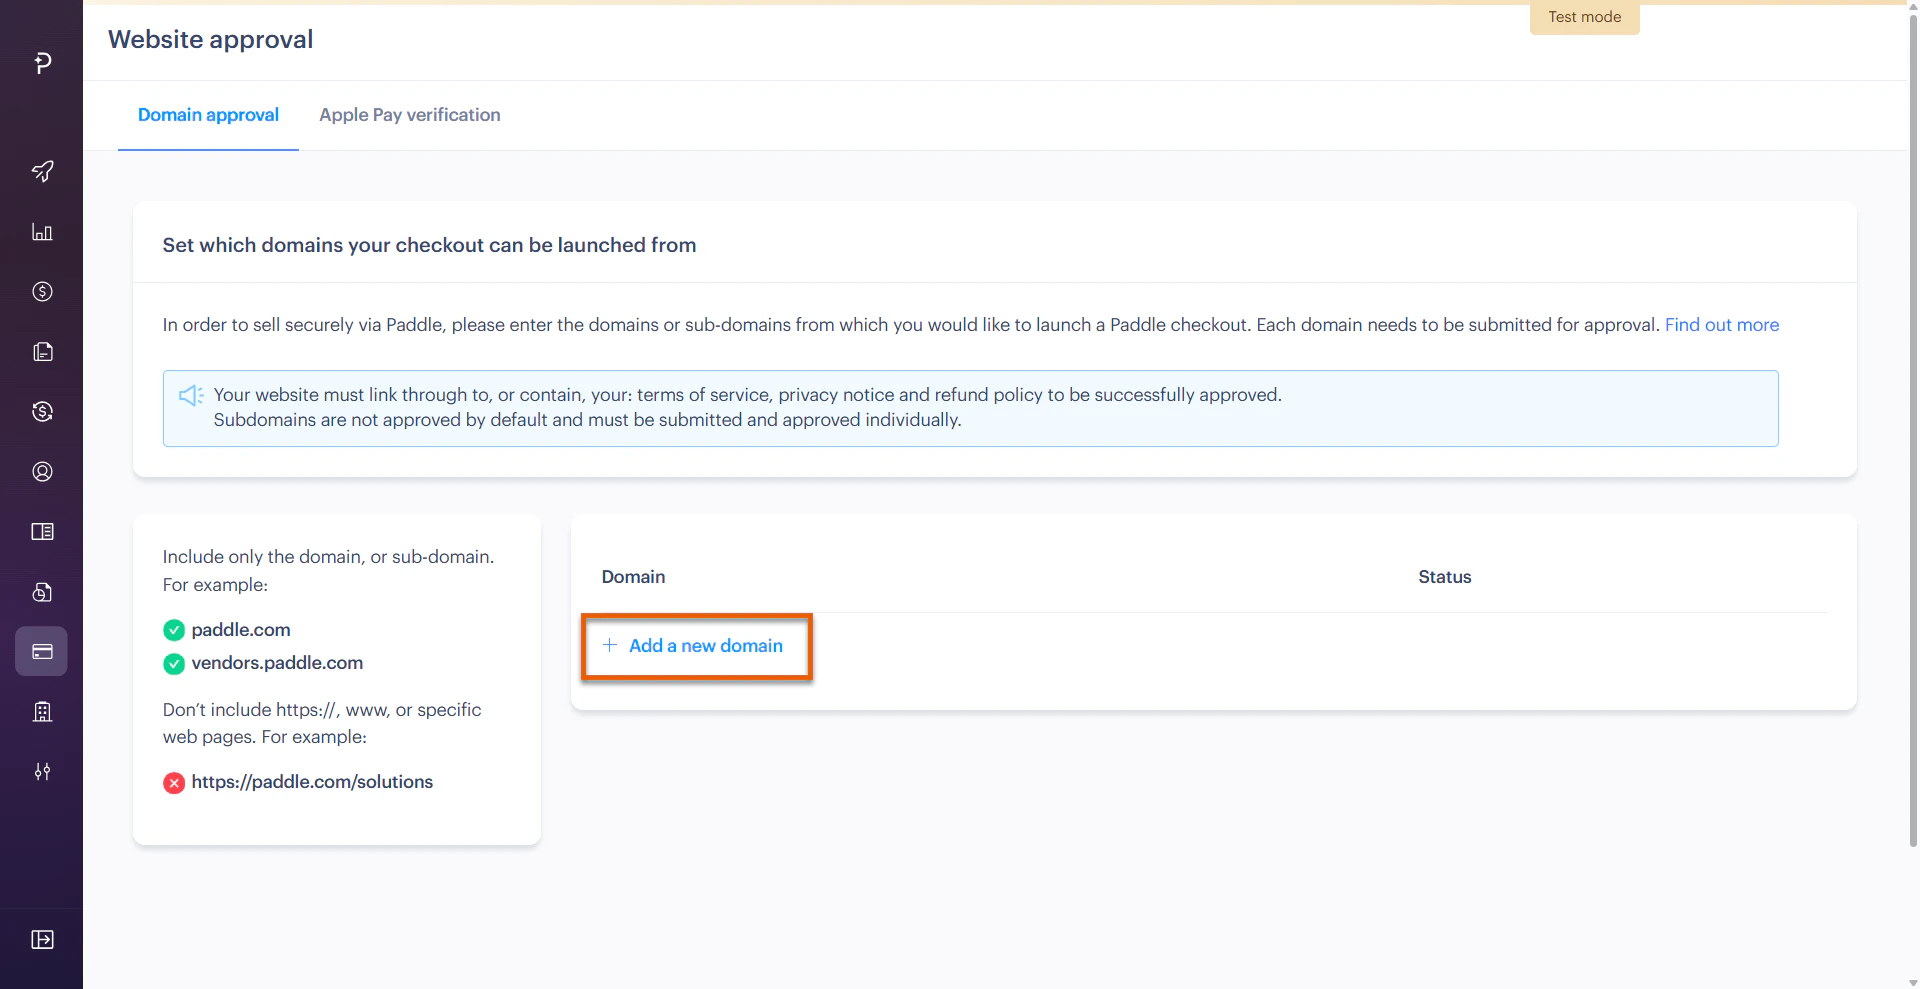
1. Go to **Checkout > Website approval > Domain approval** in your Paddle
dashboard.
2. Click **+ Add a new domain**.
#### Domain verification
To verify your domain:
1. Go to **Checkout > Website approval > Domain approval** in your Paddle
dashboard.
2. Click **+ Add a new domain**.
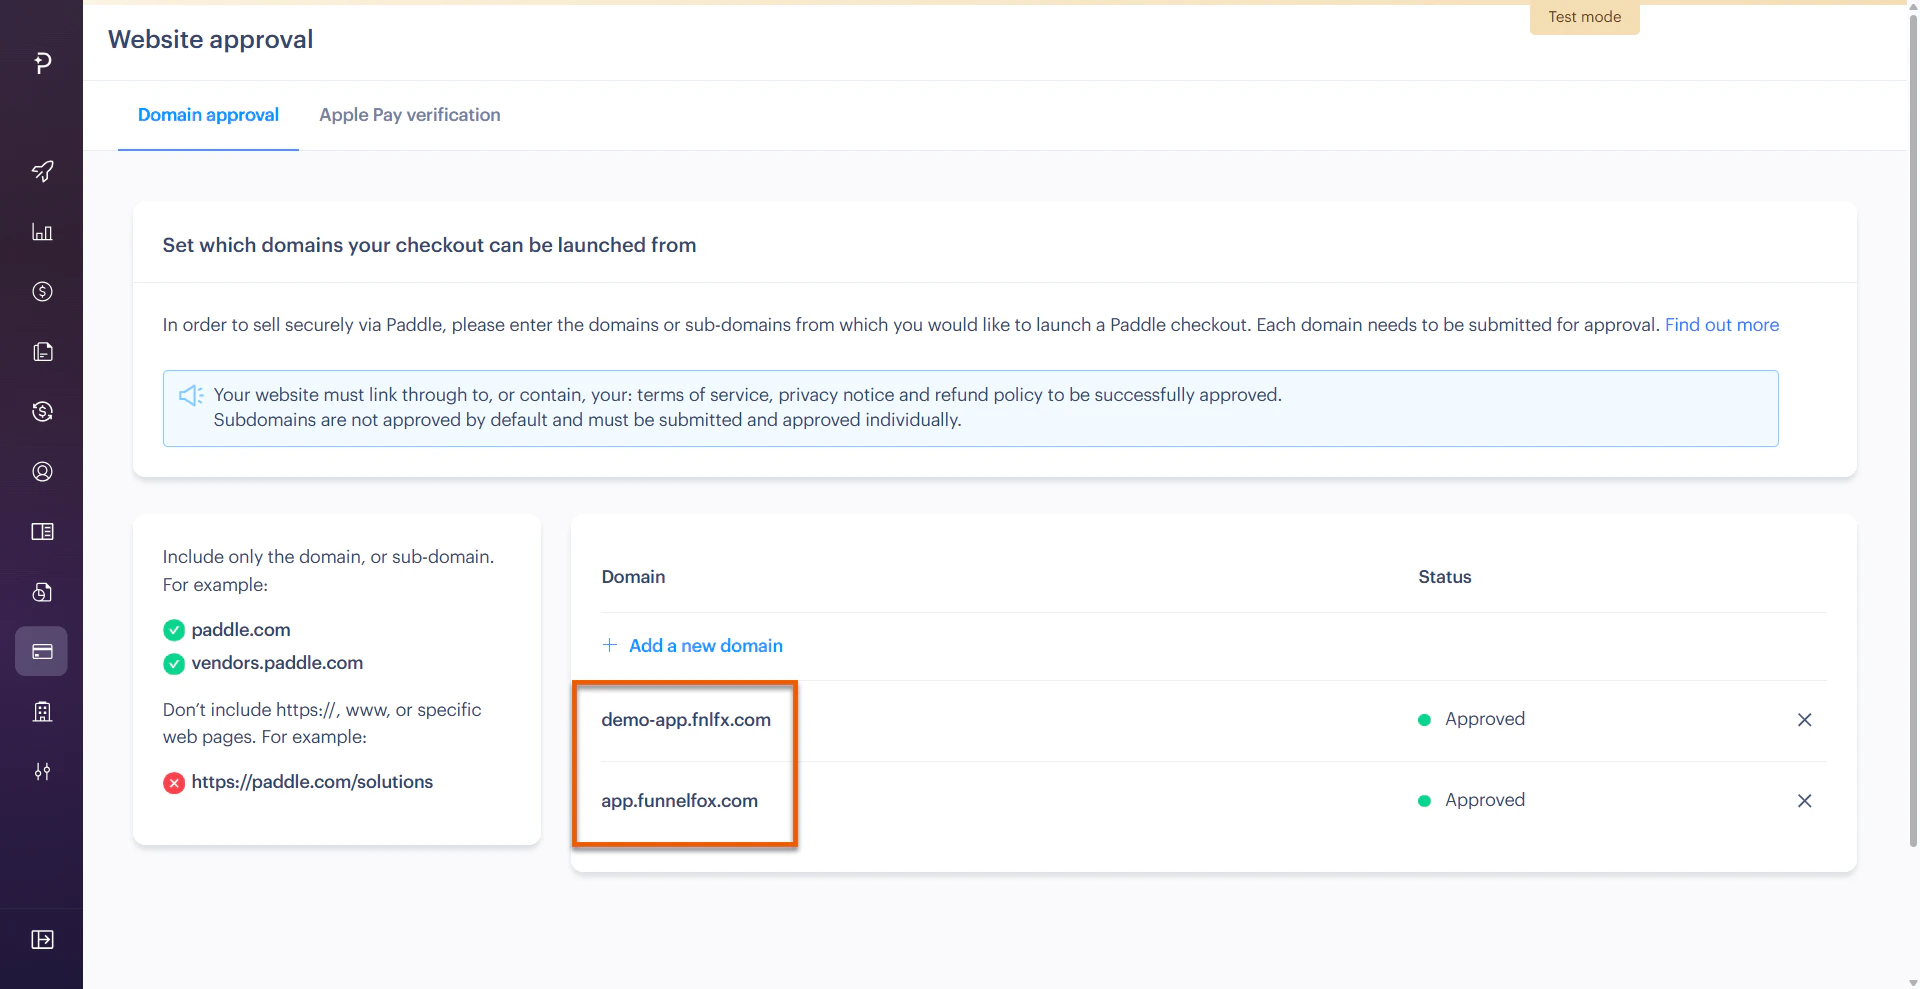
 3. Add your project domain from [Settings > Domains](https://app.funnelfox.com/settings/domains)
in FunnelFox and click **Save**. If you have a custom domain, add it as
well.
3. Add your project domain from [Settings > Domains](https://app.funnelfox.com/settings/domains)
in FunnelFox and click **Save**. If you have a custom domain, add it as
well.
 4. Go to [Settings > Domains](https://app.funnelfox.com/settings/domains) in
FunnelFox.
5. Select **Paddle** under **Apple Pay domain verification**.
4. Go to [Settings > Domains](https://app.funnelfox.com/settings/domains) in
FunnelFox.
5. Select **Paddle** under **Apple Pay domain verification**.
 6. Click **Save**.
One-click Apple Pay button will become available in your checkout after
domain verification completes.
### Google Pay
Google Pay checkout buttons with Paddle works by default and requires no additional
configuration.
Enable Google Pay as [payment method for Paddle](/elements/checkout#paddle-2) in your Checkout element.
## Testing
Test your Paddle integration with simulated payments before going live.
1. Configure the test in your Checkout element's **Sandbox** section.
6. Click **Save**.
One-click Apple Pay button will become available in your checkout after
domain verification completes.
### Google Pay
Google Pay checkout buttons with Paddle works by default and requires no additional
configuration.
Enable Google Pay as [payment method for Paddle](/elements/checkout#paddle-2) in your Checkout element.
## Testing
Test your Paddle integration with simulated payments before going live.
1. Configure the test in your Checkout element's **Sandbox** section.
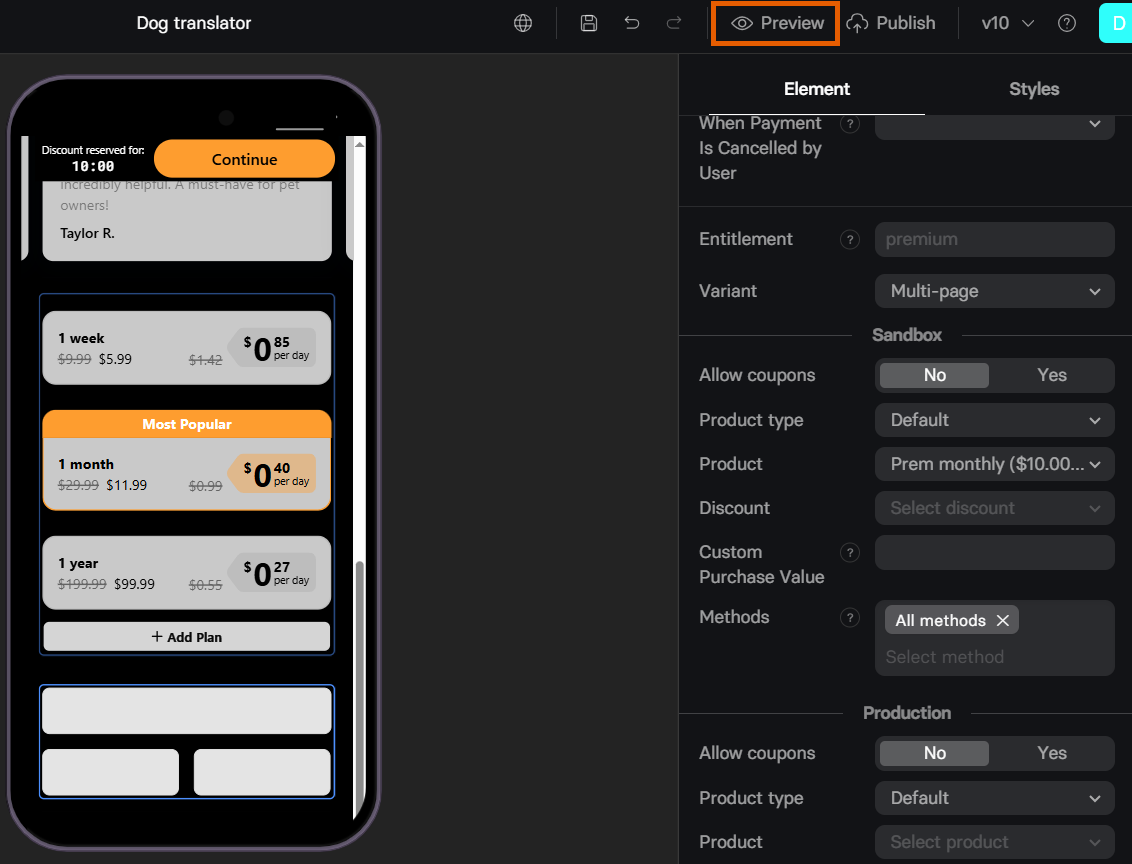
 2. Open your funnel in **Preview** mode.
 3. Use these Paddle test cards with any future expiry date and `100` as CVV:
| Card Number | Result |
| ------------------- | ---------------------------------------------------------------- |
| 4242 4242 4242 4242 | Success |
| 4000 0000 0000 0002 | Declined |
| 4000 0027 6000 3184 | Successful initial transaction, subsequent declined transactions |
Learn more about [Paddle test cards](https://developer.paddle.com/concepts/payment-methods/credit-debit-card#test-payment-method).
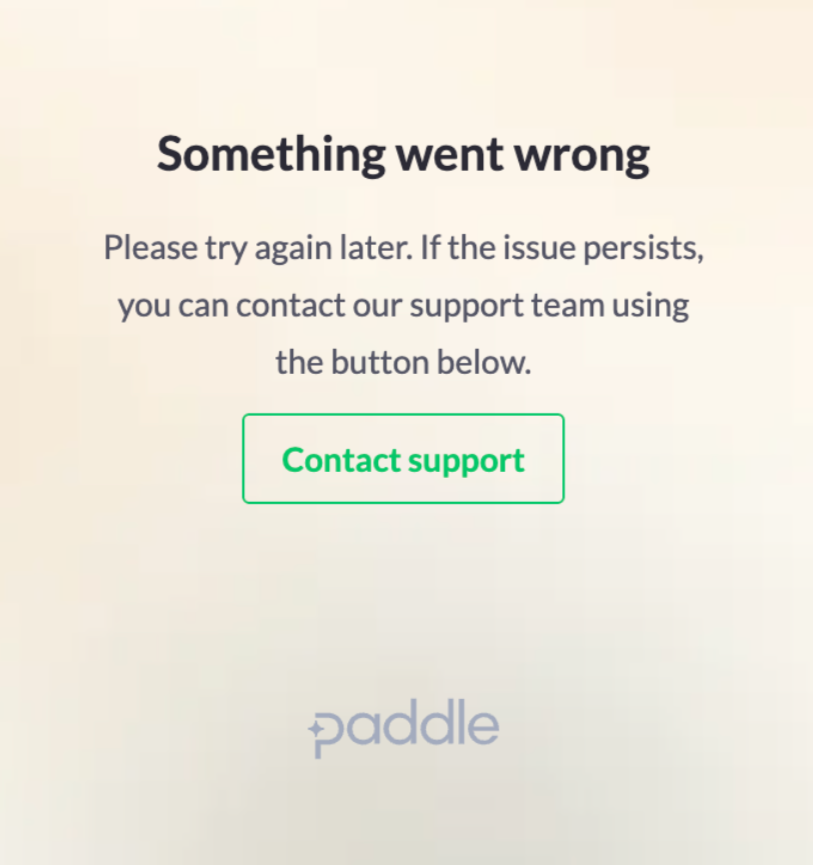
## Troubleshooting
This error often occurs when your setup is missing the default payment link:
3. Use these Paddle test cards with any future expiry date and `100` as CVV:
| Card Number | Result |
| ------------------- | ---------------------------------------------------------------- |
| 4242 4242 4242 4242 | Success |
| 4000 0000 0000 0002 | Declined |
| 4000 0027 6000 3184 | Successful initial transaction, subsequent declined transactions |
Learn more about [Paddle test cards](https://developer.paddle.com/concepts/payment-methods/credit-debit-card#test-payment-method).
## Troubleshooting
This error often occurs when your setup is missing the default payment link:
 1. Go to [Checkout > Checkout settings](https://vendors.paddle.com/checkout-settings) in Paddle.
2. Check if you have the link set under the **Default payment link**.
3. If not, go to [Settings > Domains](https://app.funnelfox.com/settings/domains) in FunnelFox.
4. Copy your project subdomain from the **Hosted subdomain** section (for example: `https://demo-app.fnlfx.com/`).
5. Paste your project subdomain under the **Default payment link**.
6. Click **Save** at the top right, then republish your funnel.
## Next steps
* [Set up checkout element](/elements/checkout) in your funnel
1. Go to [Checkout > Checkout settings](https://vendors.paddle.com/checkout-settings) in Paddle.
2. Check if you have the link set under the **Default payment link**.
3. If not, go to [Settings > Domains](https://app.funnelfox.com/settings/domains) in FunnelFox.
4. Copy your project subdomain from the **Hosted subdomain** section (for example: `https://demo-app.fnlfx.com/`).
5. Paste your project subdomain under the **Default payment link**.
6. Click **Save** at the top right, then republish your funnel.
## Next steps
* [Set up checkout element](/elements/checkout) in your funnel