> ## Documentation Index
> Fetch the complete documentation index at: https://funnelfox.com/docs/llms.txt
> Use this file to discover all available pages before exploring further.
# Adapty Mail integration: email campaigns
> Connect Adapty Mail to FunnelFox to turn funnel leads into email campaigns. Forward profiles, purchases, and subscription changes automatically.
The Adapty Mail integration forwards the emails you collect in your funnels,
along with each customer's purchase history, into Adapty Mail. Campaigns there
can then nurture leads who never bought and win back customers who cancelled,
hit a billing issue, or churned.
To learn what Adapty Mail can do, go to the
[Adapty Mail documentation](https://adapty.io/docs/adapty-mail).
 ## How it works
The integration is a one-way push into a single Adapty Mail project.
FunnelFox
sends people and their purchase history, but never reads your campaigns back
and never sends email itself.
When a user interacts with a funnel:
1. **Profile creation**: FunnelFox sends the profile when a funnel collects an
email. Repeat submissions update the same profile instead of creating a
duplicate. A profile without an email is never sent.
2. **Purchases**: A completed payment arrives as a subscription start, a
renewal, or a one-time purchase.
3. **Subscription changes**: Cancellations, reactivations, billing issues, and
expirations are sent as they happen. This is what keeps a churned
subscriber from reading as an active subscriber in Adapty Mail.
4. **Refunds**: A refund issued through FunnelFox arrives as a negative
amount, so Adapty Mail subtracts it from revenue.
Here's what FunnelFox sends with each profile:
* Email
* Customer user ID
* Country
* Device, operating system, locale, and timezone
* Funnel ID
* Profile ID
* Session ID
* Experiment ID (if applicable)
* Email consent
Adapty Mail receives these within about a minute of the funnel event.
FunnelFox doesn't backfill. Forwarding starts when you save the secret key.
Emails, purchases, and subscriptions from before that point are never sent, and
there's no way to re-sync them.
If you also use the [Adapty integration](/docs/integrations/subscription-management/adapty),
the same purchase can reach Adapty Mail twice. Adapty Mail removes the
duplicate, so your revenue isn't counted twice.
## Setup
You need an active Adapty Mail project to complete this setup. Set up your
sending domain, campaign, and flow in Adapty Mail first, then connect
FunnelFox.
Finish the Adapty Mail setup ([steps 1-5](/docs/integrations/email-providers/adapty-mail#1-set-up-your-brand-and-company)) before you paste your secret key into FunnelFox.
FunnelFox starts forwarding the moment you save the key and never backfills, so
profiles that arrive before your flow exists won't be picked up by it.
### 1. Set up your brand and company
1. Go to [Brand](https://mail.adapty.io/brand) in your Adapty Mail dashboard
and check that your brand is set. If it isn't, drop in your App Store or
Google Play link and Adapty Mail builds a brand profile from it.
## How it works
The integration is a one-way push into a single Adapty Mail project.
FunnelFox
sends people and their purchase history, but never reads your campaigns back
and never sends email itself.
When a user interacts with a funnel:
1. **Profile creation**: FunnelFox sends the profile when a funnel collects an
email. Repeat submissions update the same profile instead of creating a
duplicate. A profile without an email is never sent.
2. **Purchases**: A completed payment arrives as a subscription start, a
renewal, or a one-time purchase.
3. **Subscription changes**: Cancellations, reactivations, billing issues, and
expirations are sent as they happen. This is what keeps a churned
subscriber from reading as an active subscriber in Adapty Mail.
4. **Refunds**: A refund issued through FunnelFox arrives as a negative
amount, so Adapty Mail subtracts it from revenue.
Here's what FunnelFox sends with each profile:
* Email
* Customer user ID
* Country
* Device, operating system, locale, and timezone
* Funnel ID
* Profile ID
* Session ID
* Experiment ID (if applicable)
* Email consent
Adapty Mail receives these within about a minute of the funnel event.
FunnelFox doesn't backfill. Forwarding starts when you save the secret key.
Emails, purchases, and subscriptions from before that point are never sent, and
there's no way to re-sync them.
If you also use the [Adapty integration](/docs/integrations/subscription-management/adapty),
the same purchase can reach Adapty Mail twice. Adapty Mail removes the
duplicate, so your revenue isn't counted twice.
## Setup
You need an active Adapty Mail project to complete this setup. Set up your
sending domain, campaign, and flow in Adapty Mail first, then connect
FunnelFox.
Finish the Adapty Mail setup ([steps 1-5](/docs/integrations/email-providers/adapty-mail#1-set-up-your-brand-and-company)) before you paste your secret key into FunnelFox.
FunnelFox starts forwarding the moment you save the key and never backfills, so
profiles that arrive before your flow exists won't be picked up by it.
### 1. Set up your brand and company
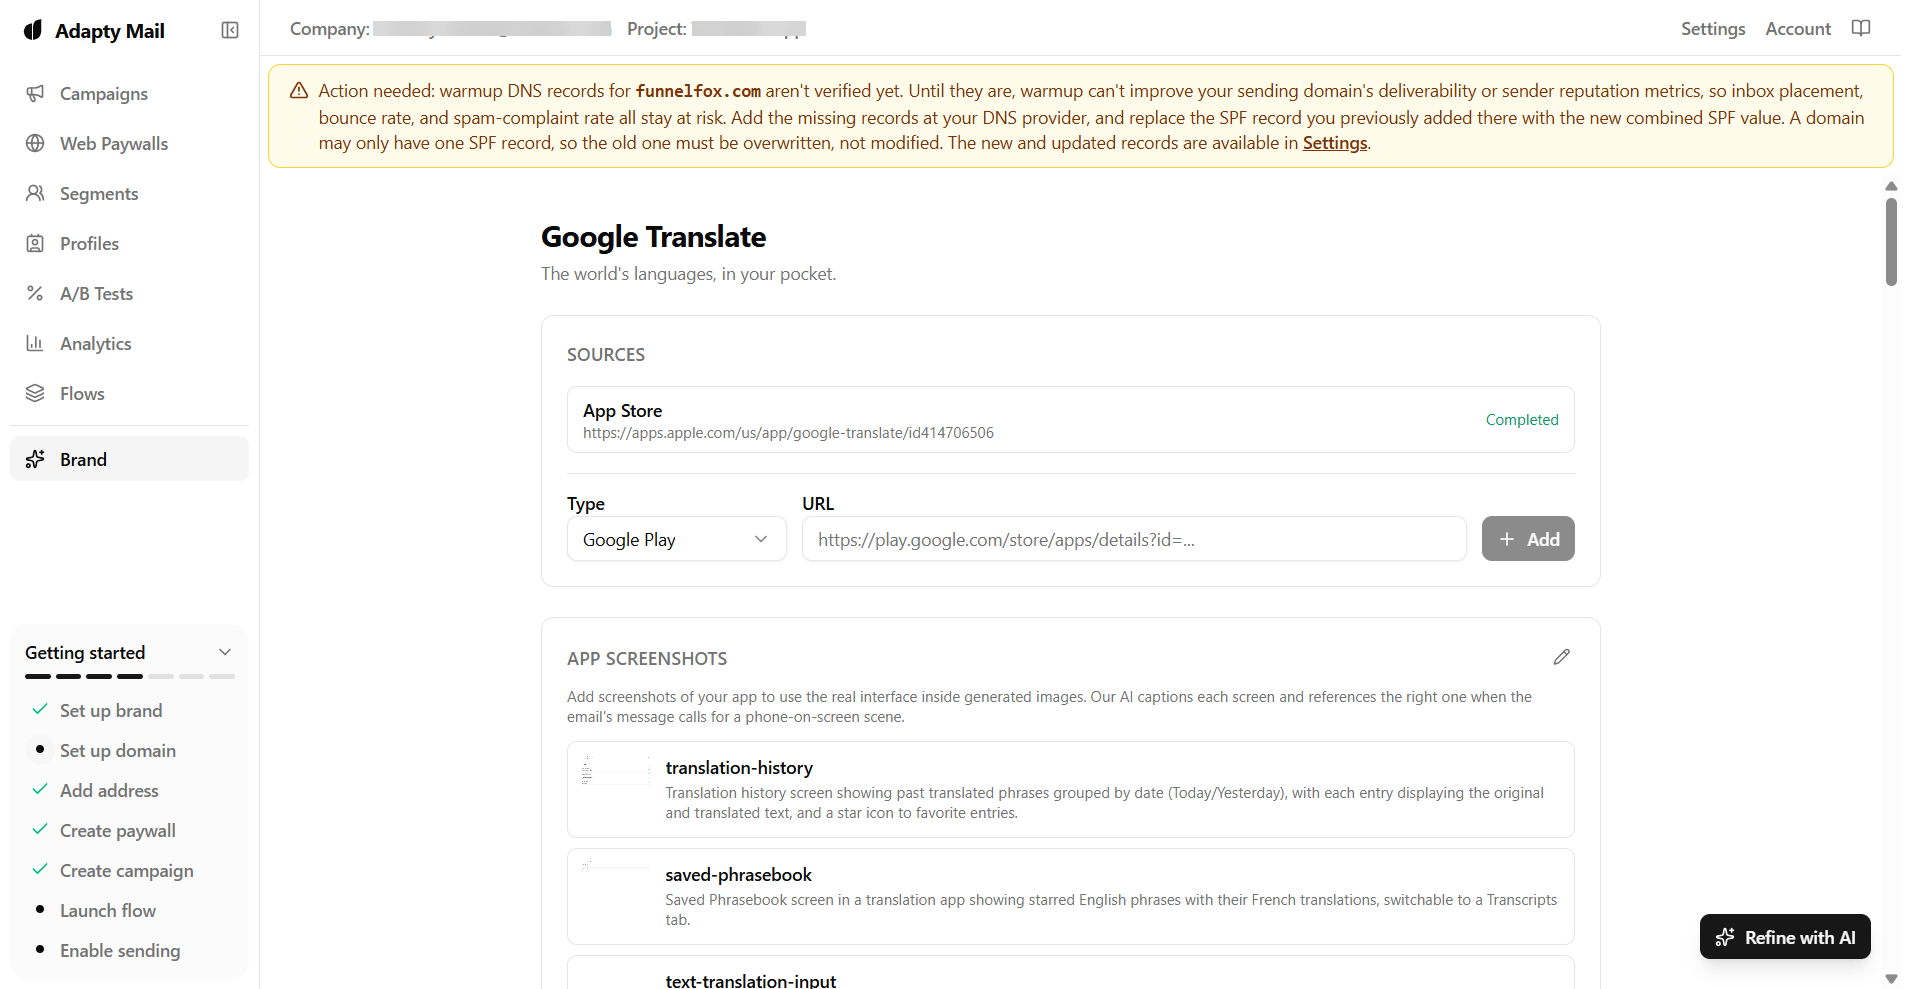
1. Go to [Brand](https://mail.adapty.io/brand) in your Adapty Mail dashboard
and check that your brand is set. If it isn't, drop in your App Store or
Google Play link and Adapty Mail builds a brand profile from it.
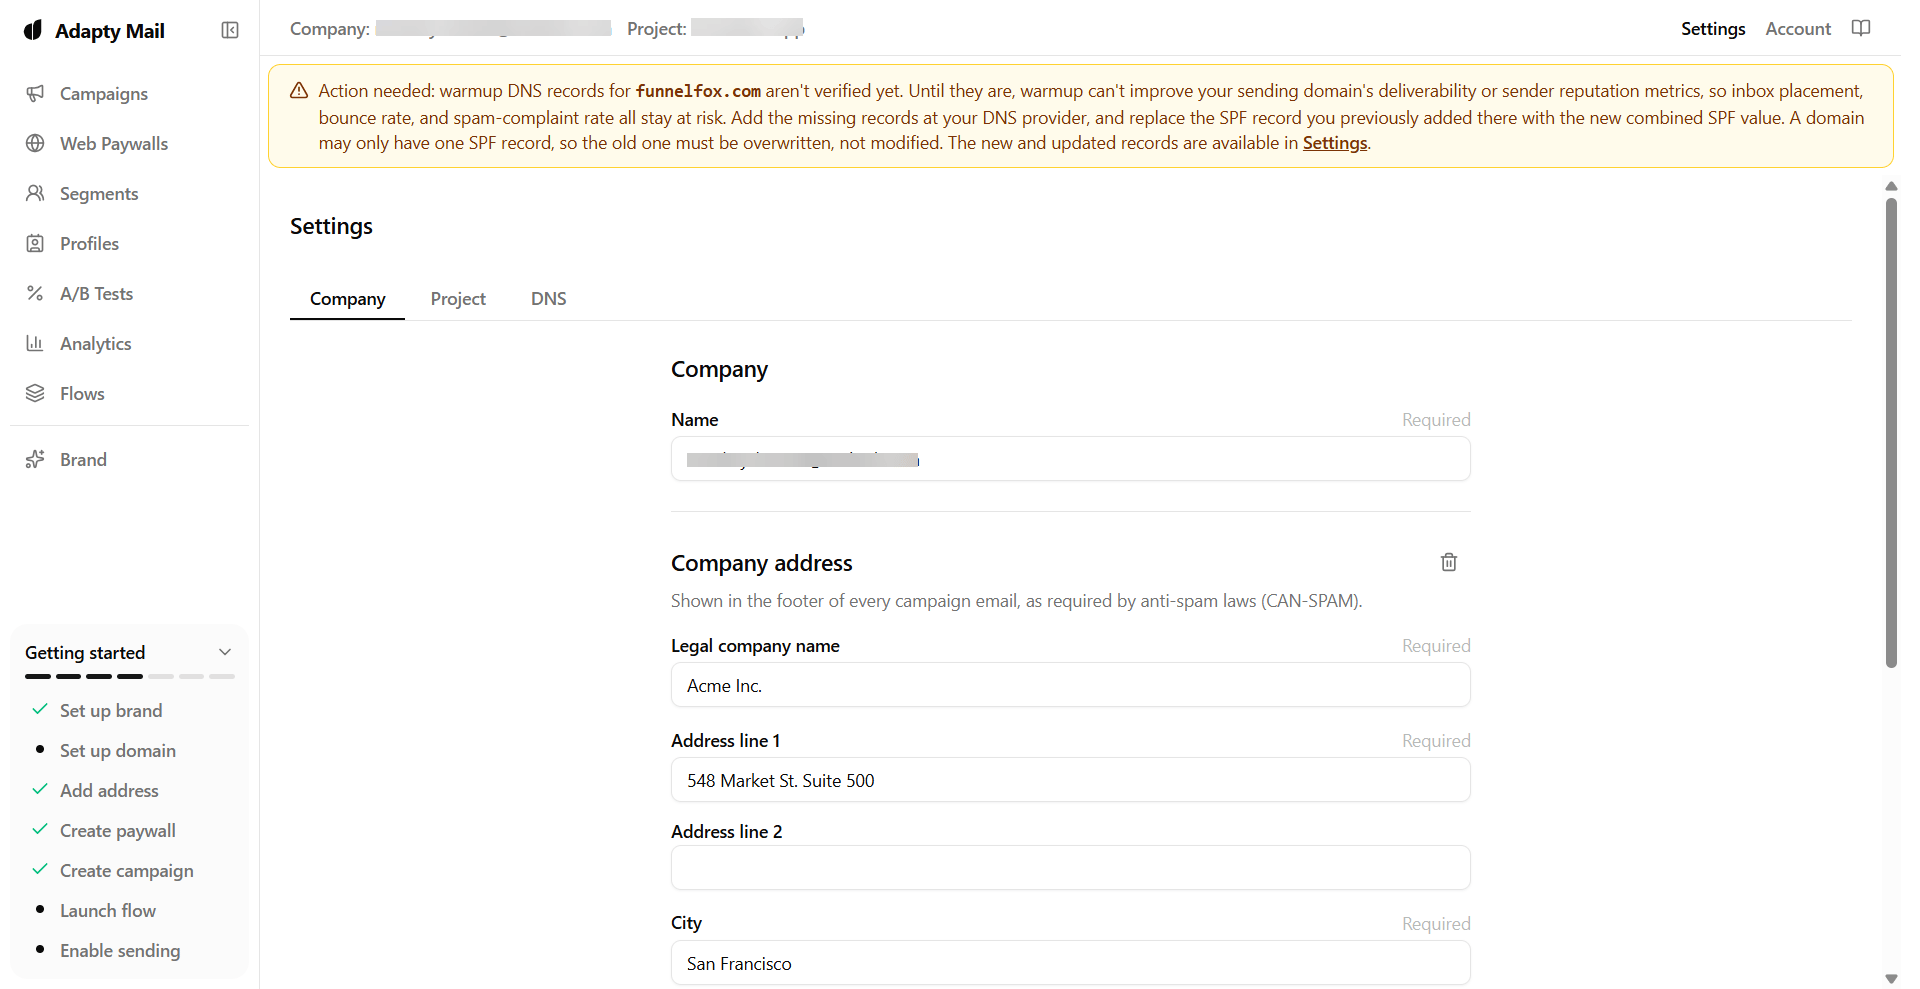
 2. Go to **Settings > Company** from the top right and check that your company
address is set.
2. Go to **Settings > Company** from the top right and check that your company
address is set.
 ### 2. Add a sending domain
1. Go to **Settings > DNS** from the top right.
2. Fill out the **Email domains** section:
* **Domain**: Your root domain, for example `yourapp.com`. Only apex domains
are accepted, so subdomains like `app.yourapp.com` are rejected at input.
* **Sending subdomain**: The prefix your emails go out from. Leave it empty to
use `mail`, and your emails then come from an address like
`hello@mail.yourapp.com`.
### 2. Add a sending domain
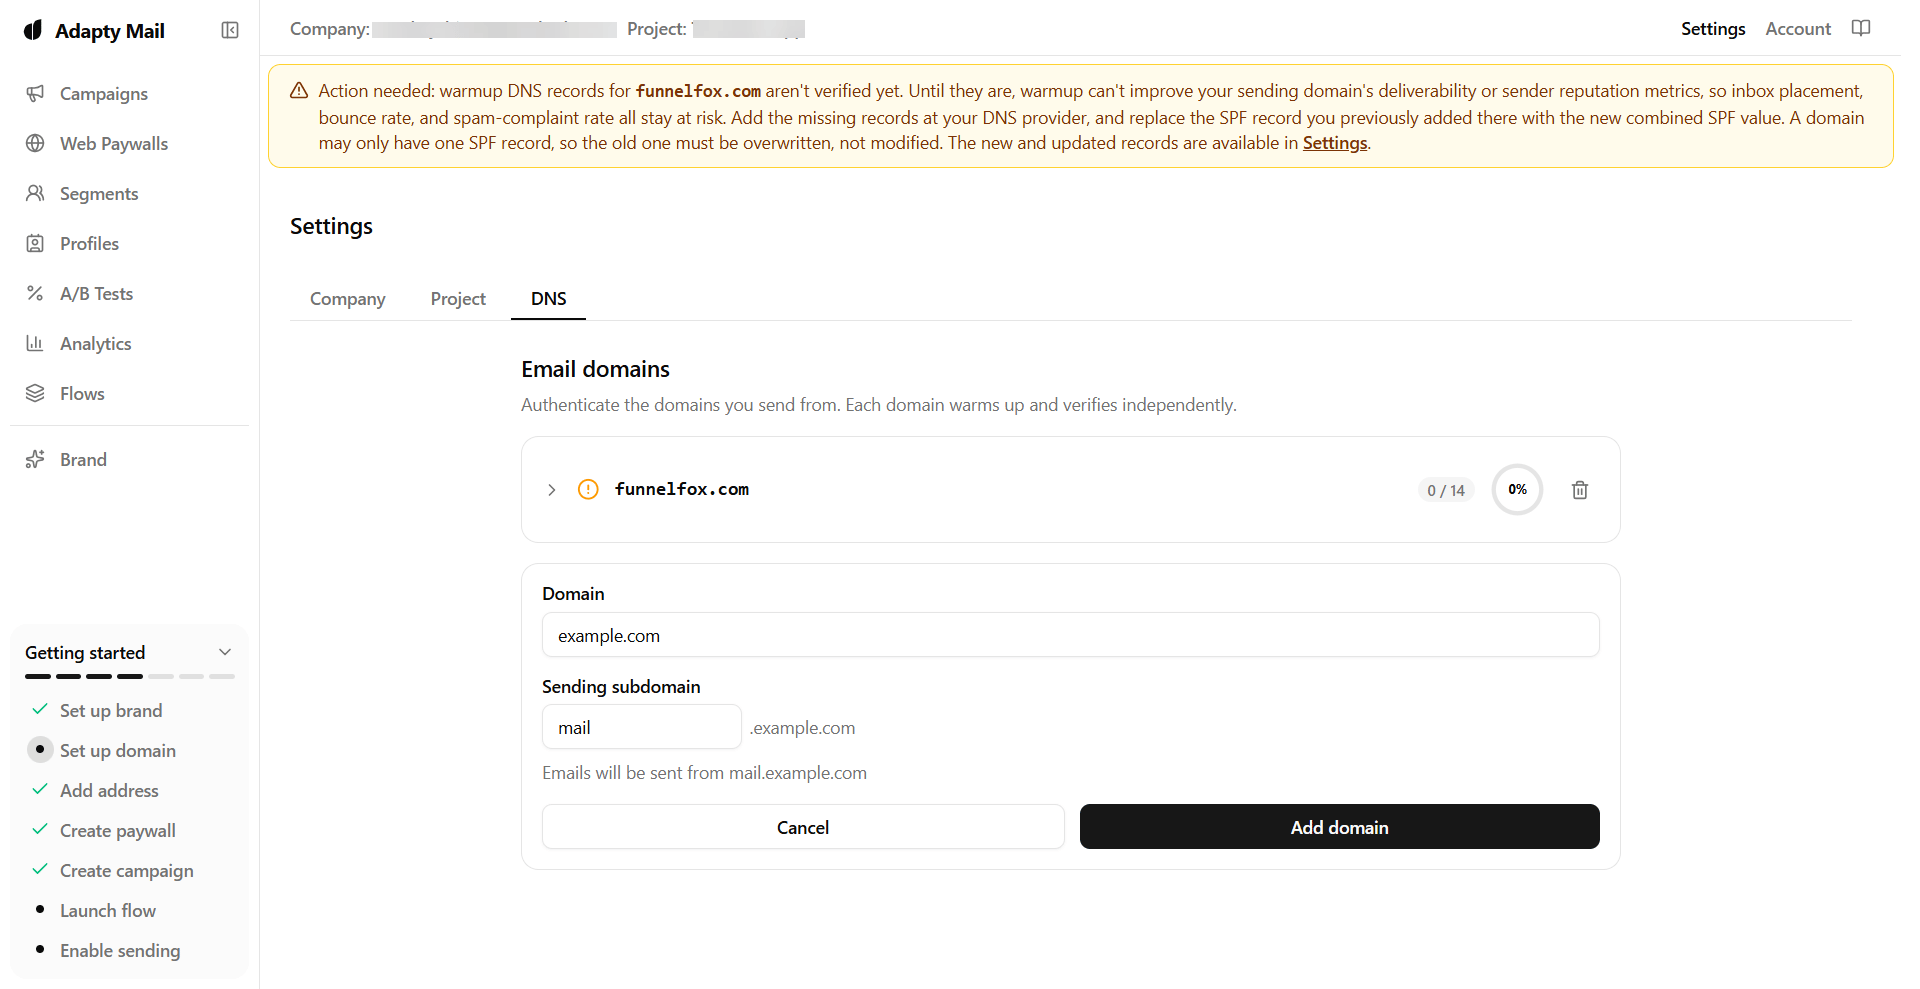
1. Go to **Settings > DNS** from the top right.
2. Fill out the **Email domains** section:
* **Domain**: Your root domain, for example `yourapp.com`. Only apex domains
are accepted, so subdomains like `app.yourapp.com` are rejected at input.
* **Sending subdomain**: The prefix your emails go out from. Leave it empty to
use `mail`, and your emails then come from an address like
`hello@mail.yourapp.com`.
 3. Click **Add domain**.
4. In your domain registrar, add every DNS record the new domain card lists.
They come in three groups: your sending subdomain's DKIM and MAIL FROM
records, the records for the mailbox that warms the domain up, and the
records for `go.yourapp.com`, which serves images and tracked links. To
learn what each group does, go to
[which records you add](https://adapty.io/docs/mail-sending-domain#which-records-you-add).
5. Add the suggested DMARC TXT record on your root domain.
6. Click **Check** to verify your domain, or leave the page and let Adapty Mail
poll DNS for you.
3. Click **Add domain**.
4. In your domain registrar, add every DNS record the new domain card lists.
They come in three groups: your sending subdomain's DKIM and MAIL FROM
records, the records for the mailbox that warms the domain up, and the
records for `go.yourapp.com`, which serves images and tracked links. To
learn what each group does, go to
[which records you add](https://adapty.io/docs/mail-sending-domain#which-records-you-add).
5. Add the suggested DMARC TXT record on your root domain.
6. Click **Check** to verify your domain, or leave the page and let Adapty Mail
poll DNS for you.
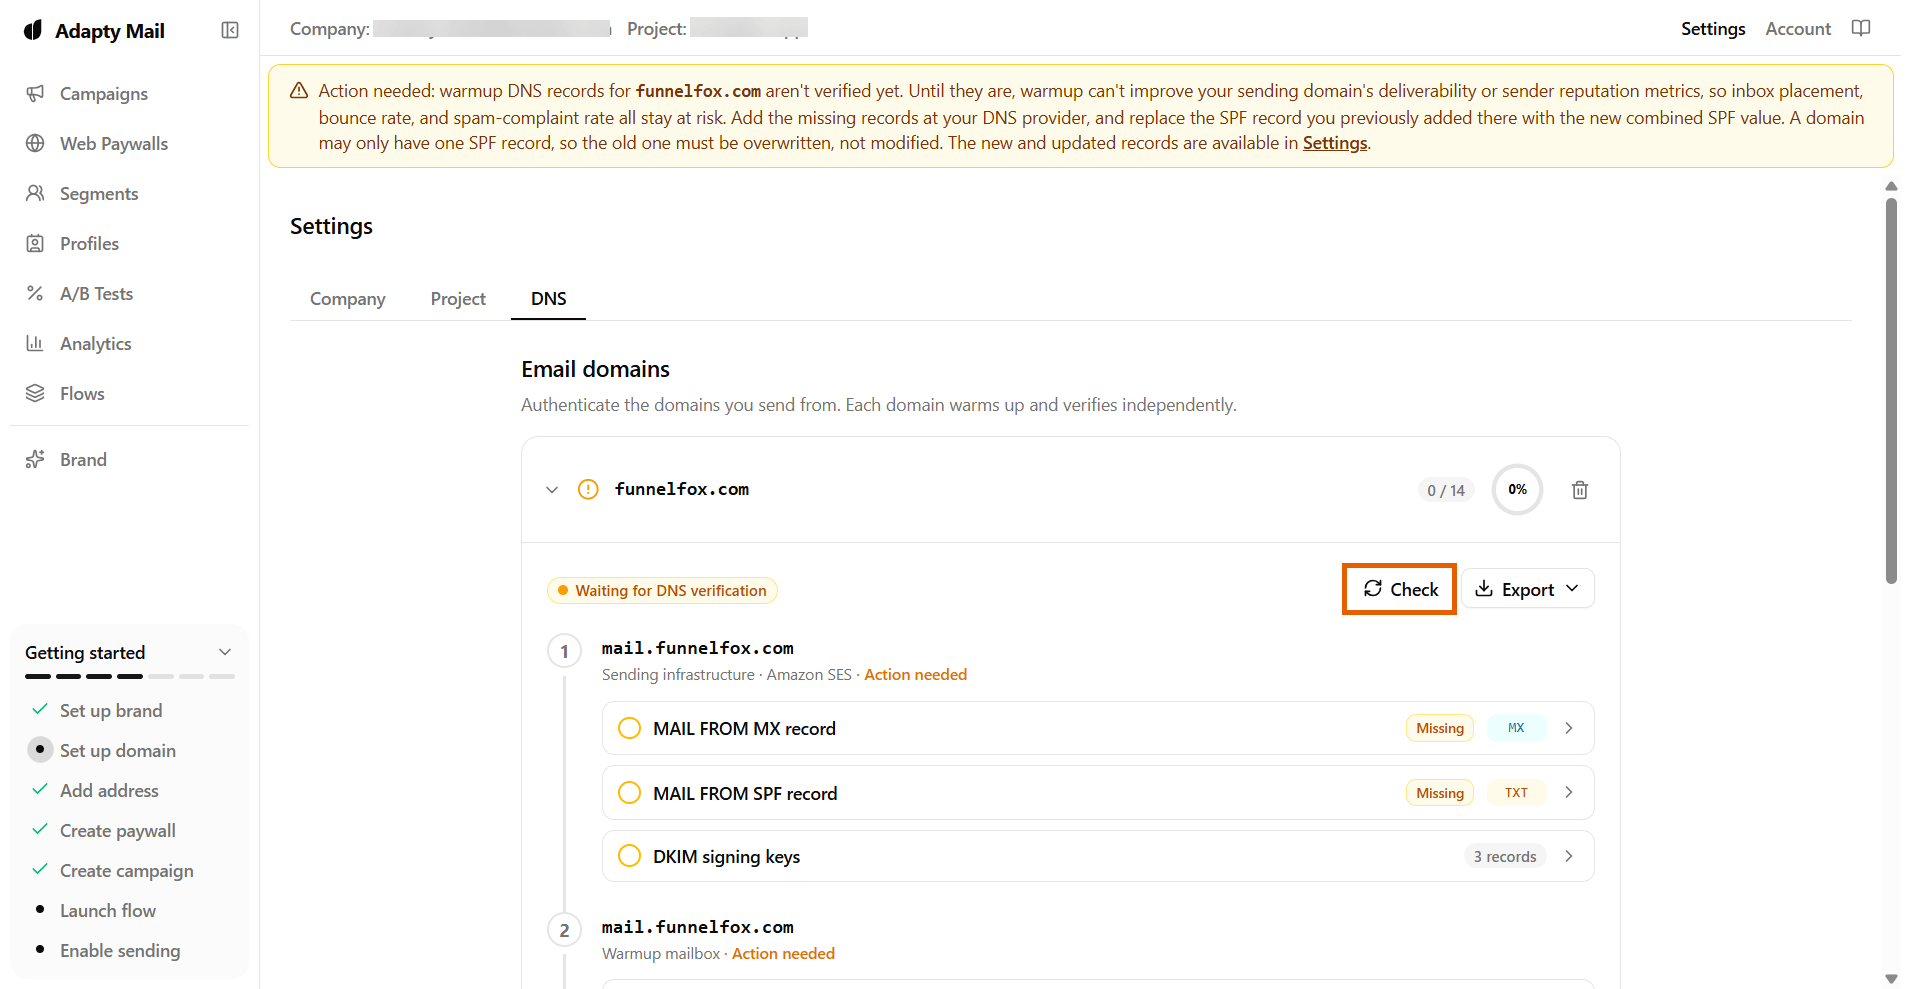 * **Automatic polling**: The first check runs 1 minute after you add the
domain. Intervals then double up to once per hour until the records are
found.
* **Manual check**: Click **Check** at any time to trigger an immediate check.
* **DNS propagation**: Usually minutes, up to 48 hours in rare cases.
* **Verification window**: 7 days. If it lapses, your DNS records stay in
place, so add your domain again in **Settings > DNS** to start a new window.
One verified domain is enough to start sending, and a project can hold up to
five. You don't have to wait for DNS to propagate before continuing: set up
your web paywall, campaign, and flow in the meantime.
### 3. Create a web paywall
The web paywall is the funnel with checkout that users land on when they click
a call to action in your emails.
1. Go to **Web Paywalls** in your Adapty Mail dashboard.
2. Click **Create** at the top right and enter your web paywall details:
* **Name**: Your paywall title.
* **Paywall URL**: Select **Enter URL manually**.
* **URL**: Your [funnel URL](/docs/dashboard/funnels#funnel-list) with placeholders
as query parameters, for example
`https://demo-app.fnlfx.com/new-paywall?email={email}&adapty_profile_id={adapty.external_profile_id}`.
* **Automatic polling**: The first check runs 1 minute after you add the
domain. Intervals then double up to once per hour until the records are
found.
* **Manual check**: Click **Check** at any time to trigger an immediate check.
* **DNS propagation**: Usually minutes, up to 48 hours in rare cases.
* **Verification window**: 7 days. If it lapses, your DNS records stay in
place, so add your domain again in **Settings > DNS** to start a new window.
One verified domain is enough to start sending, and a project can hold up to
five. You don't have to wait for DNS to propagate before continuing: set up
your web paywall, campaign, and flow in the meantime.
### 3. Create a web paywall
The web paywall is the funnel with checkout that users land on when they click
a call to action in your emails.
1. Go to **Web Paywalls** in your Adapty Mail dashboard.
2. Click **Create** at the top right and enter your web paywall details:
* **Name**: Your paywall title.
* **Paywall URL**: Select **Enter URL manually**.
* **URL**: Your [funnel URL](/docs/dashboard/funnels#funnel-list) with placeholders
as query parameters, for example
`https://demo-app.fnlfx.com/new-paywall?email={email}&adapty_profile_id={adapty.external_profile_id}`.
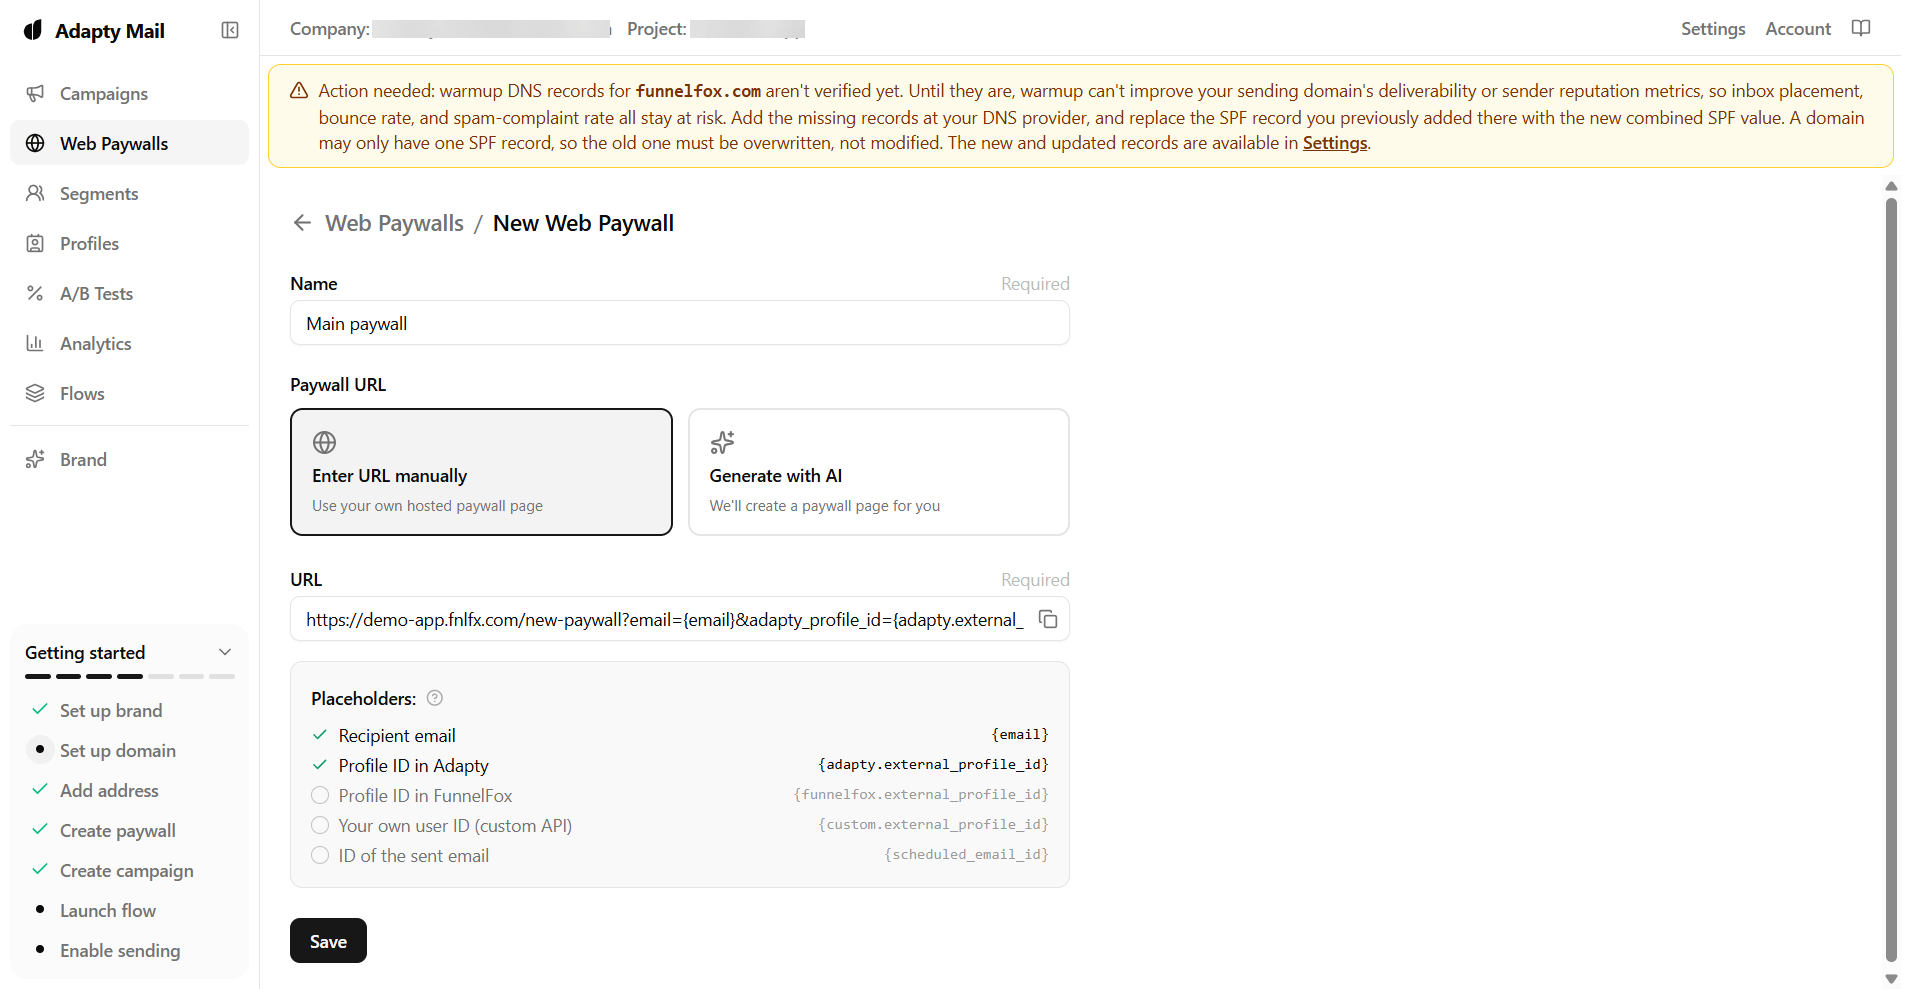 3. Click **Save**.
### 4. Create a campaign
1. Go to **Campaigns** in your Adapty Mail dashboard.
2. Click **Create** at the top right and enter your campaign details:
* **Name**: Your campaign title.
* **Web paywall**: Select the web paywall you created in the previous step.
* **Description**: Your optional campaign description.
3. Click **Generate emails**.
3. Click **Save**.
### 4. Create a campaign
1. Go to **Campaigns** in your Adapty Mail dashboard.
2. Click **Create** at the top right and enter your campaign details:
* **Name**: Your campaign title.
* **Web paywall**: Select the web paywall you created in the previous step.
* **Description**: Your optional campaign description.
3. Click **Generate emails**.
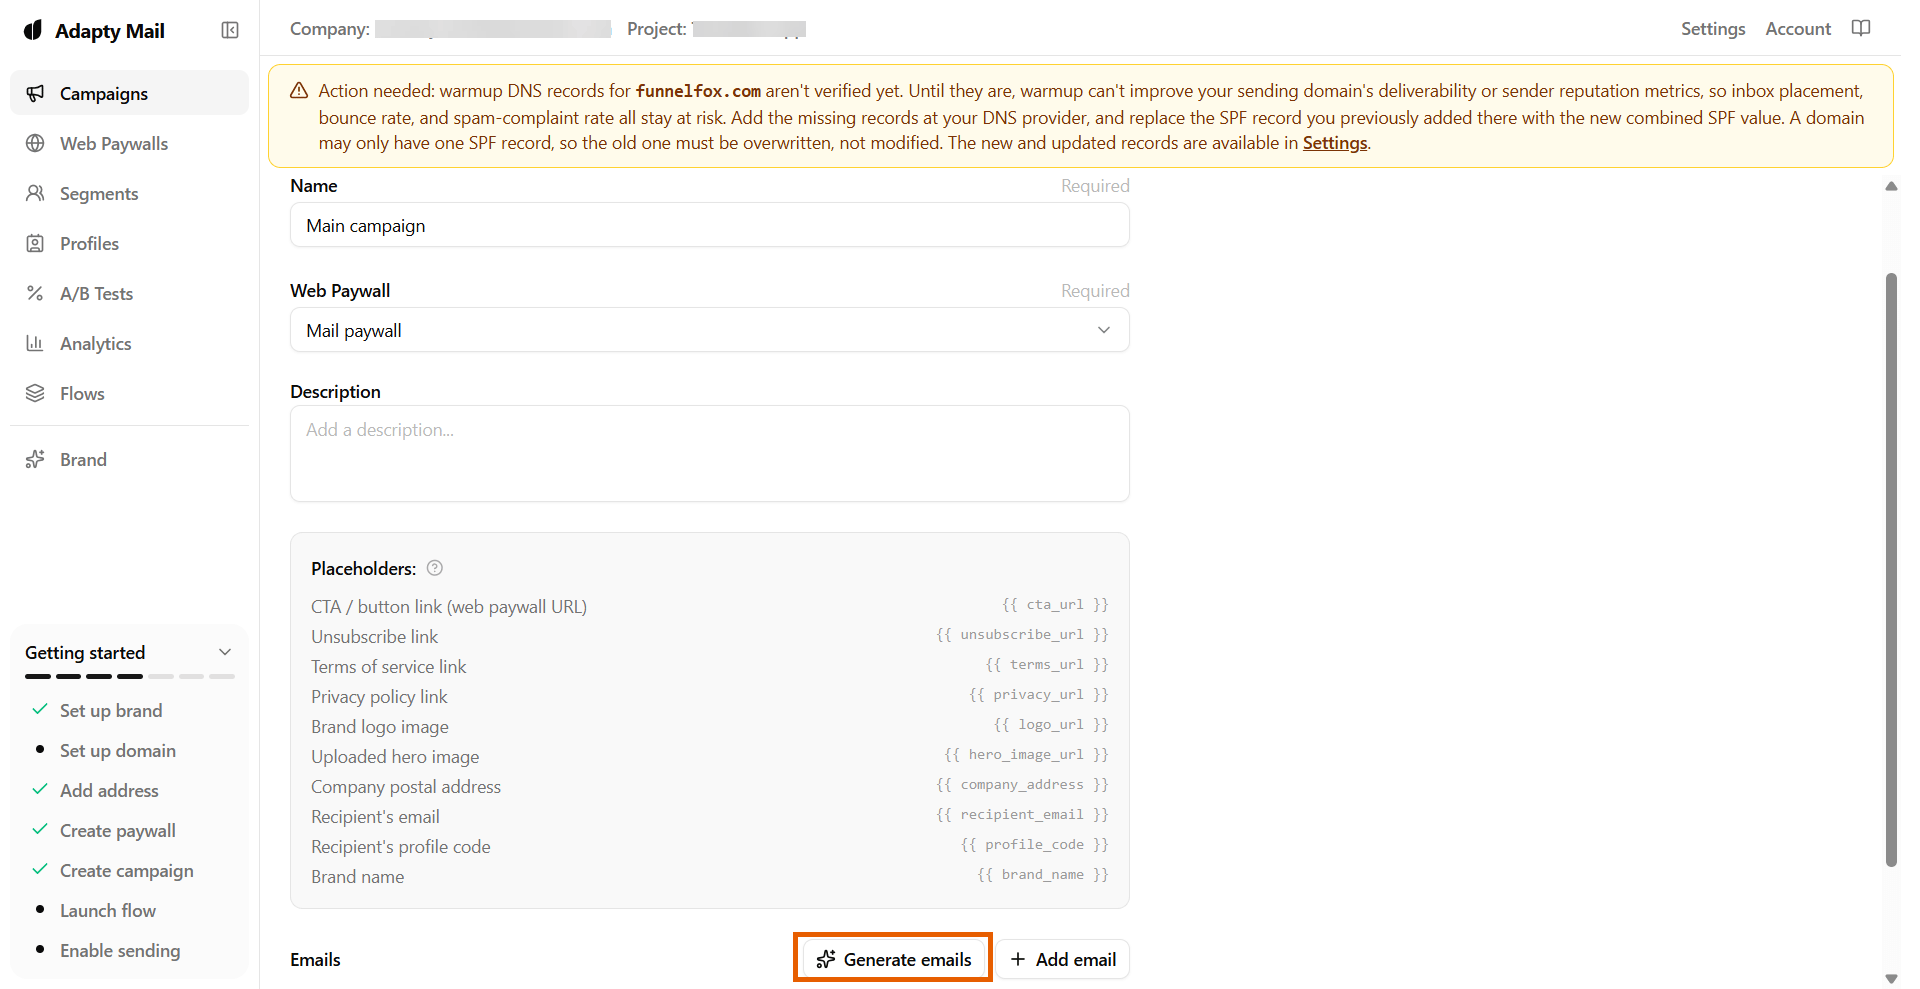 4. Select how emails are generated:
* **Tone**: Options are generated specifically for your app's category. Your
choice shapes subject lines, headlines, body copy, and calls to action across
every email. It doesn't affect layout or hero images.
* **Language**: Pick the email language.
* **Custom prompt**: Optional free-form instructions, up to 2,000 characters.
Add promo or audience details, must-have items, or extra tone direction the
presets can't capture.
* **Number of emails**: By default, the AI picks the count based on best
practices and your app context. Set the number manually if needed, between 1
and 15 emails.
4. Select how emails are generated:
* **Tone**: Options are generated specifically for your app's category. Your
choice shapes subject lines, headlines, body copy, and calls to action across
every email. It doesn't affect layout or hero images.
* **Language**: Pick the email language.
* **Custom prompt**: Optional free-form instructions, up to 2,000 characters.
Add promo or audience details, must-have items, or extra tone direction the
presets can't capture.
* **Number of emails**: By default, the AI picks the count based on best
practices and your app context. Set the number manually if needed, between 1
and 15 emails.
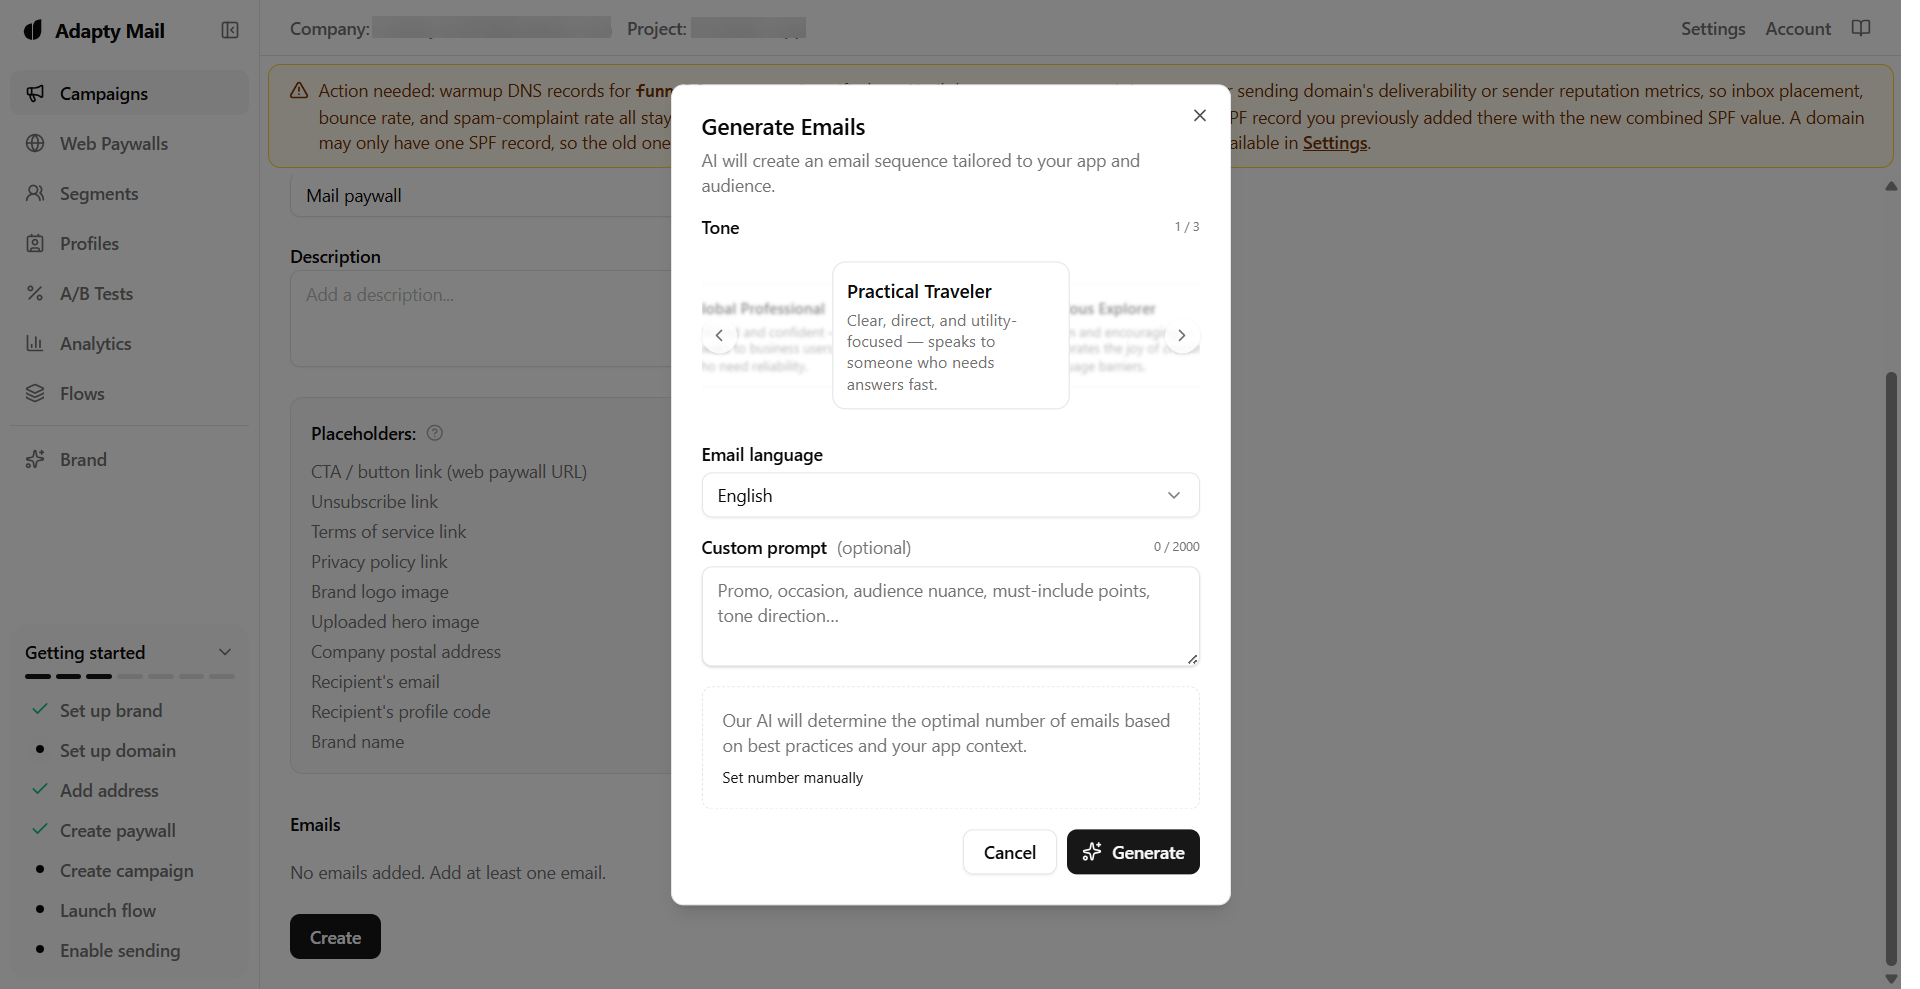 5. Click **Create**.
Review the generated emails now, or come back to them once the rest of the
integration is set up.
### 5. Create a flow
1. Go to [Flows](https://mail.adapty.io/flows/never-purchased) in your Adapty
Mail dashboard.
2. Select your trigger. Each tab represents a user segment that starts your
email campaign:
* **Never purchased**: Users who signed up but haven't made any purchase yet.
* **Renewal cancelled**: Users who turned off auto-renewal but still have an
active subscription. This covers both paid subscribers and trial users who
cancelled before conversion.
* **Billing issue**: Payment failed because of a declined or expired card, or
the subscription is in a grace period after a missed renewal.
* **Expired**: Subscription lapsed and access is gone.
* **Refunded**: Users who requested a refund after purchase.
5. Click **Create**.
Review the generated emails now, or come back to them once the rest of the
integration is set up.
### 5. Create a flow
1. Go to [Flows](https://mail.adapty.io/flows/never-purchased) in your Adapty
Mail dashboard.
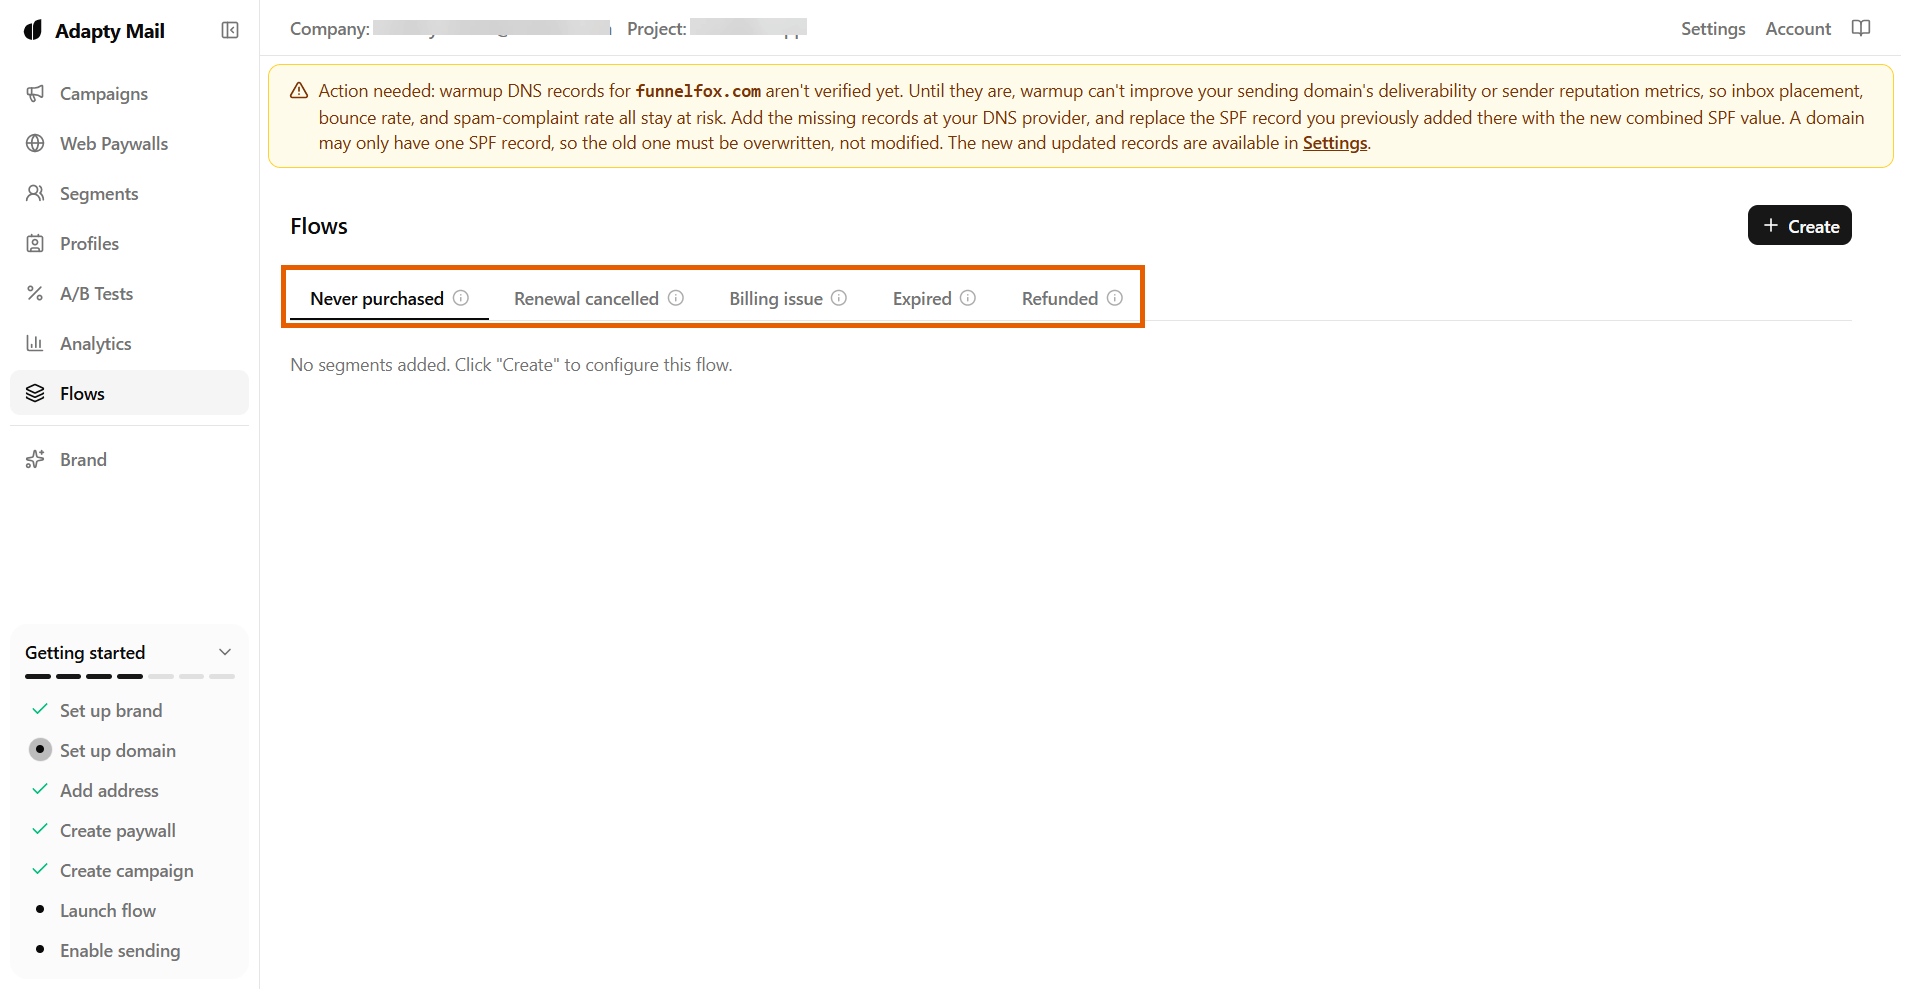
2. Select your trigger. Each tab represents a user segment that starts your
email campaign:
* **Never purchased**: Users who signed up but haven't made any purchase yet.
* **Renewal cancelled**: Users who turned off auto-renewal but still have an
active subscription. This covers both paid subscribers and trial users who
cancelled before conversion.
* **Billing issue**: Payment failed because of a declined or expired card, or
the subscription is in a grace period after a missed renewal.
* **Expired**: Subscription lapsed and access is gone.
* **Refunded**: Users who requested a refund after purchase.
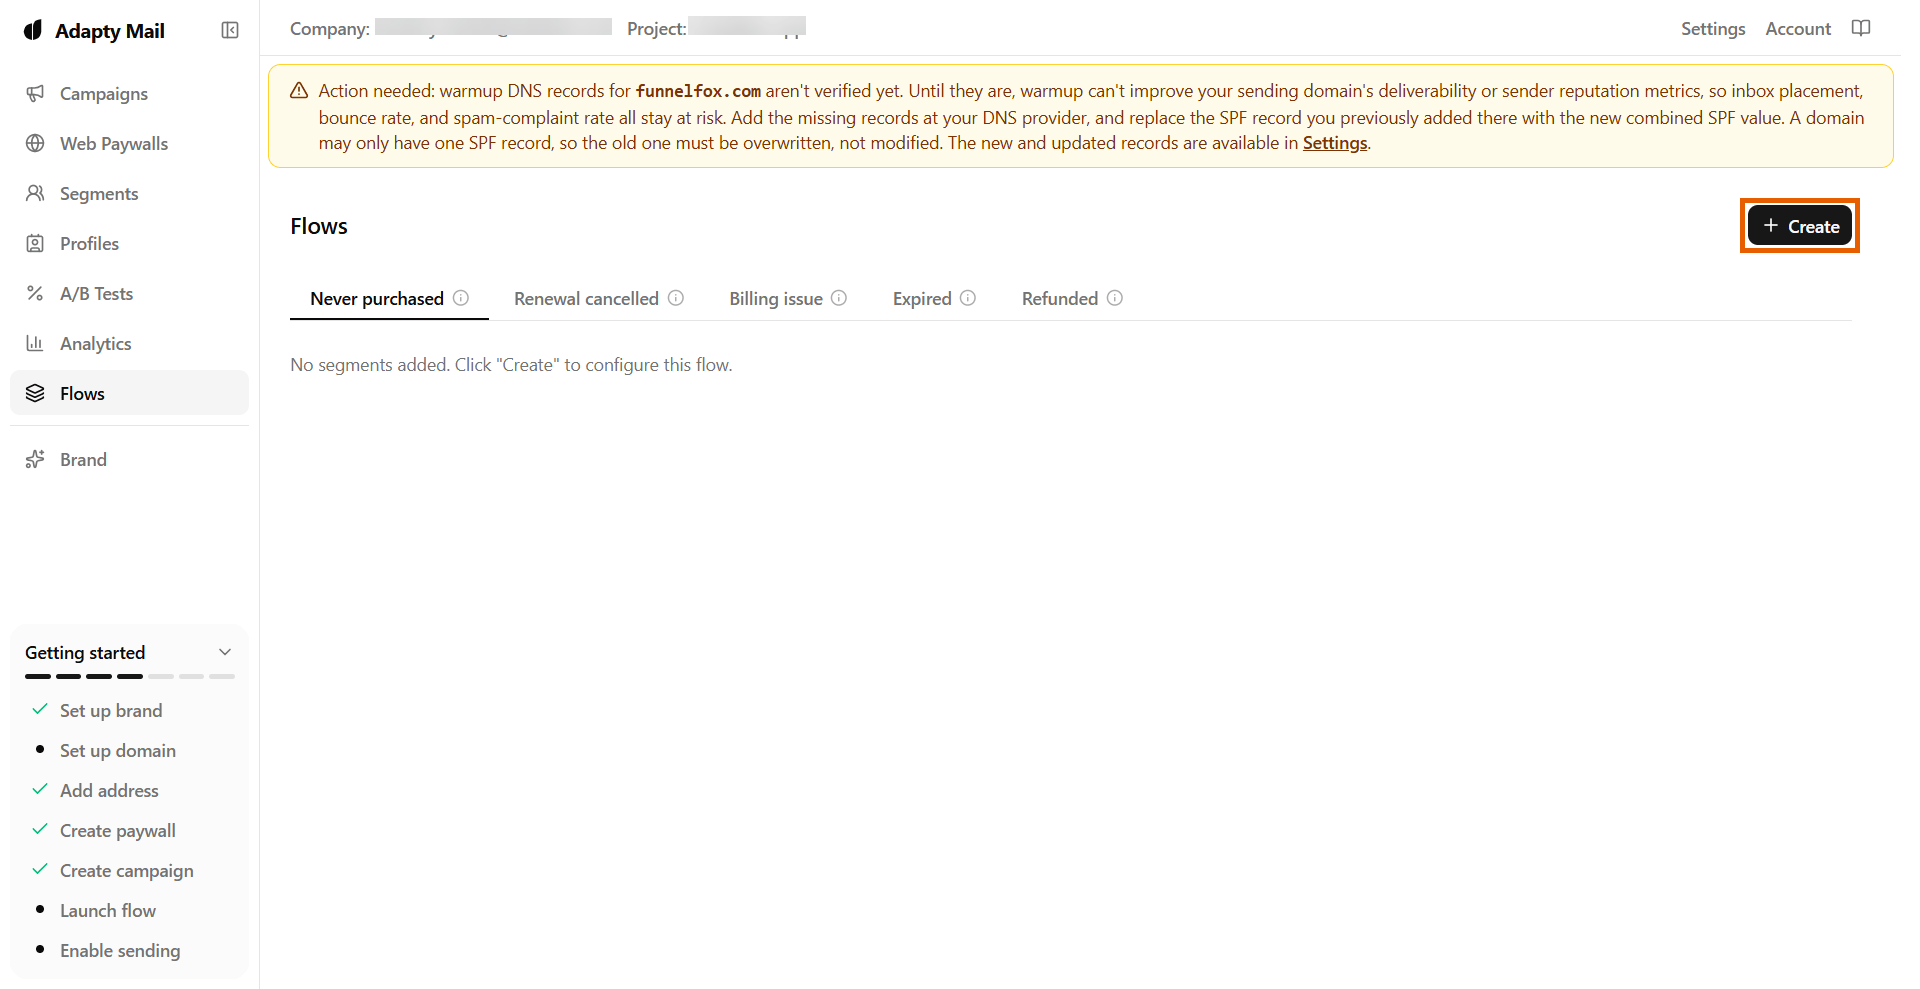
 3. Click **Create** from the tab you want to configure.
 4. Select how you create your flow:
* **Segment**: Select **All Users** to target everyone who hits this trigger,
or create a new segment based on profile attributes.
* **Content type**: Keep the default **Campaign**.
* **Campaign**: Select the campaign you just created.
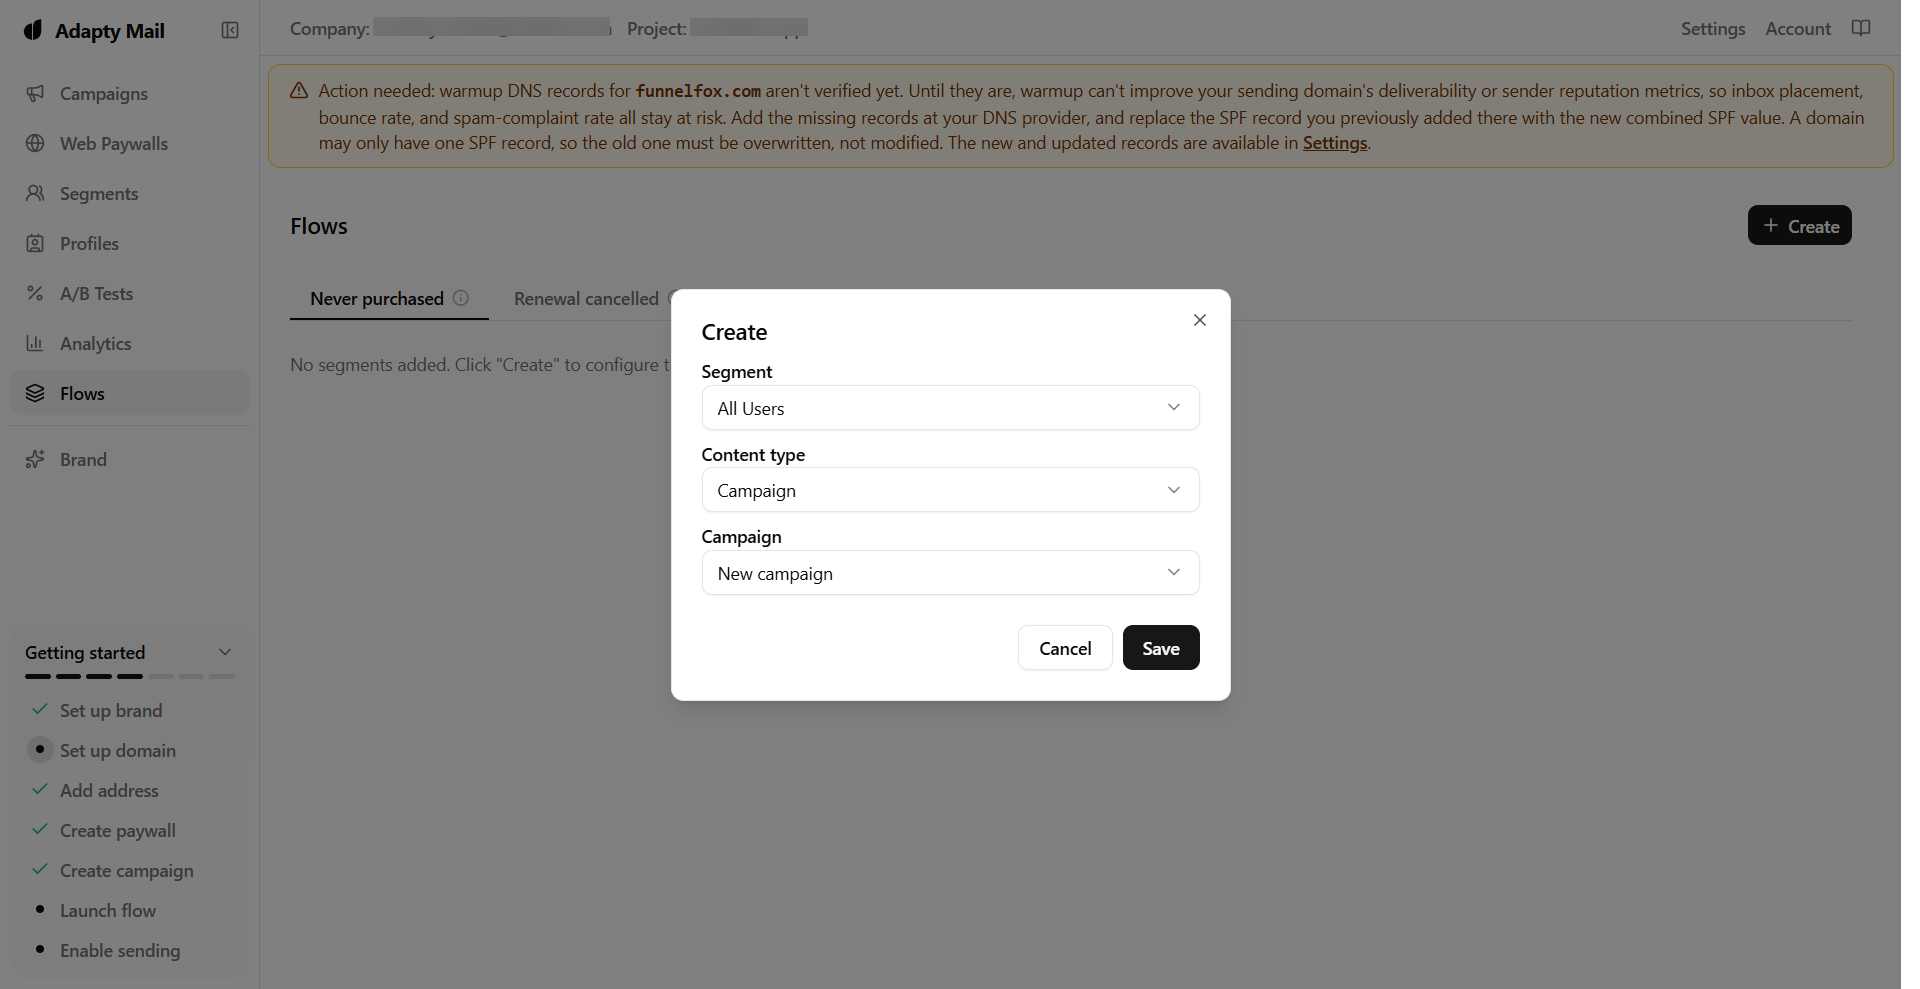
4. Select how you create your flow:
* **Segment**: Select **All Users** to target everyone who hits this trigger,
or create a new segment based on profile attributes.
* **Content type**: Keep the default **Campaign**.
* **Campaign**: Select the campaign you just created.
 5. Click **Save**.
FunnelFox forwards a profile whether or not the user ticked the marketing
consent checkbox in your funnel. The answer travels as the `email_consent`
attribute, so **All Users** includes leads who didn't consent. Build your
segment on `email_consent` if you need to honor it.
Two triggers depend on events FunnelFox can't always send:
* **Never purchased**: A \$0 Stripe intro offer sends no purchase event, so a
user who starts a free trial stays "never purchased" until their first real
charge.
* **Refunded**: Only refunds issued through FunnelFox are forwarded. A refund
you make directly in the PSP
dashboard never reaches Adapty Mail, so campaigns keep treating that user as
a customer.
### 6. Connect to FunnelFox
1. Go to **Settings > Project** in your Adapty Mail dashboard.
2. Copy the **Secret key**.
5. Click **Save**.
FunnelFox forwards a profile whether or not the user ticked the marketing
consent checkbox in your funnel. The answer travels as the `email_consent`
attribute, so **All Users** includes leads who didn't consent. Build your
segment on `email_consent` if you need to honor it.
Two triggers depend on events FunnelFox can't always send:
* **Never purchased**: A \$0 Stripe intro offer sends no purchase event, so a
user who starts a free trial stays "never purchased" until their first real
charge.
* **Refunded**: Only refunds issued through FunnelFox are forwarded. A refund
you make directly in the PSP
dashboard never reaches Adapty Mail, so campaigns keep treating that user as
a customer.
### 6. Connect to FunnelFox
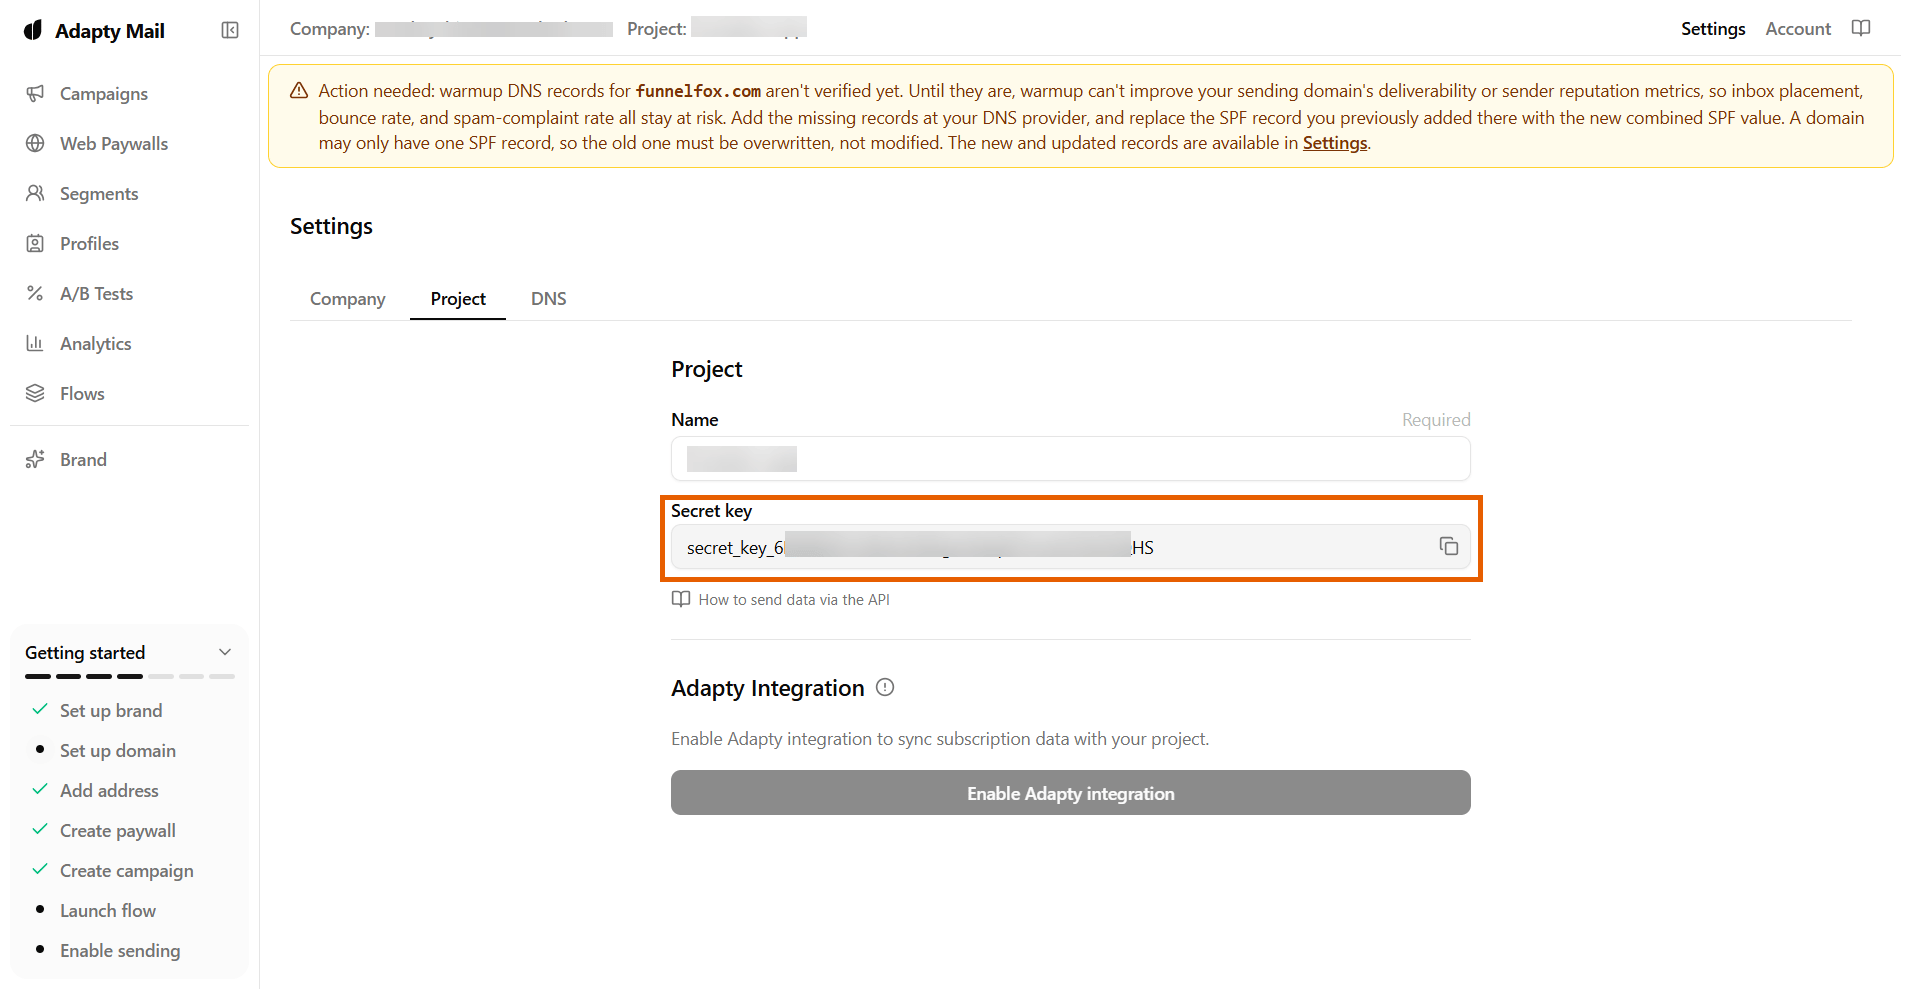
1. Go to **Settings > Project** in your Adapty Mail dashboard.
2. Copy the **Secret key**.
 3. Go to [Integrations > Adapty Mail](https://app.funnelfox.com/integrations/adapty_mail)
in FunnelFox.
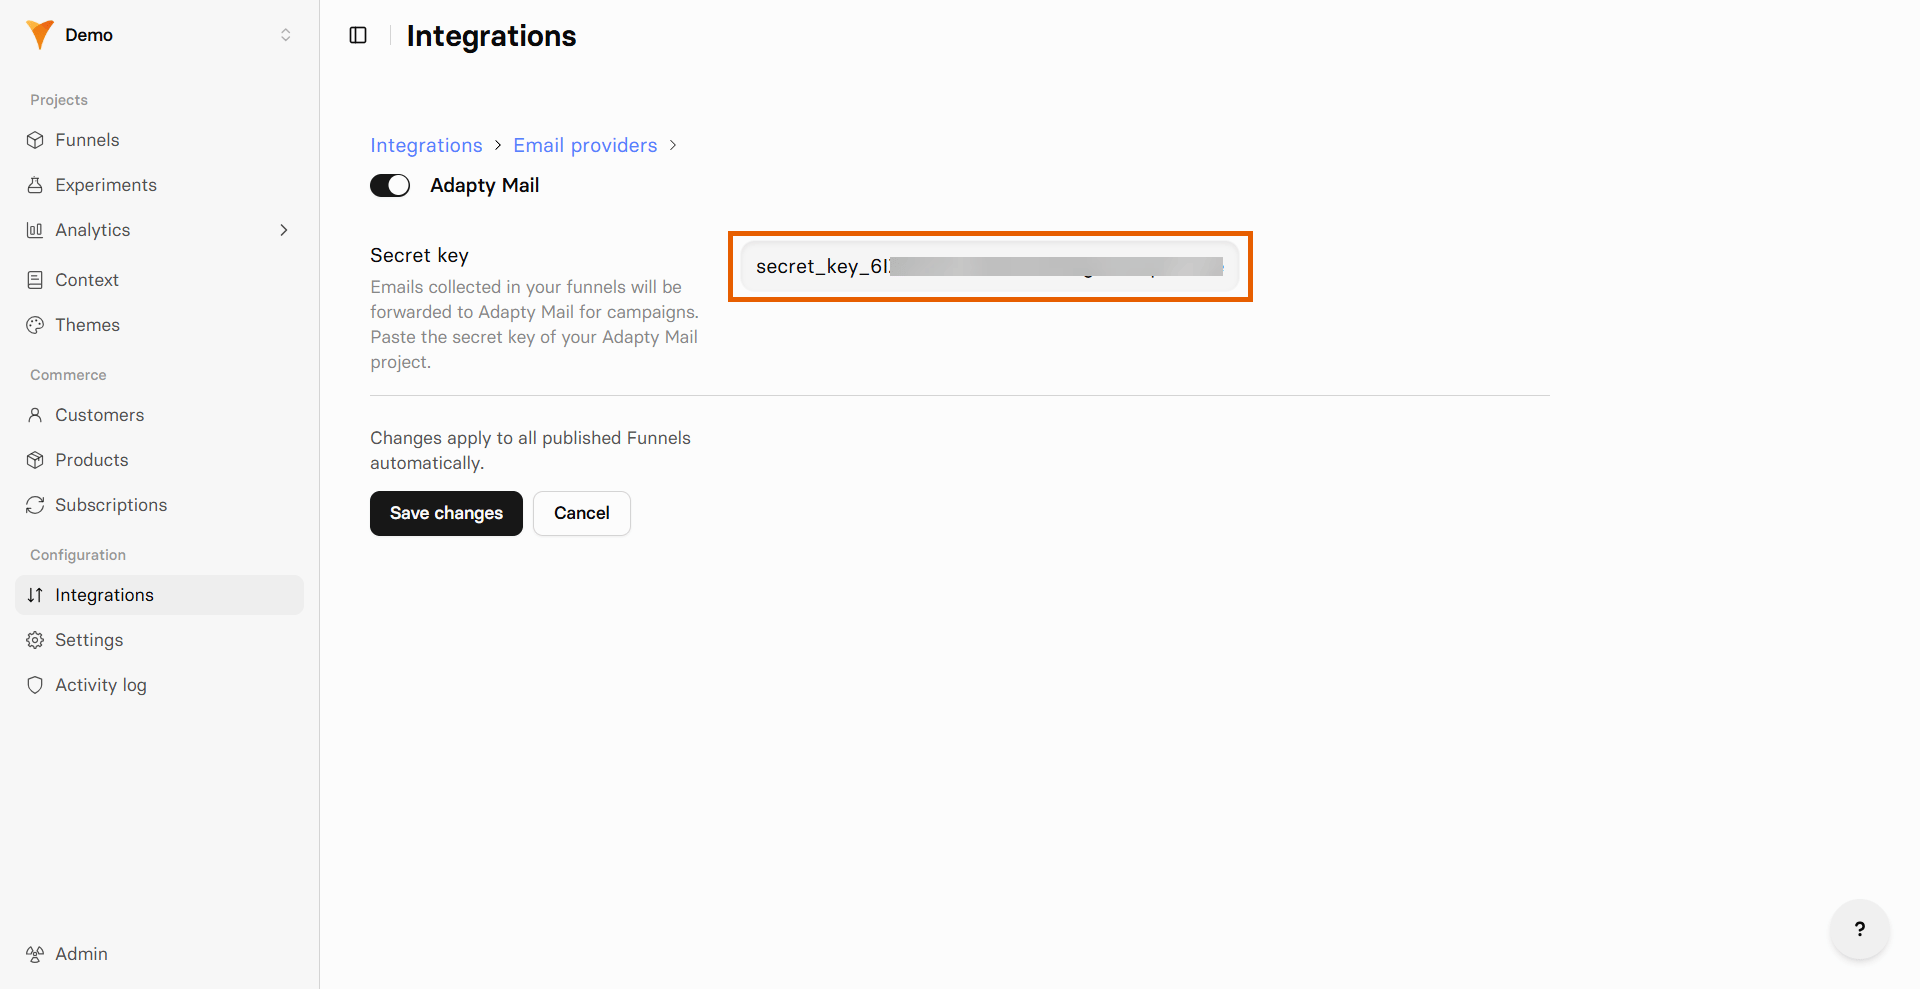
4. Paste your key into **Secret key** and click **Save changes**.
3. Go to [Integrations > Adapty Mail](https://app.funnelfox.com/integrations/adapty_mail)
in FunnelFox.
4. Paste your key into **Secret key** and click **Save changes**.
 Your setup is complete. Emails collected in your funnels now flow into your Adapty Mail campaigns.
Preview and test funnel traffic is forwarded as real profiles. Use a throwaway
address or a separate Adapty Mail project when you test.
Your setup is complete. Emails collected in your funnels now flow into your Adapty Mail campaigns.
Preview and test funnel traffic is forwarded as real profiles. Use a throwaway
address or a separate Adapty Mail project when you test.