> ## Documentation Index
> Fetch the complete documentation index at: https://funnelfox.com/docs/llms.txt
> Use this file to discover all available pages before exploring further.
# FunnelFox Protect
> Reduce chargebacks with FunnelFox Protect. Automatic fraud detection, dispute management, and revenue protection for web payments.
FunnelFox Protect alerts you about pending chargeback disputes before they reach card networks, reducing the risk of your payment provider account being blocked.
If you want to use this tool with FunnelFox Billing, see the [article on dispute prevention in FunnelFox Billing](/billing/disputes).
This is a paid service. Please contact your Customer Success Manager to enable it.
 ## How it works
FunnelFox Protect intercepts disputes before they become chargebacks. Compare the two scenarios below to see the difference.
**Without FunnelFox Protect:**
Customer files a transaction dispute with their bank.
Card network processes the chargeback and withdraws funds.
PSP blocks your merchant account due to frequent chargebacks.
**With FunnelFox Protect enabled:**
Customer files a transaction dispute with their card issuer.
FunnelFox Protect automatically refunds the transaction before it becomes a chargeback.
Your merchant account remains in good standing since no chargeback is recorded with the card network.
## Setup
To protect your merchant account, you need to enable the service and configure your payment provider details. This allows FunnelFox Protect to monitor and respond to disputes automatically.
Before you start, ask your Solutions Manager to enable FunnelFox Protect, then follow the steps below.
### 1. Configure integration
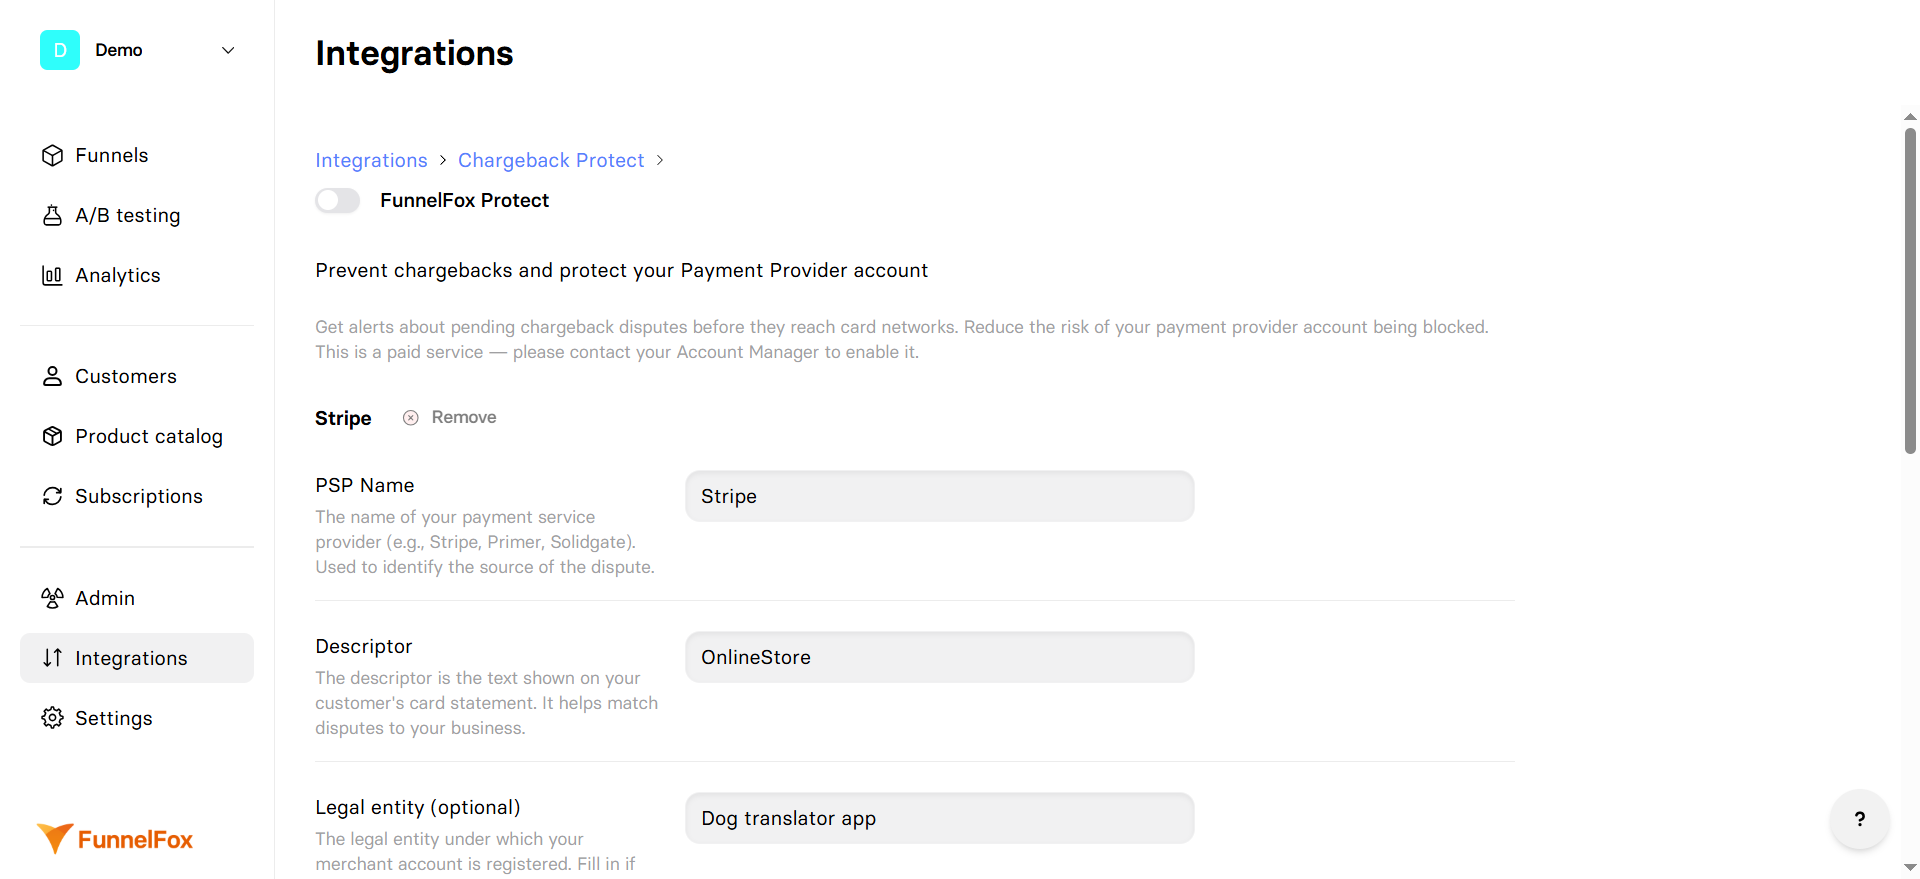
1. Go to [Integrations > FunnelFox Protect](https://app.funnelfox.com/integrations/protect).
2. Configure the following fields:
* **PSP Name**: Your payment service provider name (e.g., Stripe, Primer, Solidgate). Used to identify the dispute source.
* **Descriptor**: Text shown on your customer's card statement. Helps match disputes to your business.
* **Legal entity (optional)**: Legal entity under which your merchant account is registered. Fill in if you operate multiple companies.
* **Internal ID (optional)**: Your internal merchant or account identifier. Can help with integration and tracking.
* **Visa CAID**: Unique Visa Card Acceptor ID for your merchant account. Used for tracking and handling Visa card disputes.
* **Visa BIN**: Bank Identification Number for your Visa transactions. The first 6 digits of the card number, used for payment routing.
* **MCC**: Merchant Category Code — a four-digit code that defines your business category for payment systems.
3. Click **Add alert for PSP** to set up FunnelFox Protect for another PSP.
4. Click **Save changes**.
### 2. Create restricted key
1. Log in to your [Stripe dashboard](https://dashboard.stripe.com/login).
2. Go to **Developers > API keys** at the bottom left.
## How it works
FunnelFox Protect intercepts disputes before they become chargebacks. Compare the two scenarios below to see the difference.
**Without FunnelFox Protect:**
Customer files a transaction dispute with their bank.
Card network processes the chargeback and withdraws funds.
PSP blocks your merchant account due to frequent chargebacks.
**With FunnelFox Protect enabled:**
Customer files a transaction dispute with their card issuer.
FunnelFox Protect automatically refunds the transaction before it becomes a chargeback.
Your merchant account remains in good standing since no chargeback is recorded with the card network.
## Setup
To protect your merchant account, you need to enable the service and configure your payment provider details. This allows FunnelFox Protect to monitor and respond to disputes automatically.
Before you start, ask your Solutions Manager to enable FunnelFox Protect, then follow the steps below.
### 1. Configure integration
1. Go to [Integrations > FunnelFox Protect](https://app.funnelfox.com/integrations/protect).
2. Configure the following fields:
* **PSP Name**: Your payment service provider name (e.g., Stripe, Primer, Solidgate). Used to identify the dispute source.
* **Descriptor**: Text shown on your customer's card statement. Helps match disputes to your business.
* **Legal entity (optional)**: Legal entity under which your merchant account is registered. Fill in if you operate multiple companies.
* **Internal ID (optional)**: Your internal merchant or account identifier. Can help with integration and tracking.
* **Visa CAID**: Unique Visa Card Acceptor ID for your merchant account. Used for tracking and handling Visa card disputes.
* **Visa BIN**: Bank Identification Number for your Visa transactions. The first 6 digits of the card number, used for payment routing.
* **MCC**: Merchant Category Code — a four-digit code that defines your business category for payment systems.
3. Click **Add alert for PSP** to set up FunnelFox Protect for another PSP.
4. Click **Save changes**.
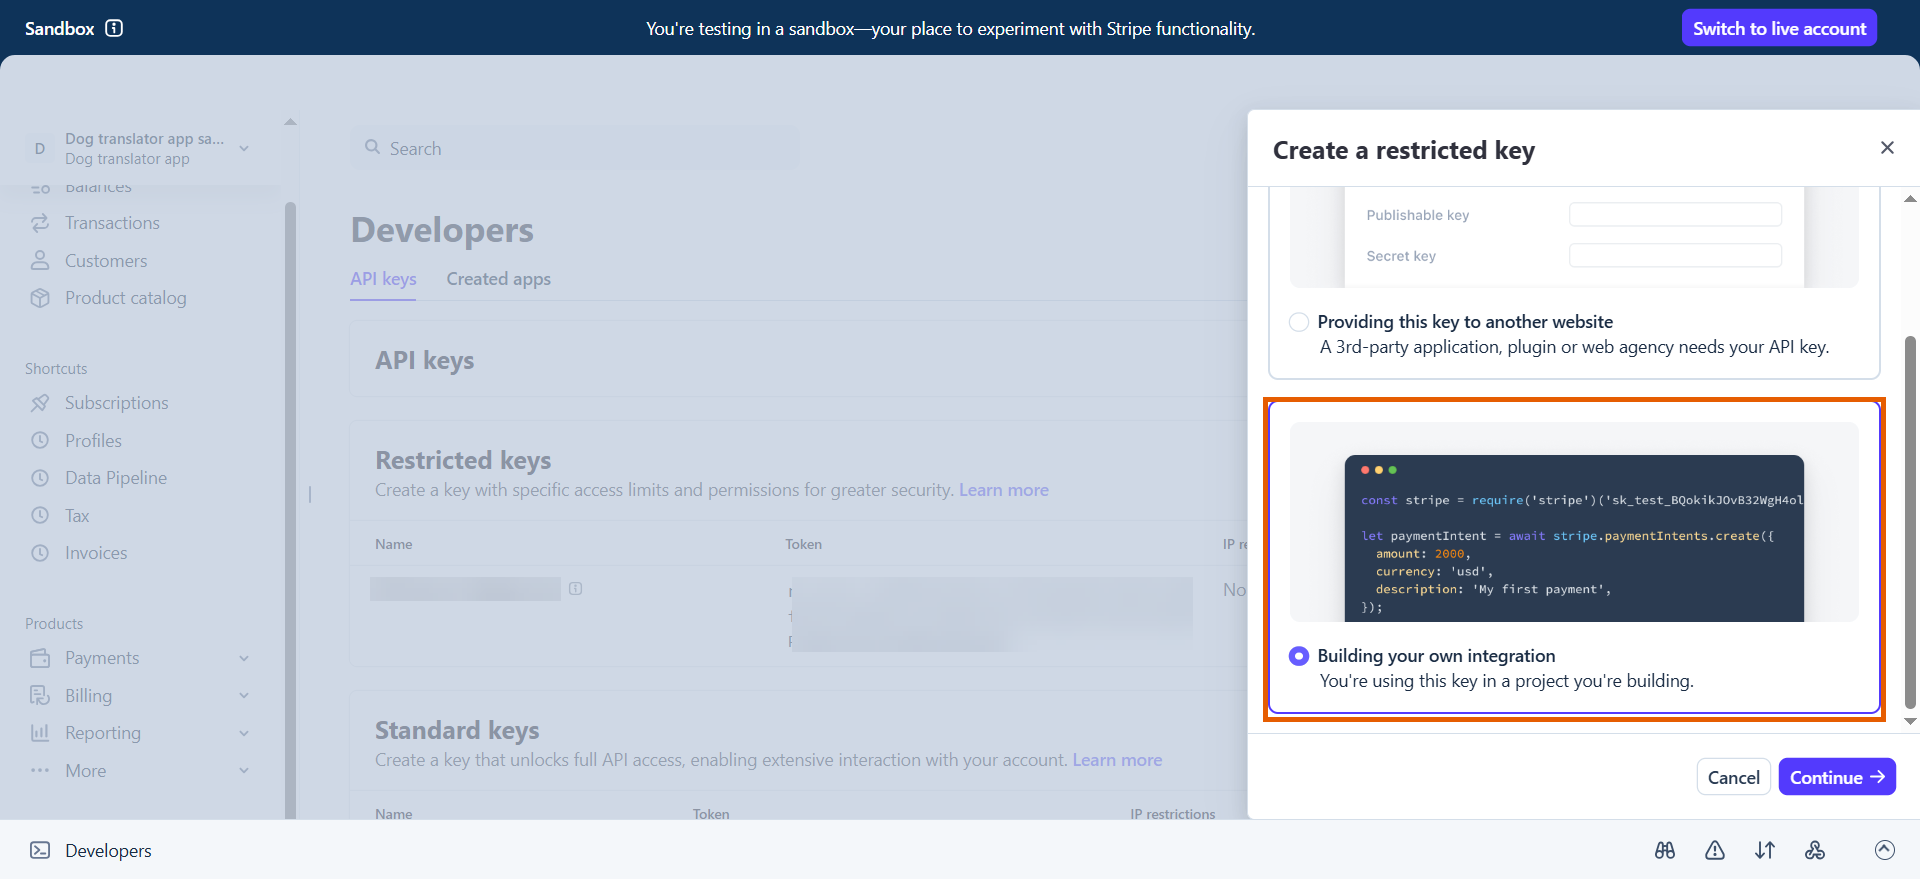
### 2. Create restricted key
1. Log in to your [Stripe dashboard](https://dashboard.stripe.com/login).
2. Go to **Developers > API keys** at the bottom left.
 3. Click **+ Create restricted key**.
 4. Select **Building your own integration** and click **Continue**.
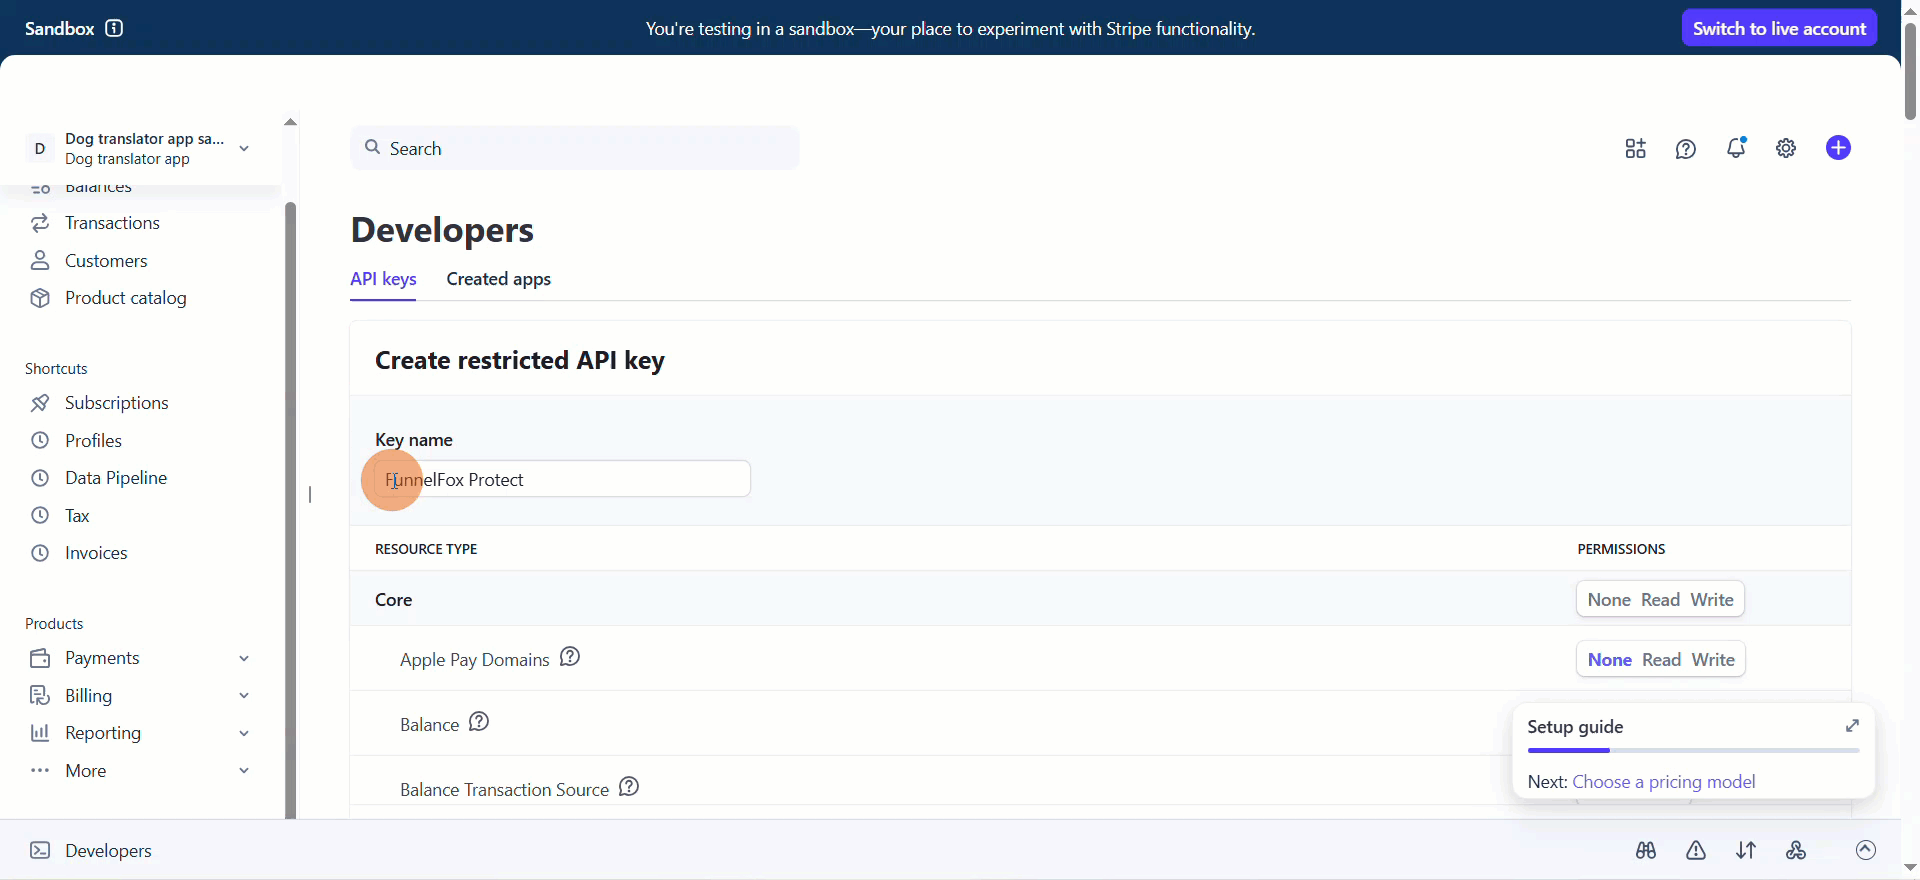
 5. Name your key.
6. Set the following permissions:
* **Charges and refunds**: Write
* **Invoices**: Read
* **Credit notes**: Read
* **Subscriptions**: Write
* **Connect category**: Read
5. Name your key.
6. Set the following permissions:
* **Charges and refunds**: Write
* **Invoices**: Read
* **Credit notes**: Read
* **Subscriptions**: Write
* **Connect category**: Read
 7. Click **Create key**.
8. Provide the key to your Solutions Manager.
Your setup is complete. Due to the Visa and MasterCard application review process, this integration will go live in approximately two weeks.
7. Click **Create key**.
8. Provide the key to your Solutions Manager.
Your setup is complete. Due to the Visa and MasterCard application review process, this integration will go live in approximately two weeks.