> ## Documentation Index
> Fetch the complete documentation index at: https://funnelfox.com/docs/llms.txt
> Use this file to discover all available pages before exploring further.
# Supabase authentication
> Set up Supabase Authentication in FunnelFox. Enable email and social login for your web funnel users.
The [Supabase integration](https://app.funnelfox.com/integrations/supabase) enables multiple authentication methods while maintaining a consistent user identity.
## How it works
FunnelFox authenticates users directly within your funnels, giving each user a stable Supabase UID. It will either:
* **Create a new Supabase user (sign up)**: If no user exists for the customer's credentials.
* **Authenticate an existing Supabase user (sign in)**: If the user was created during a previous funnel experience and signs in using an OAuth button.
Once the user is authenticated, your app takes over the in-app authentication flow.
The email entered by the customer (via Email input or OAuth) is saved as the `{{email}}` funnel variable. You can use it in upstream screens, for example, in deep links.
### Email & Password authentication
Email-based authentication occurs when the customer navigates from the authentication screen with email/password inputs filled out.
**Sign up:**
When a customer submits their credentials in a funnel, FunnelFox automatically handles Supabase user creation:
* FunnelFox creates a Supabase user with email and password-based authentication.
* By default, a secure random password is generated for the user.
* If the same screen includes a Password input element, that value replaces the generated password.
For the Email/Password sign up, we recommend using the Password input element. If you rely on the generated random password, it won't be accessible to the user, so you'll need to implement a [password reset flow](https://supabase.com/docs/guides/auth/passwords#resetting-a-password) during the in-app authentication step.
**Sign in:**
Email-based sign in is not currently supported. This feature is under development.
### OAuth authentication
Unlike email/password authentication, OAuth works right when the customer uses the OAuth button.
OAuth providers enable seamless social authentication within your funnels:
* Enable OAuth providers (e.g., Google or Apple) in Supabase and add OAuth buttons in the Editor.
* Users receive a secure and seamless authentication experience:
* If it's the user's first time, Supabase creates the account.
* If the account already exists, Supabase signs them in using the same OAuth buttons.
### User identification
The Supabase UID serves as the canonical identifier for each authenticated user within FunnelFox. It is stored on the user's profile and available to your app after authentication.
## Setup
Complete the Supabase integration by creating a Supabase project and connecting it to FunnelFox.
Only one authentication integration can be enabled at a time. If you have the Firebase integration enabled, disable it first in [Integrations > Firebase](https://app.funnelfox.com/integrations/firebase) before continuing.
### 1. Create Supabase project
Start by setting up a new project in the [Supabase dashboard](https://supabase.com/dashboard).
1. Click **+ New project**.
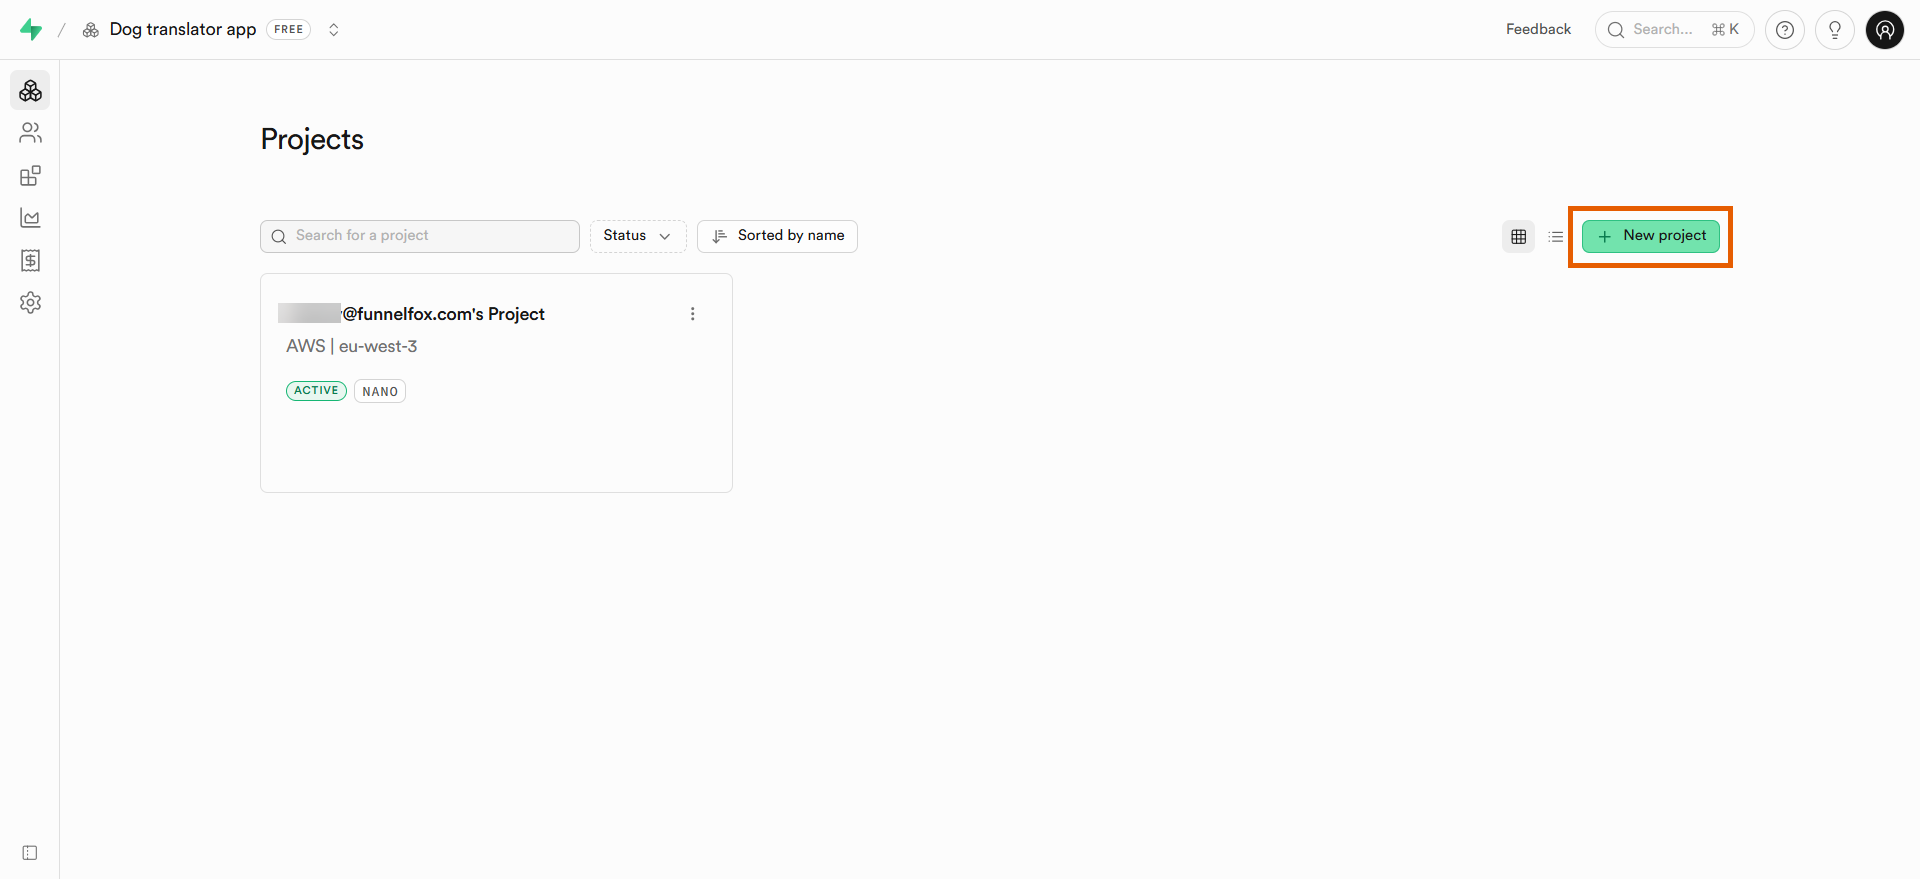 2. Name your project and set a database password.
3. Click **Create new project**.
### 2. Configure auth providers
Email/Password is enabled by default and requires no additional setup.
Select an OAuth provider to configure.
Google OAuth provides seamless authentication using Google accounts. You'll configure your Google Cloud console to authorize your FunnelFox domain, then enable the provider in Supabase.
You need an existing project in the [Google Cloud console](https://console.cloud.google.com/). If you don't have one, create it before continuing.
**Google Cloud console configuration**
You will need your full project URL for this step. Go to [Settings > Domains](https://app.funnelfox.com/settings/domains) in your FunnelFox project and copy your project URL, e.g. `https://demo-app.fnlfx.com`.
1. Go to **APIs & Services > Credentials** from the **Quick access** section.
2. Name your project and set a database password.
3. Click **Create new project**.
### 2. Configure auth providers
Email/Password is enabled by default and requires no additional setup.
Select an OAuth provider to configure.
Google OAuth provides seamless authentication using Google accounts. You'll configure your Google Cloud console to authorize your FunnelFox domain, then enable the provider in Supabase.
You need an existing project in the [Google Cloud console](https://console.cloud.google.com/). If you don't have one, create it before continuing.
**Google Cloud console configuration**
You will need your full project URL for this step. Go to [Settings > Domains](https://app.funnelfox.com/settings/domains) in your FunnelFox project and copy your project URL, e.g. `https://demo-app.fnlfx.com`.
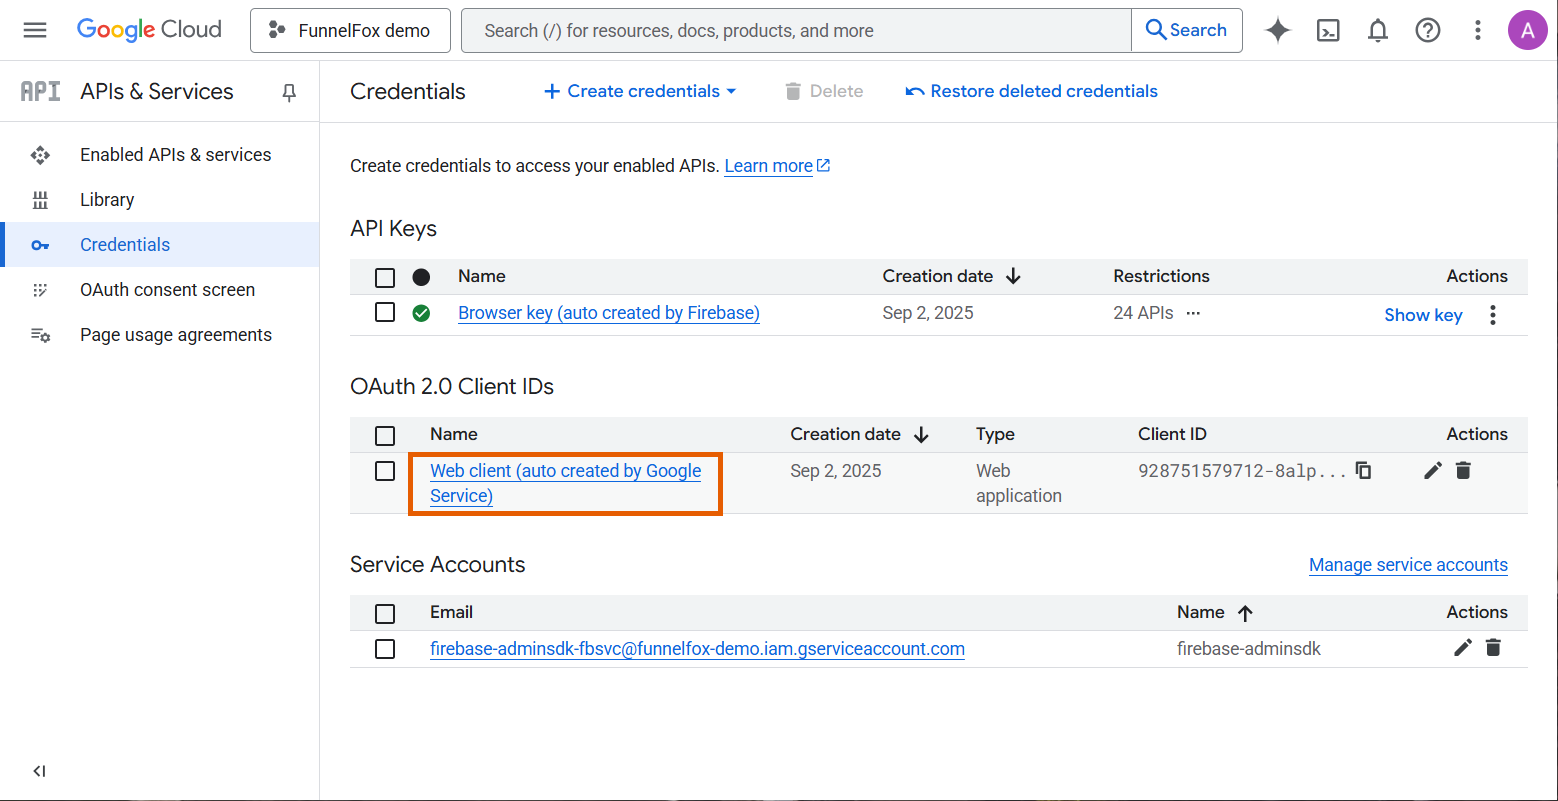
1. Go to **APIs & Services > Credentials** from the **Quick access** section.
 2. Open the web client auto-created by Google Service under **OAuth 2.0 Client IDs**.
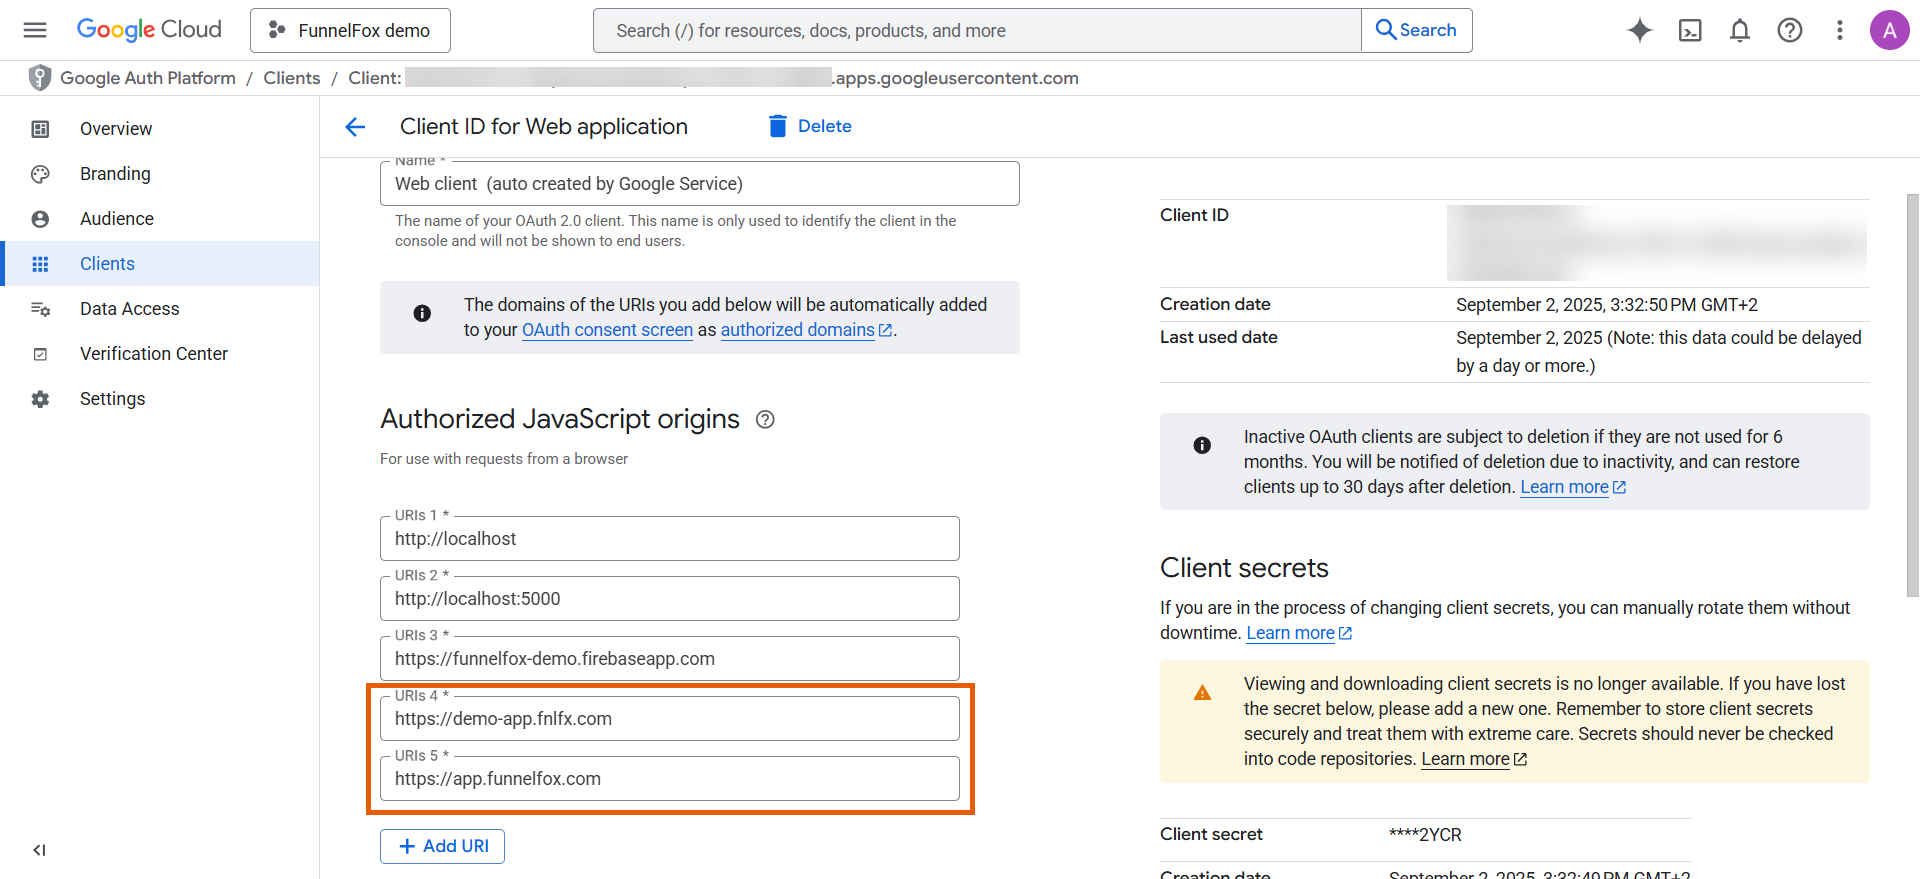
 3. Click **Add URL** twice under **Authorized JavaScript origins**, and set up the following two fields:
* Paste your full project URL.
* Paste `https://app.funnelfox.com`.
3. Click **Add URL** twice under **Authorized JavaScript origins**, and set up the following two fields:
* Paste your full project URL.
* Paste `https://app.funnelfox.com`.
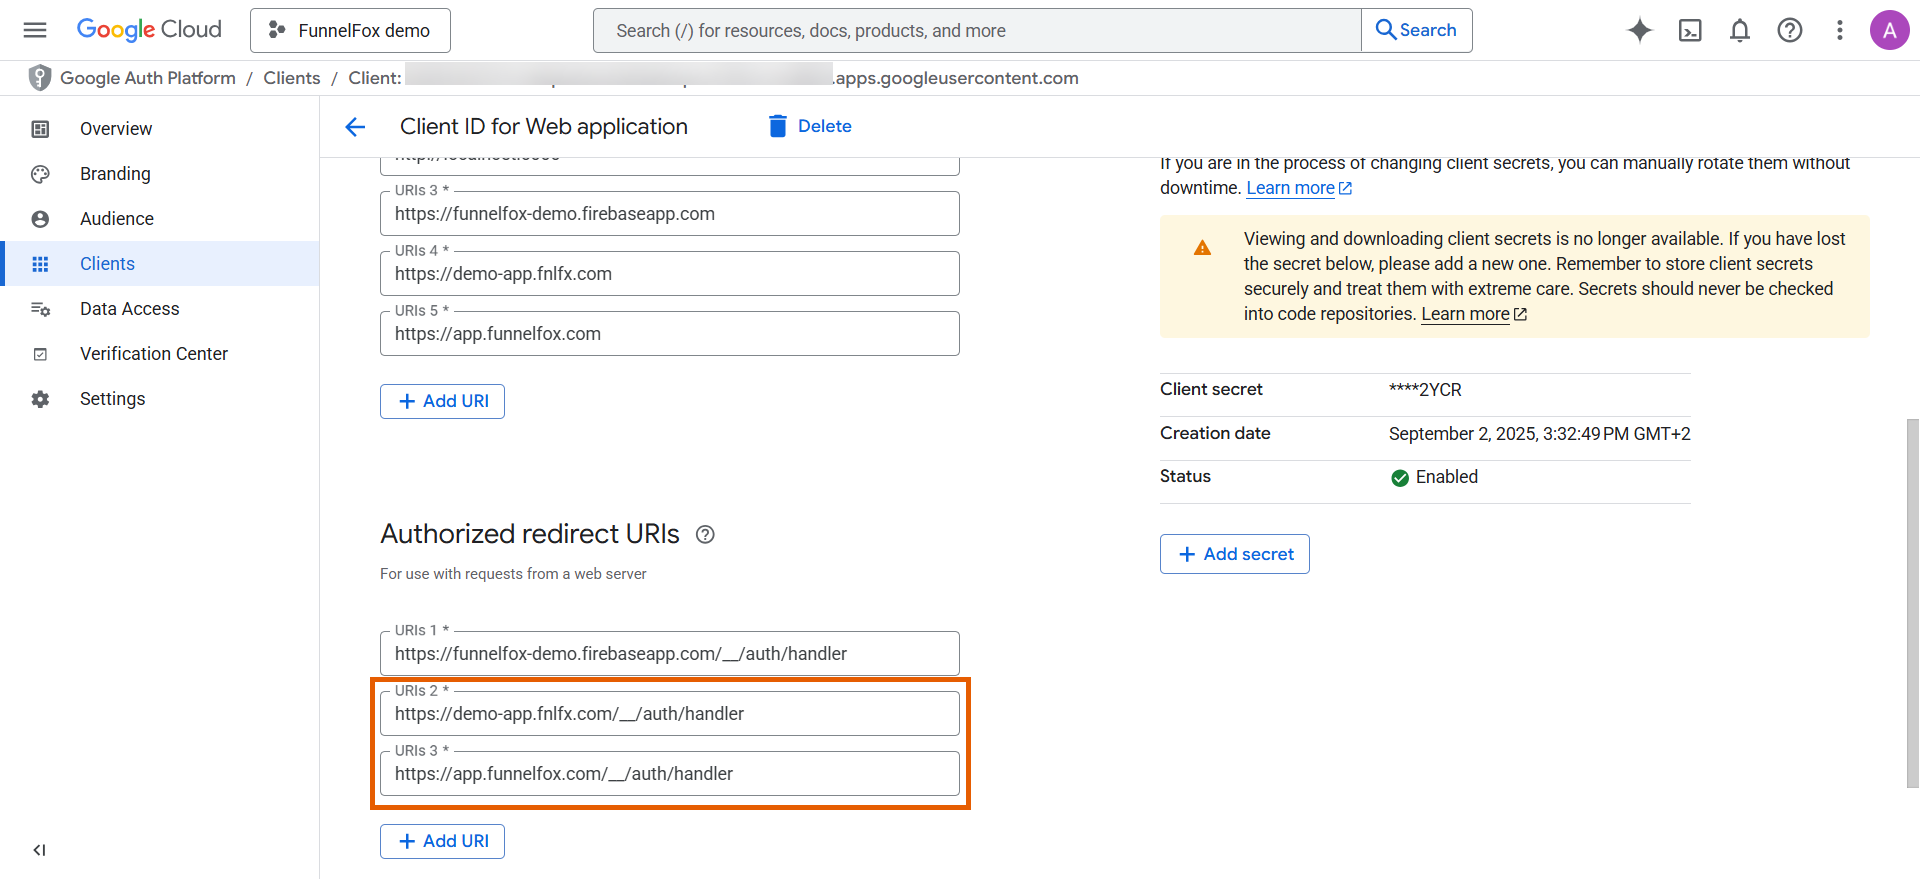
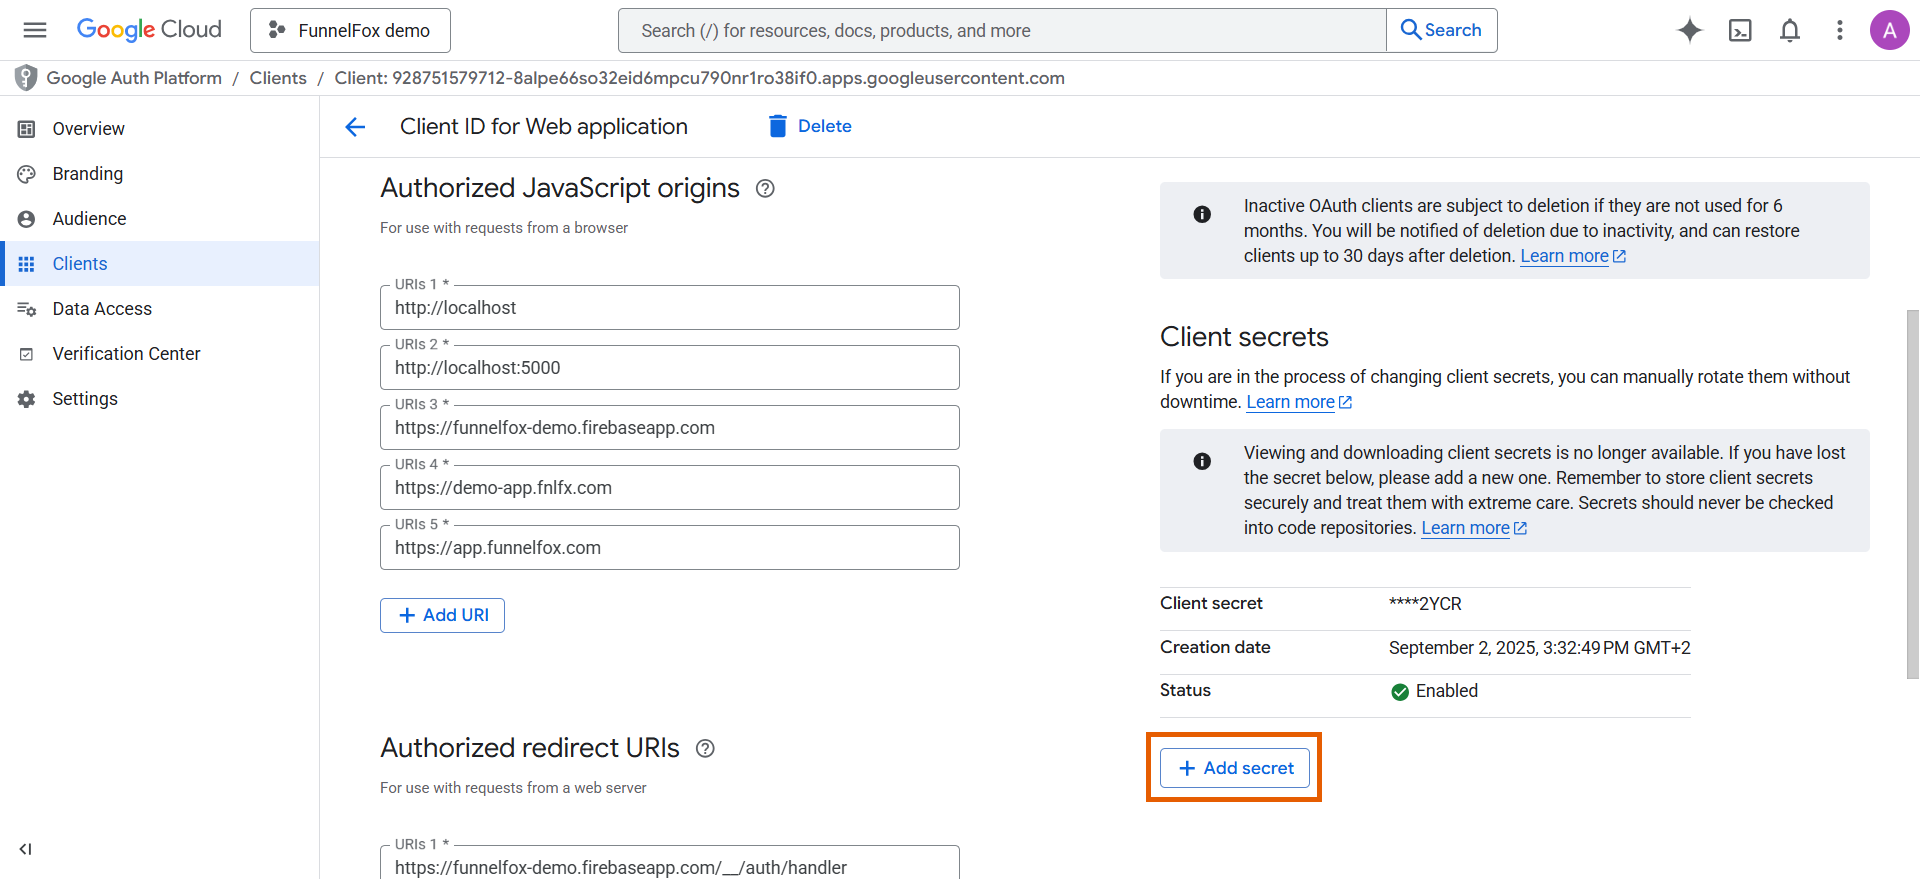
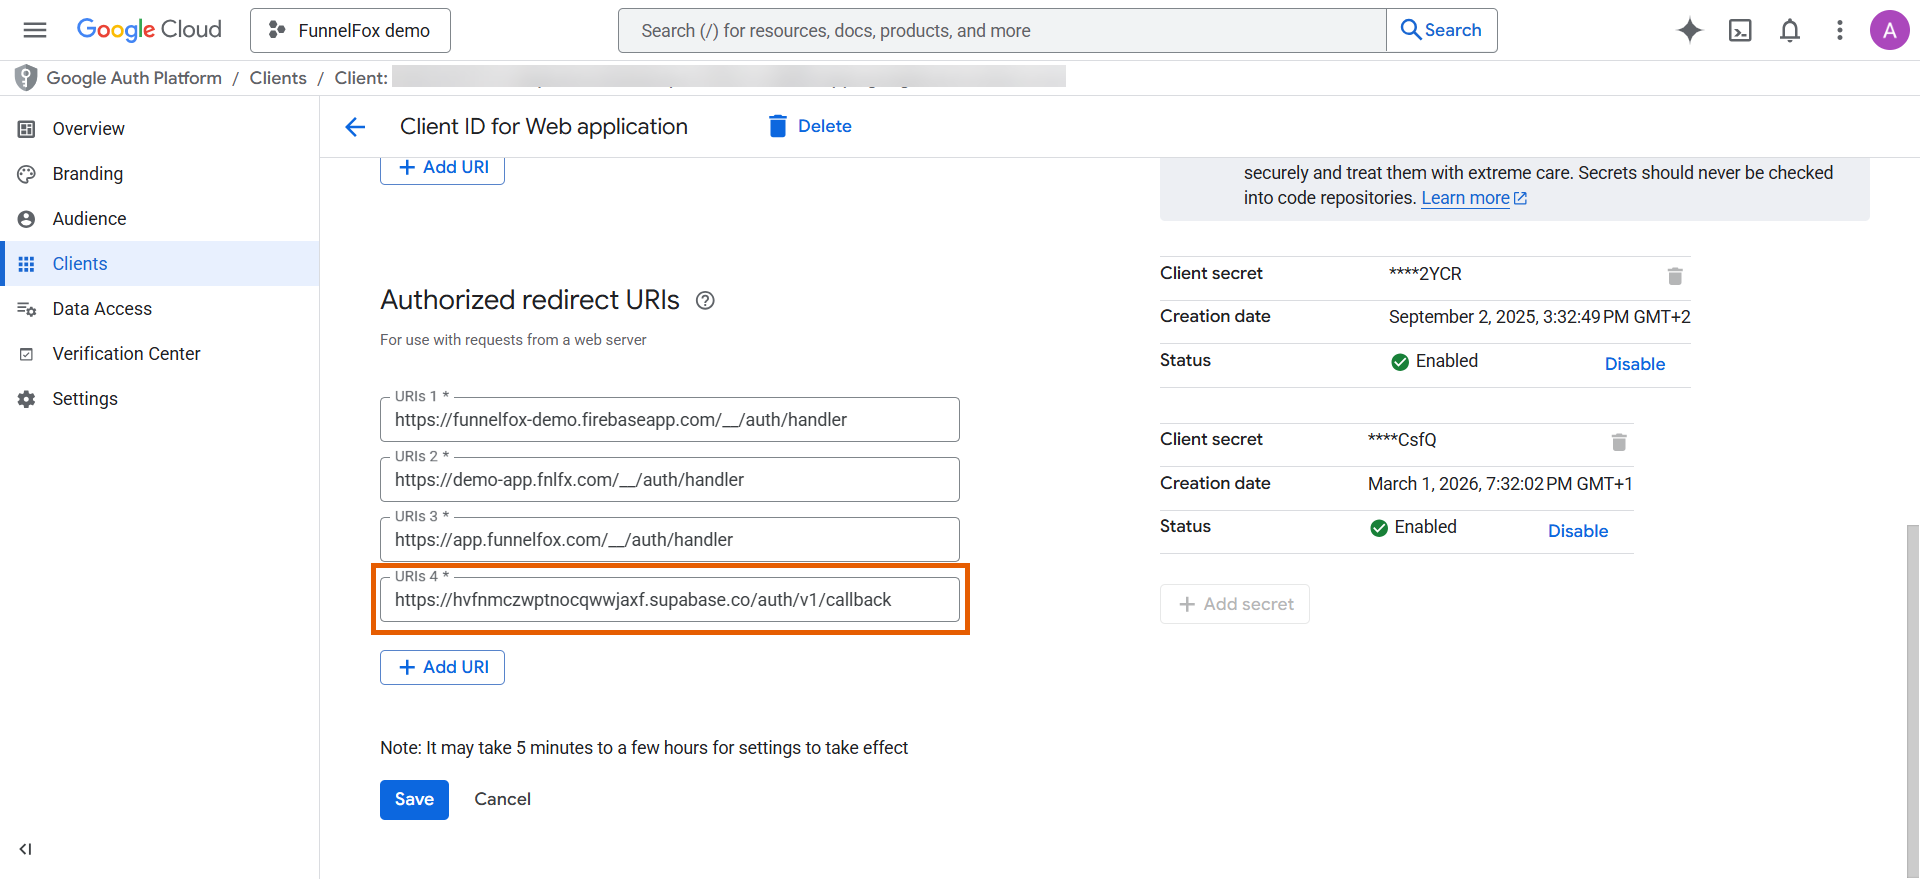
 4. Click **Add URL** twice under **Authorized redirect URIs**, and set up the following two fields:
* Paste your full project URL + `/__/auth/handler`. Your final URL will look like `https://demo-app.fnlfx.com/__/auth/handler`.
* Paste `https://app.funnelfox.com/__/auth/handler`.
4. Click **Add URL** twice under **Authorized redirect URIs**, and set up the following two fields:
* Paste your full project URL + `/__/auth/handler`. Your final URL will look like `https://demo-app.fnlfx.com/__/auth/handler`.
* Paste `https://app.funnelfox.com/__/auth/handler`.
 5. Copy your **Client ID** under **Additional information** at the top right.
**Supabase configuration**
1. Go to **Authentication > Sign In / Providers** in your Supabase project.
5. Copy your **Client ID** under **Additional information** at the top right.
**Supabase configuration**
1. Go to **Authentication > Sign In / Providers** in your Supabase project.
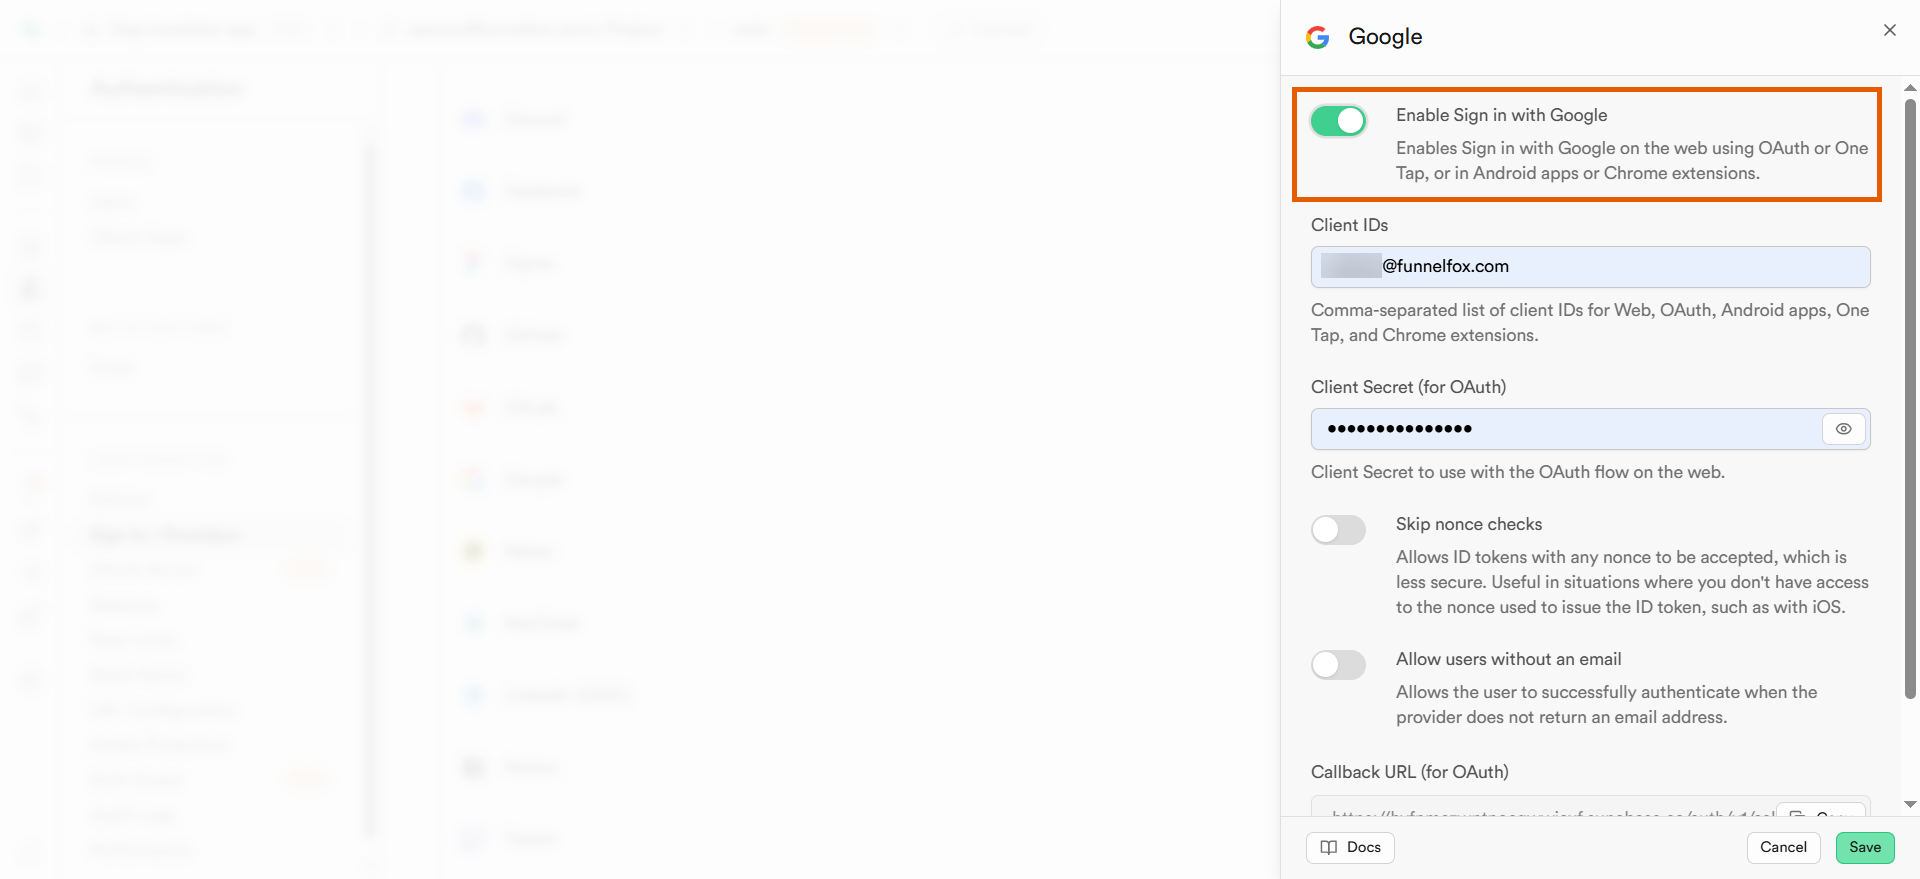
 2. Select **Google** under **Auth Providers**.
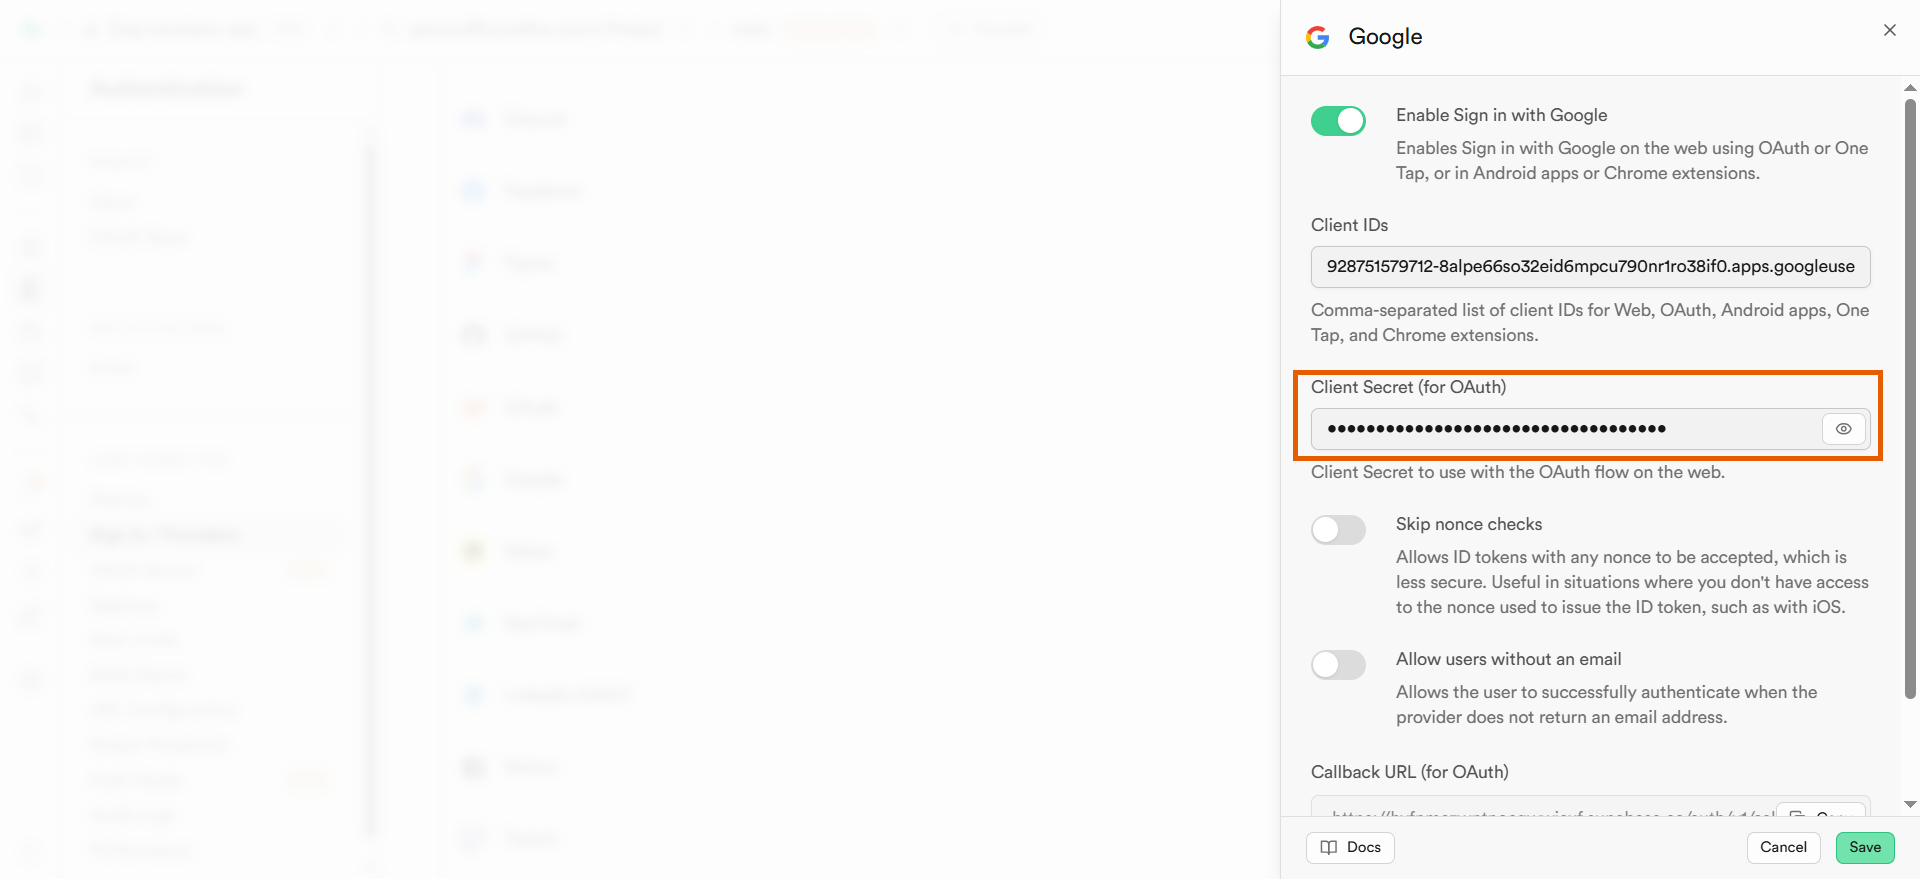
 3. Toggle on **Enable Sign in with Google**.
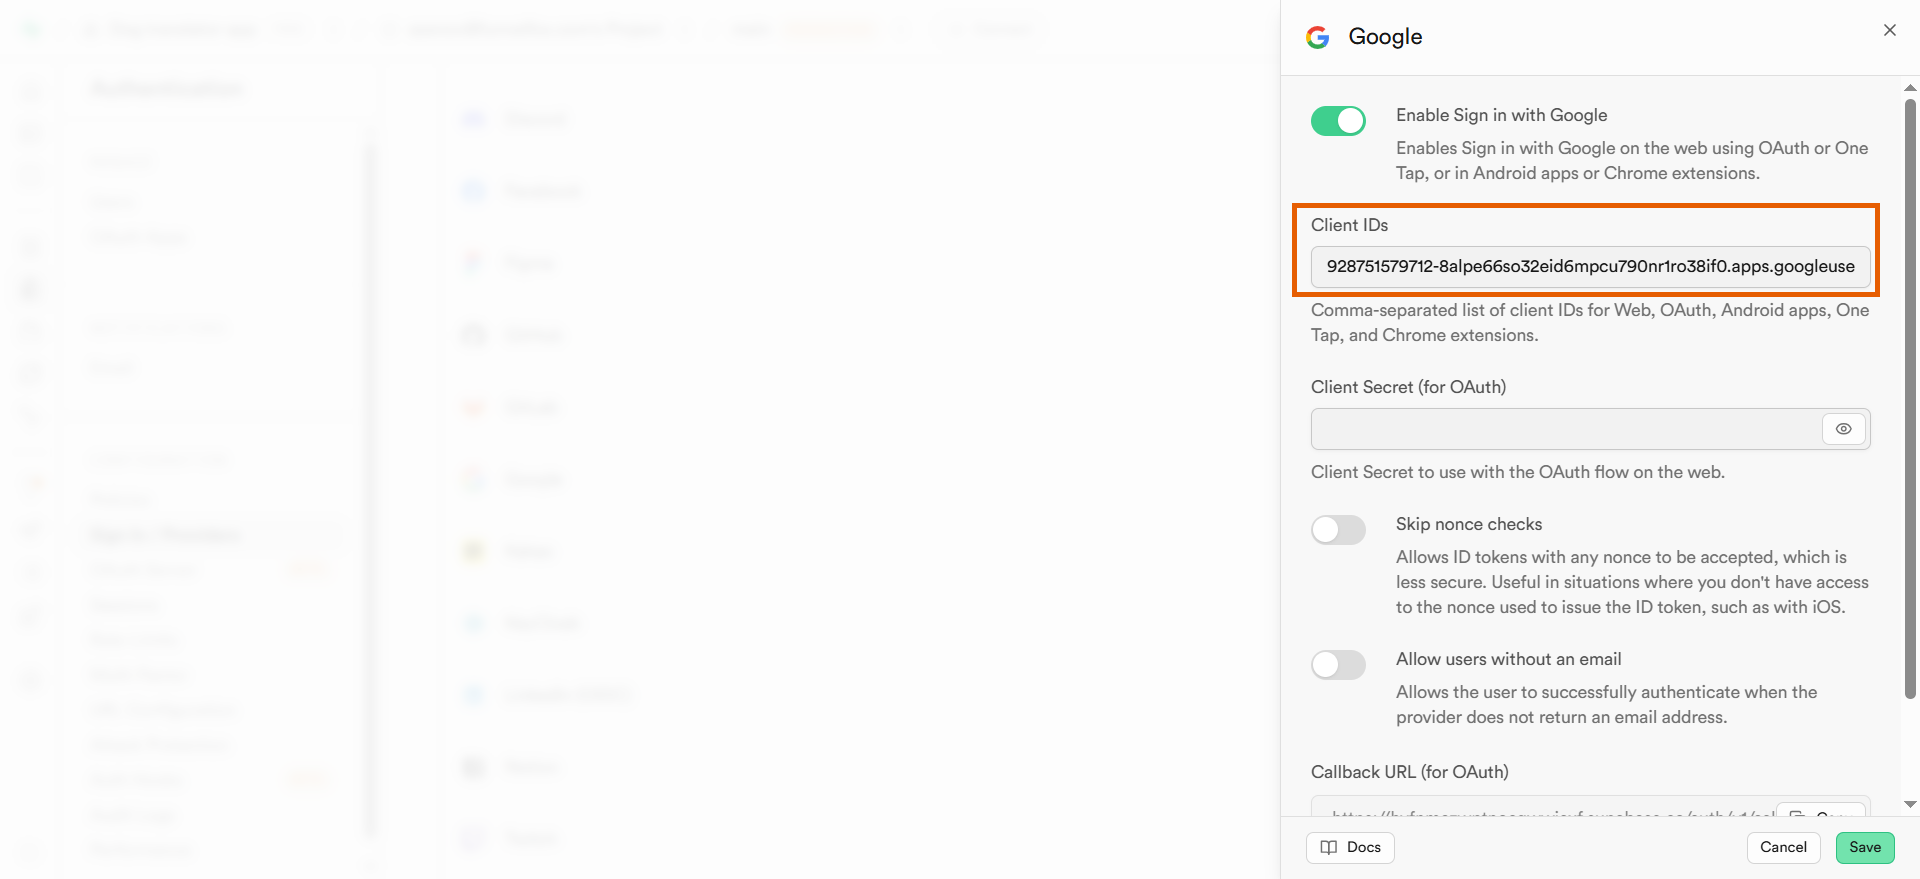
 4. Paste your Client ID into the **Client IDs** field.
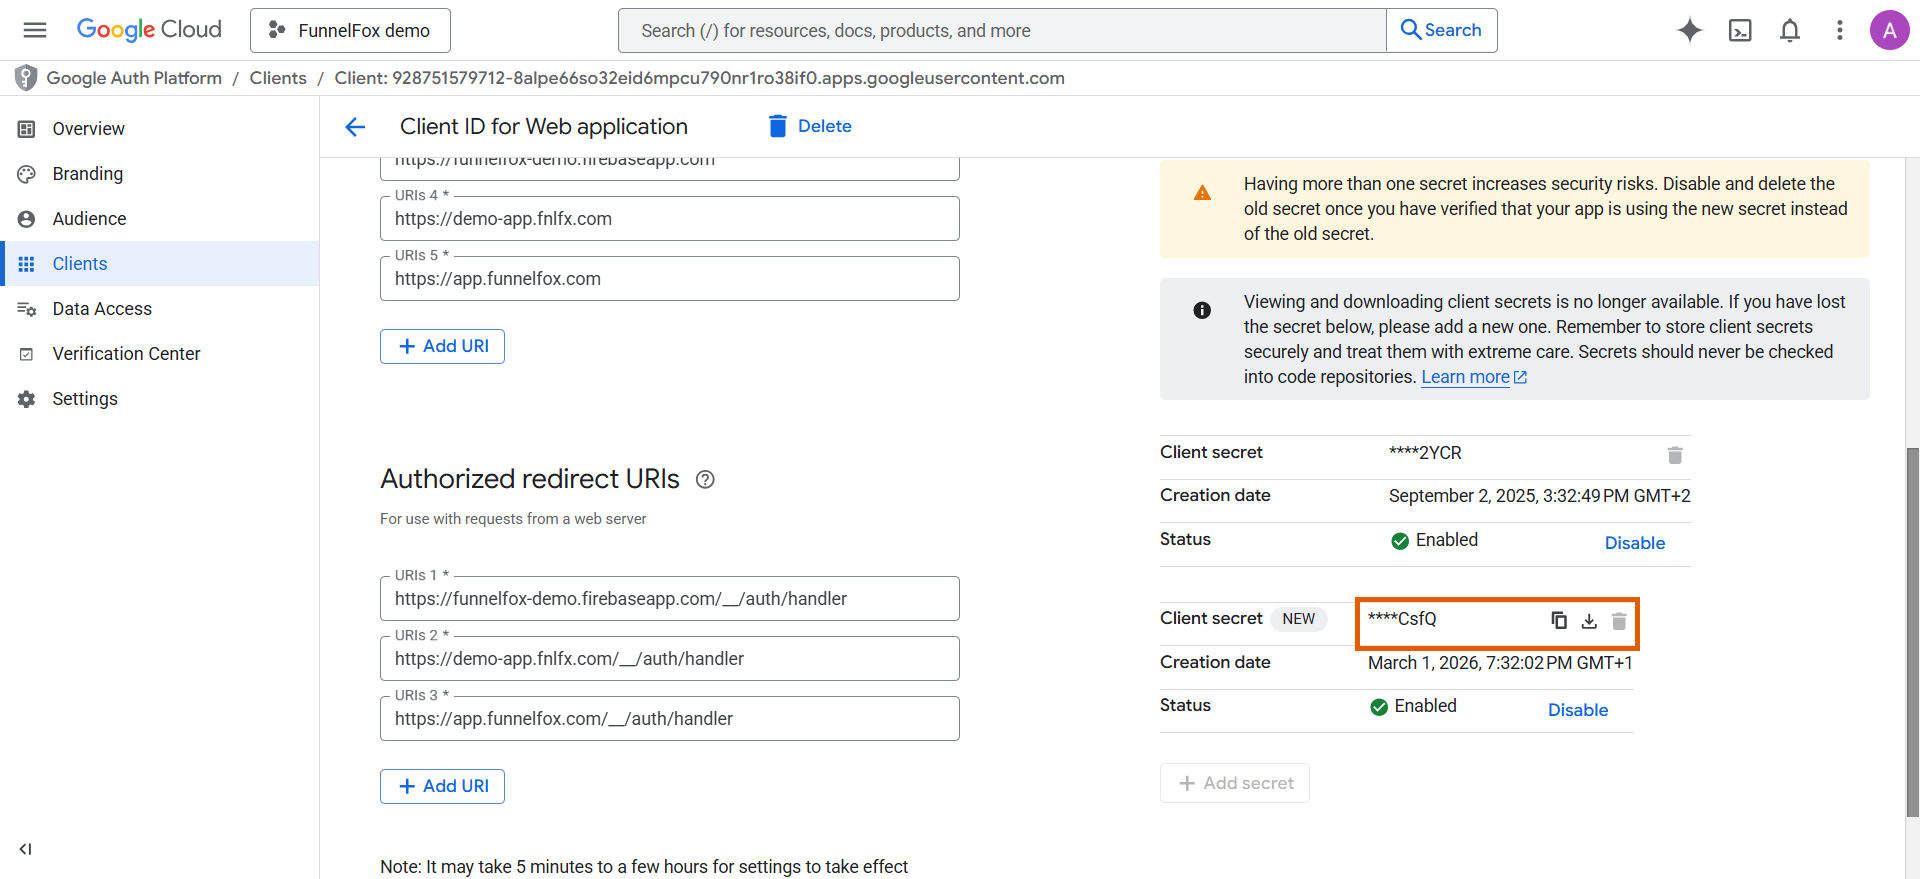
 5. Go back to your Google Cloud console and click **+ Add secret** under **Client secrets**.
 6. Copy your new client secret.
 7. Go back to Supabase and paste the secret into **Client Secret (for OAuth)**.
 8. Click **Save**.
9. Copy the **Callback URL (for OAuth)**.
8. Click **Save**.
9. Copy the **Callback URL (for OAuth)**.
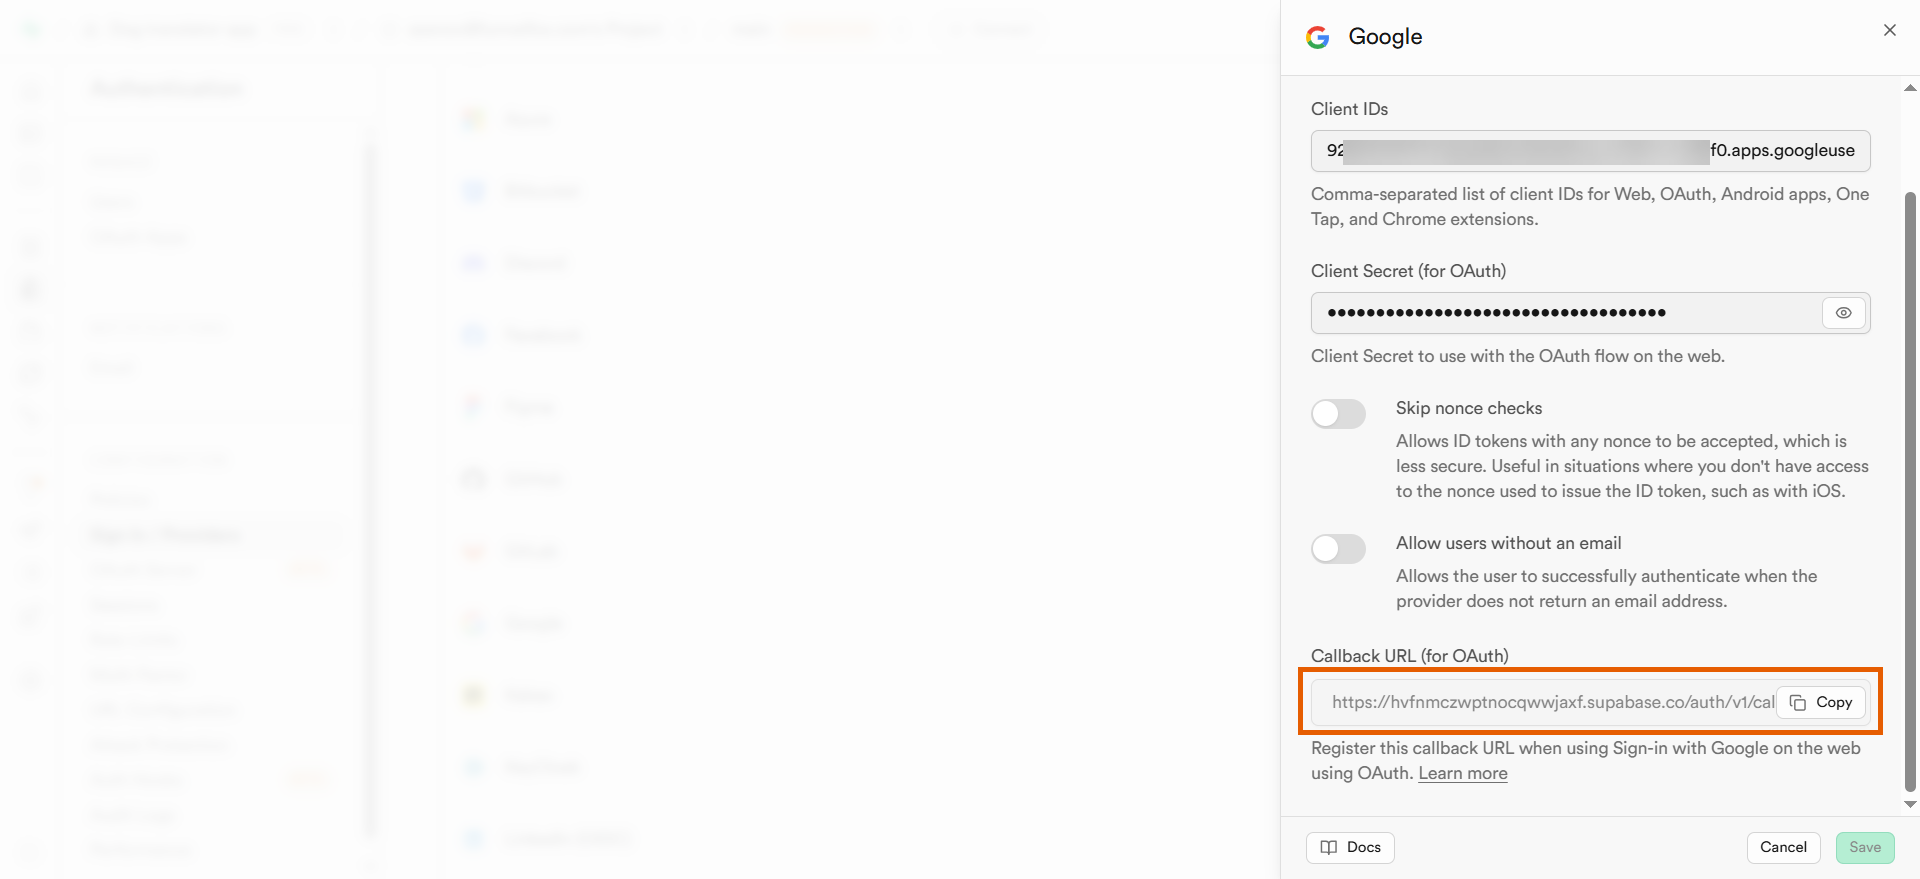 10. Go back to the **Authorized redirect URIs** in Google Cloud console and add one more URI with the callback URL from Supabase.
 11. Click **Save**.
12. Go to **Authentication > URL Configuration** in Supabase and make sure the following domains are added under **Redirect URLs**:
* Your full project URL.
* `https://app.funnelfox.com`
* Your custom domains (if any).
11. Click **Save**.
12. Go to **Authentication > URL Configuration** in Supabase and make sure the following domains are added under **Redirect URLs**:
* Your full project URL.
* `https://app.funnelfox.com`
* Your custom domains (if any).
 Apple OAuth provides seamless authentication using Apple ID. You'll configure your Service ID and key in Apple Developer Portal, then set up the provider in Supabase.
You will need an **App ID** registered with enabled **Sign in with Apple** capability. Learn about [App IDs in Apple documentation](https://developer.apple.com/help/account/identifiers/register-an-app-id) if you don't have one.
**Apple Service ID configuration**
1. Go to [Certificates, Identifiers & Profiles > Identifiers](https://developer.apple.com/account/resources/identifiers) in your Apple Developer Portal.
2. Click **+** to create a new identifier.
Apple OAuth provides seamless authentication using Apple ID. You'll configure your Service ID and key in Apple Developer Portal, then set up the provider in Supabase.
You will need an **App ID** registered with enabled **Sign in with Apple** capability. Learn about [App IDs in Apple documentation](https://developer.apple.com/help/account/identifiers/register-an-app-id) if you don't have one.
**Apple Service ID configuration**
1. Go to [Certificates, Identifiers & Profiles > Identifiers](https://developer.apple.com/account/resources/identifiers) in your Apple Developer Portal.
2. Click **+** to create a new identifier.
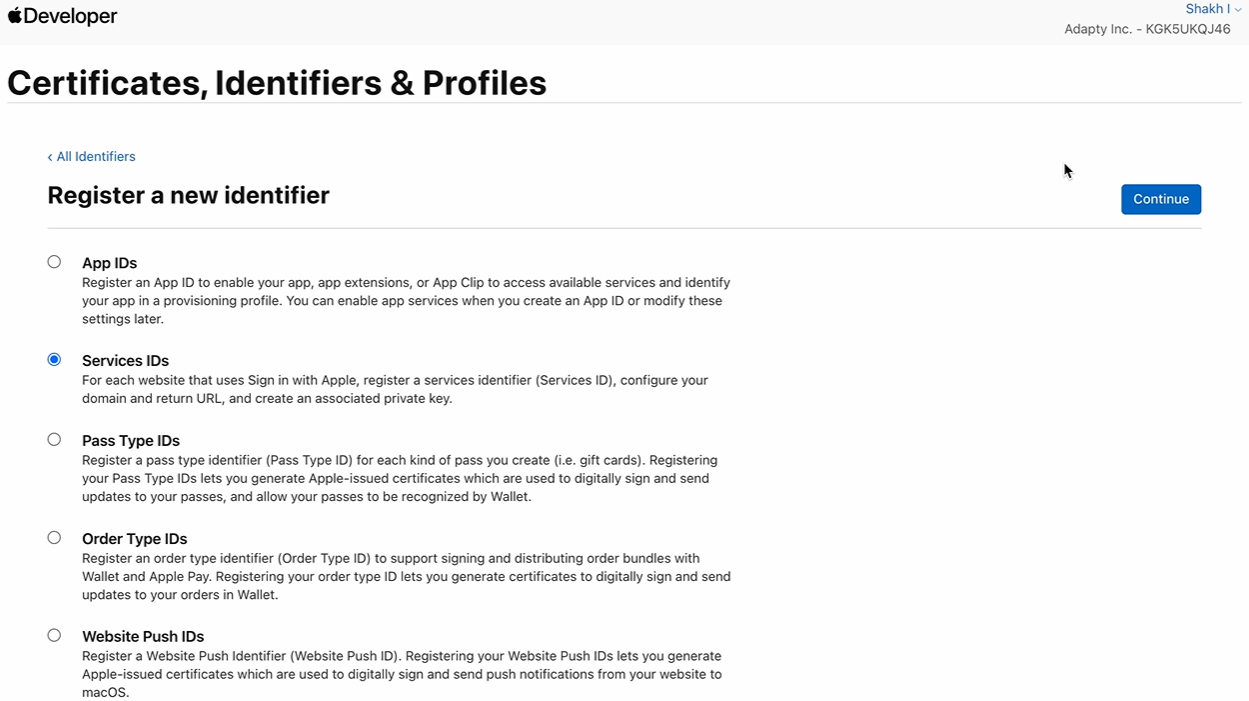
 3. Select **Services IDs** and click **Continue**.
 4. Enter your Service ID **Description** and **Identifier**. Use reverse-domain naming, e.g. `com.yourdomain.oauth`.
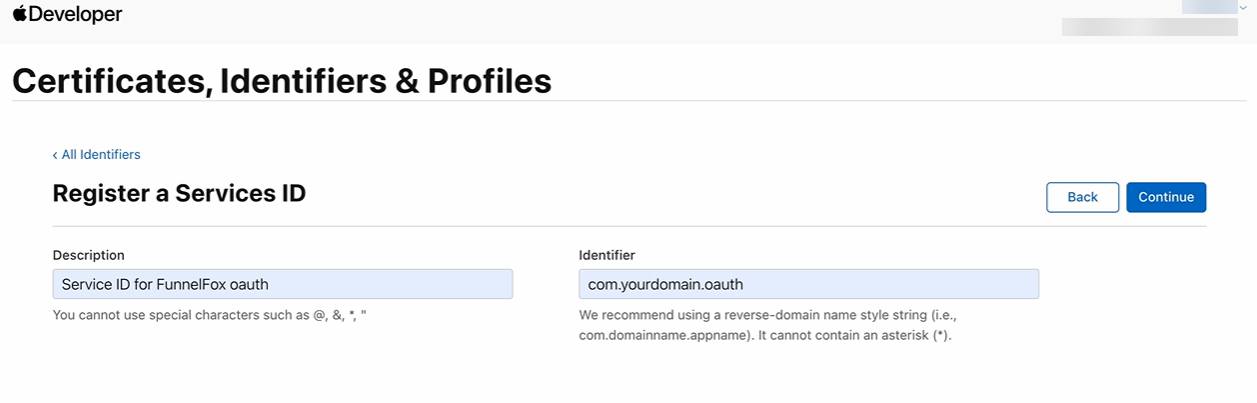 5. Click **Continue**, then **Register**.
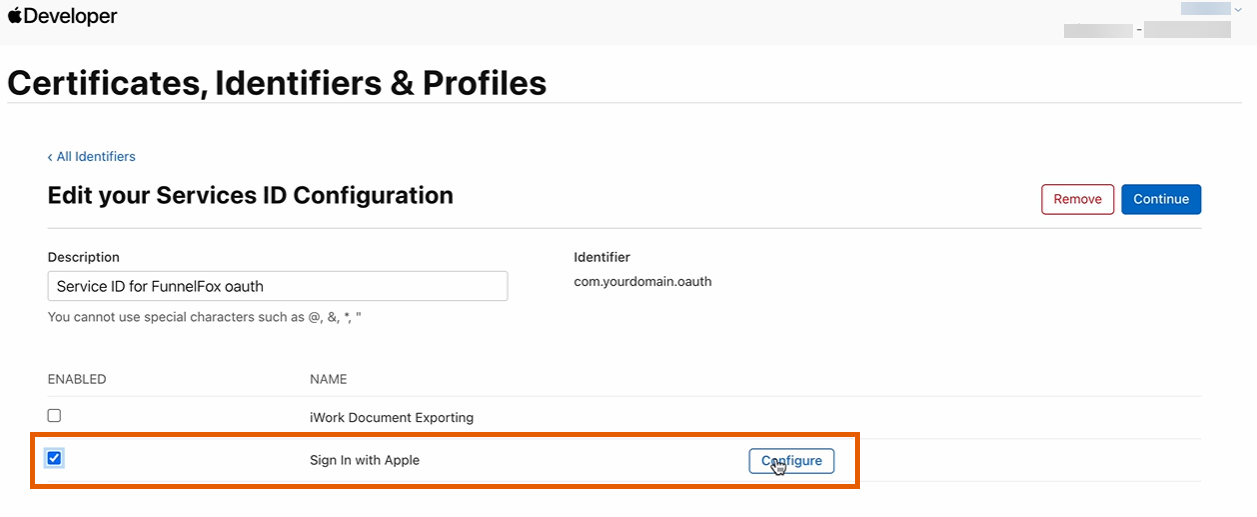
6. Open the Service ID you just created.
7. Enable **Sign In with Apple** and click **Configure**.
5. Click **Continue**, then **Register**.
6. Open the Service ID you just created.
7. Enable **Sign In with Apple** and click **Configure**.
 8. Configure the Web Authentication:
* **Primary App ID**: Select your App ID.
* **Domains and Subdomains**: Add two domains
* Your project domain from [Settings > Domains](/dashboard/settings#domains) in FunnelFox, e.g. `demo-app.fnlfx.com`.
* `https://app.funnelfox.com`.
* **Return URLs**: Add two return domains
* Your project domain with the auth handler path: `https://YOUR_DOMAIN/__/auth/handler`. For example, `https://demo-app.fnlfx.com/__/auth/handler`.
* `https://app.funnelfox.com/__/auth/handler`.
8. Configure the Web Authentication:
* **Primary App ID**: Select your App ID.
* **Domains and Subdomains**: Add two domains
* Your project domain from [Settings > Domains](/dashboard/settings#domains) in FunnelFox, e.g. `demo-app.fnlfx.com`.
* `https://app.funnelfox.com`.
* **Return URLs**: Add two return domains
* Your project domain with the auth handler path: `https://YOUR_DOMAIN/__/auth/handler`. For example, `https://demo-app.fnlfx.com/__/auth/handler`.
* `https://app.funnelfox.com/__/auth/handler`.
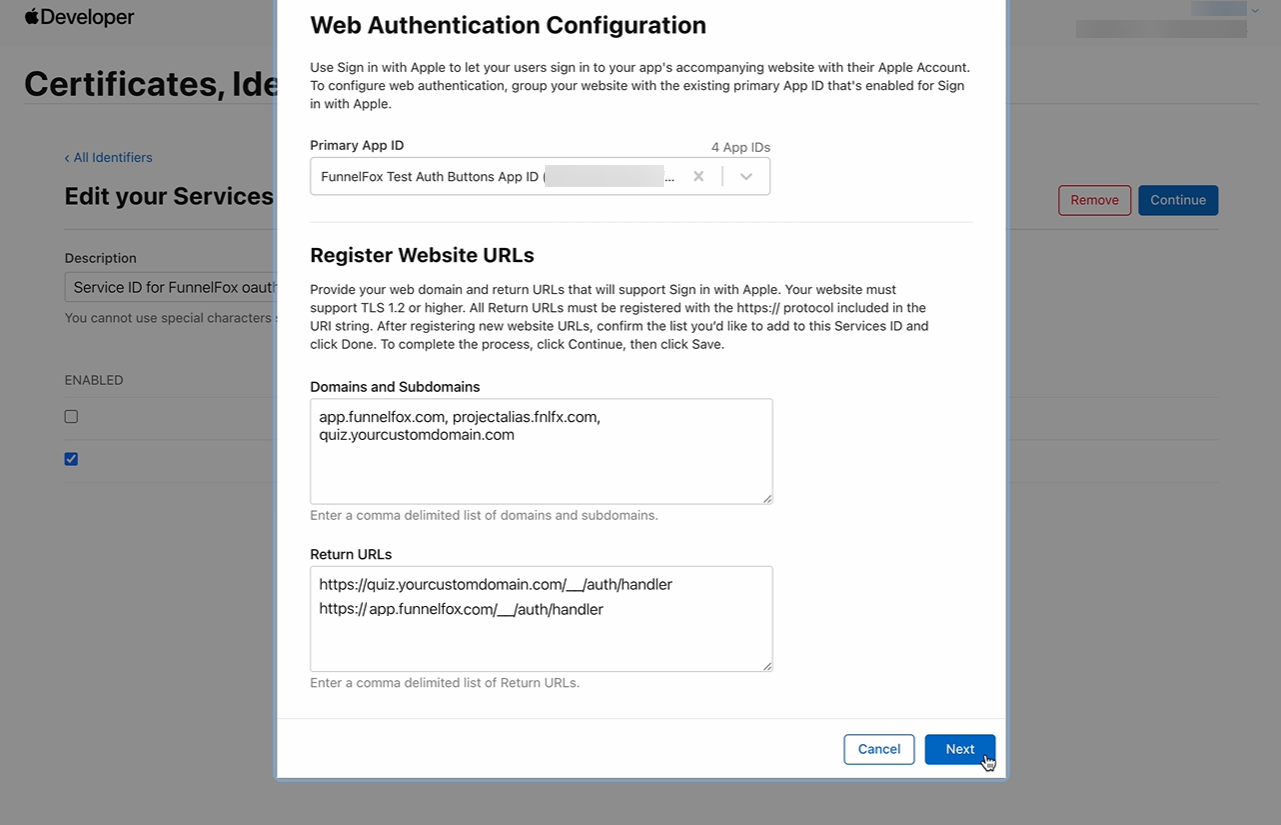 9. Click **Next**, then click **Done**.
10. Click **Continue**, then click **Save** to the right from **Services ID Configuration**.
**Apple key configuration**
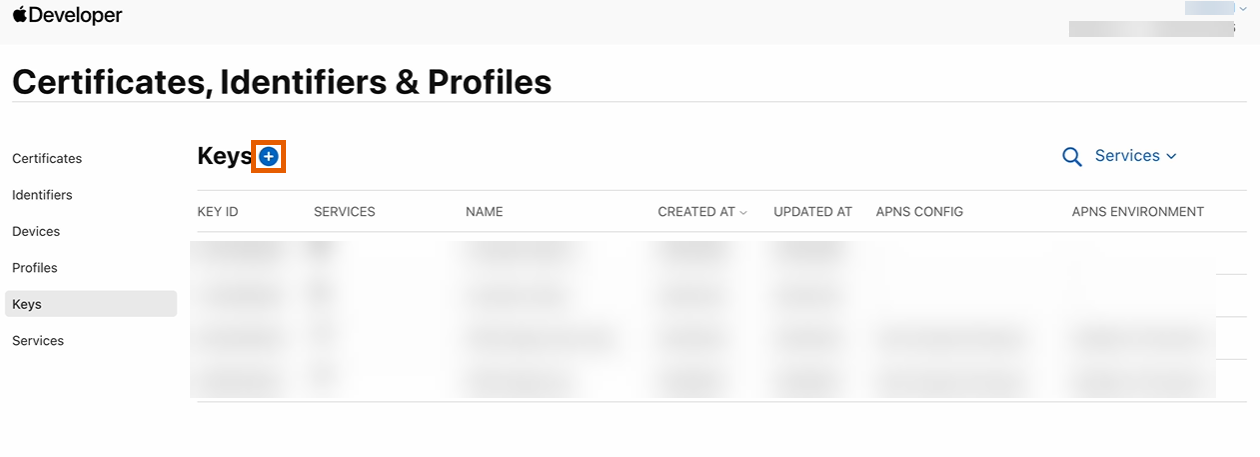
1. Go to the **Keys** tab in [Certificates, Identifiers & Profiles](https://developer.apple.com/account/resources/identifiers).
2. Click **+** to create a new key.
9. Click **Next**, then click **Done**.
10. Click **Continue**, then click **Save** to the right from **Services ID Configuration**.
**Apple key configuration**
1. Go to the **Keys** tab in [Certificates, Identifiers & Profiles](https://developer.apple.com/account/resources/identifiers).
2. Click **+** to create a new key.
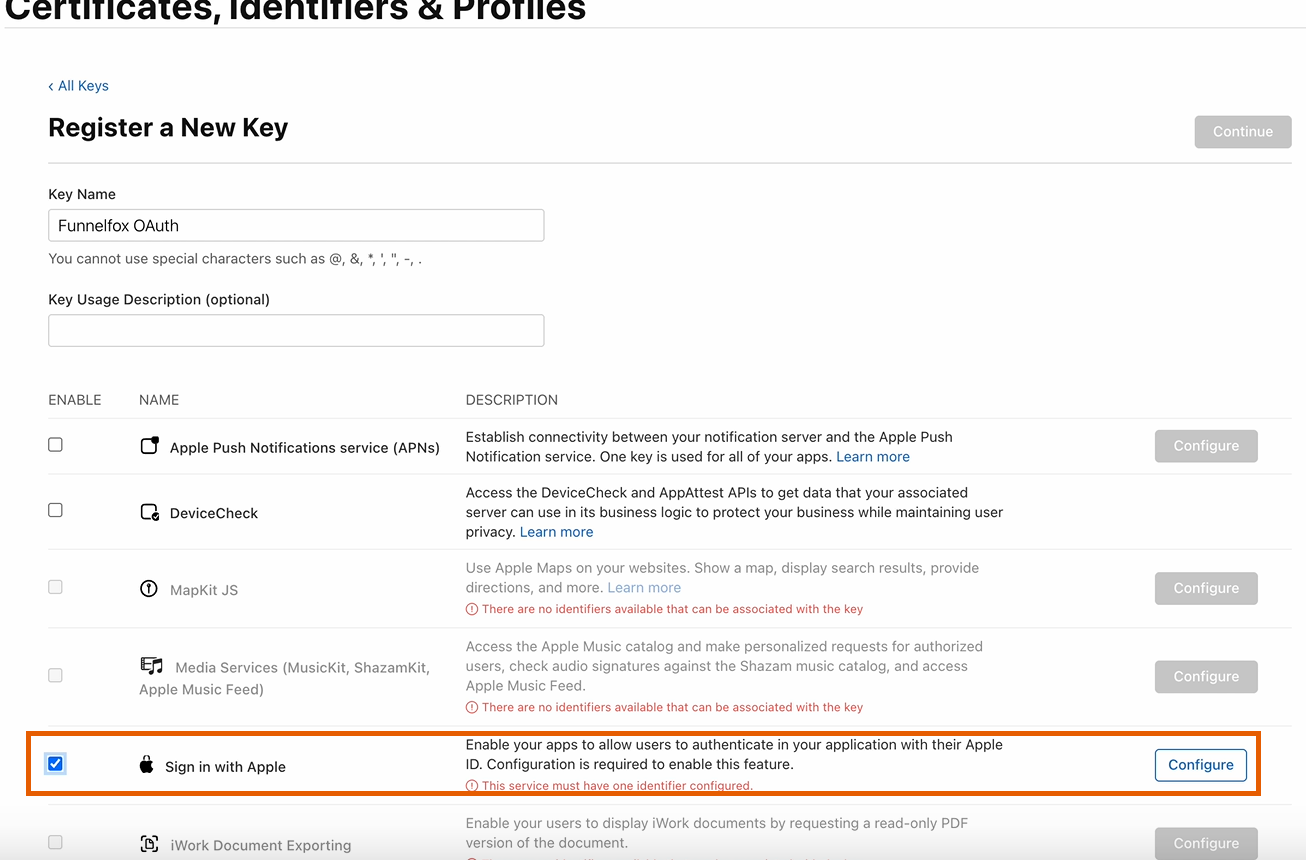
 3. Name your key.
4. Enable **Sign in with Apple** and click **Configure**.
3. Name your key.
4. Enable **Sign in with Apple** and click **Configure**.
 5. Select your **Primary App ID** and click **Save**.
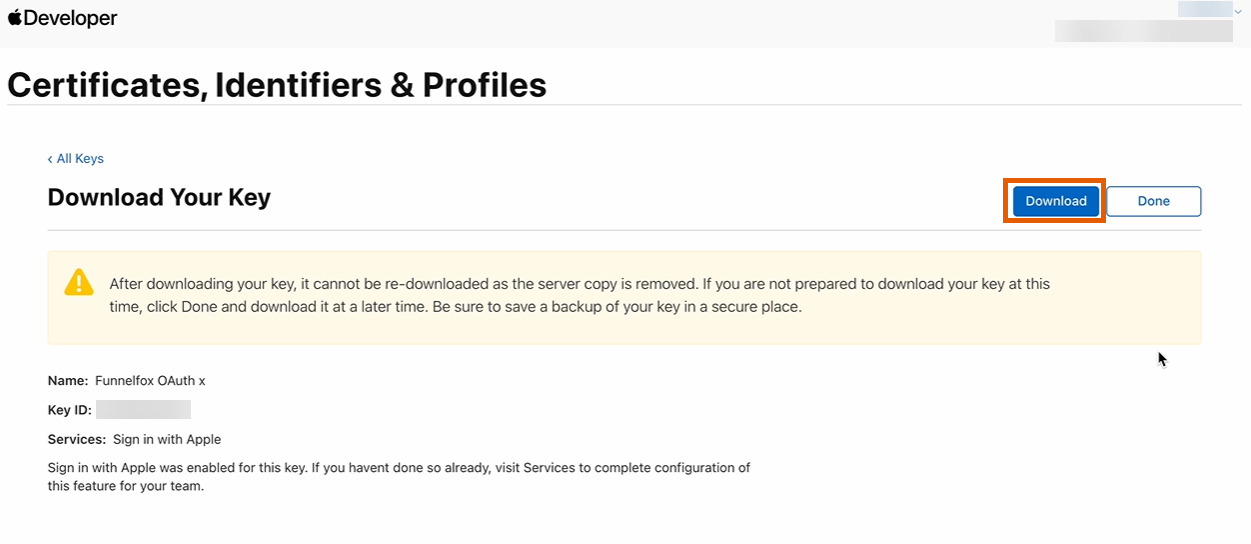
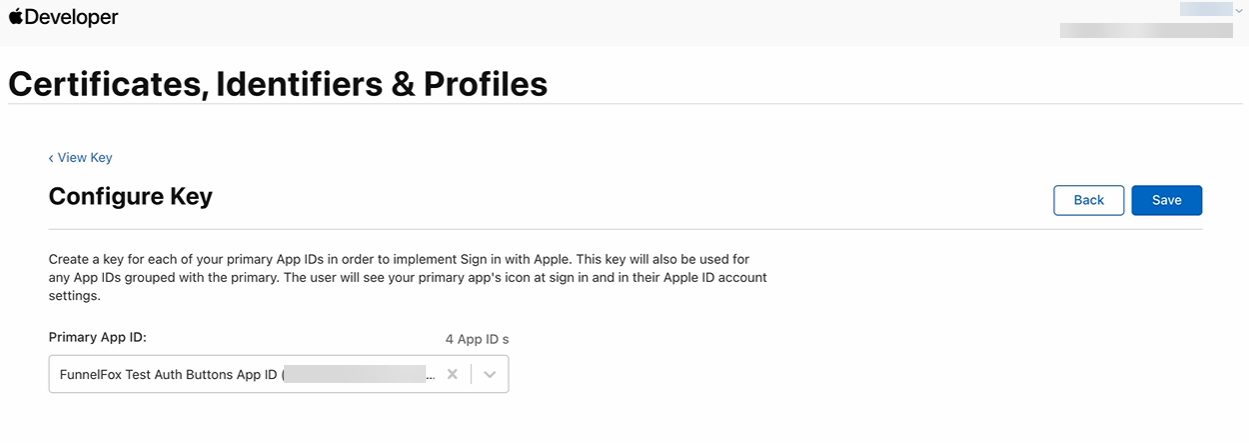 6. Click **Continue**, then click **Register**.
7. Click **Download** to save your key file. You'll need it in the next step.
You can download the key file only once.
6. Click **Continue**, then click **Register**.
7. Click **Download** to save your key file. You'll need it in the next step.
You can download the key file only once.
 **Supabase configuration**
1. Go to **Authentication > Sign In / Providers** in your Supabase project.
2. Select **Apple** under **Auth Providers**.
**Supabase configuration**
1. Go to **Authentication > Sign In / Providers** in your Supabase project.
2. Select **Apple** under **Auth Providers**.
 3. Toggle on **Enable Sign in with Apple**.
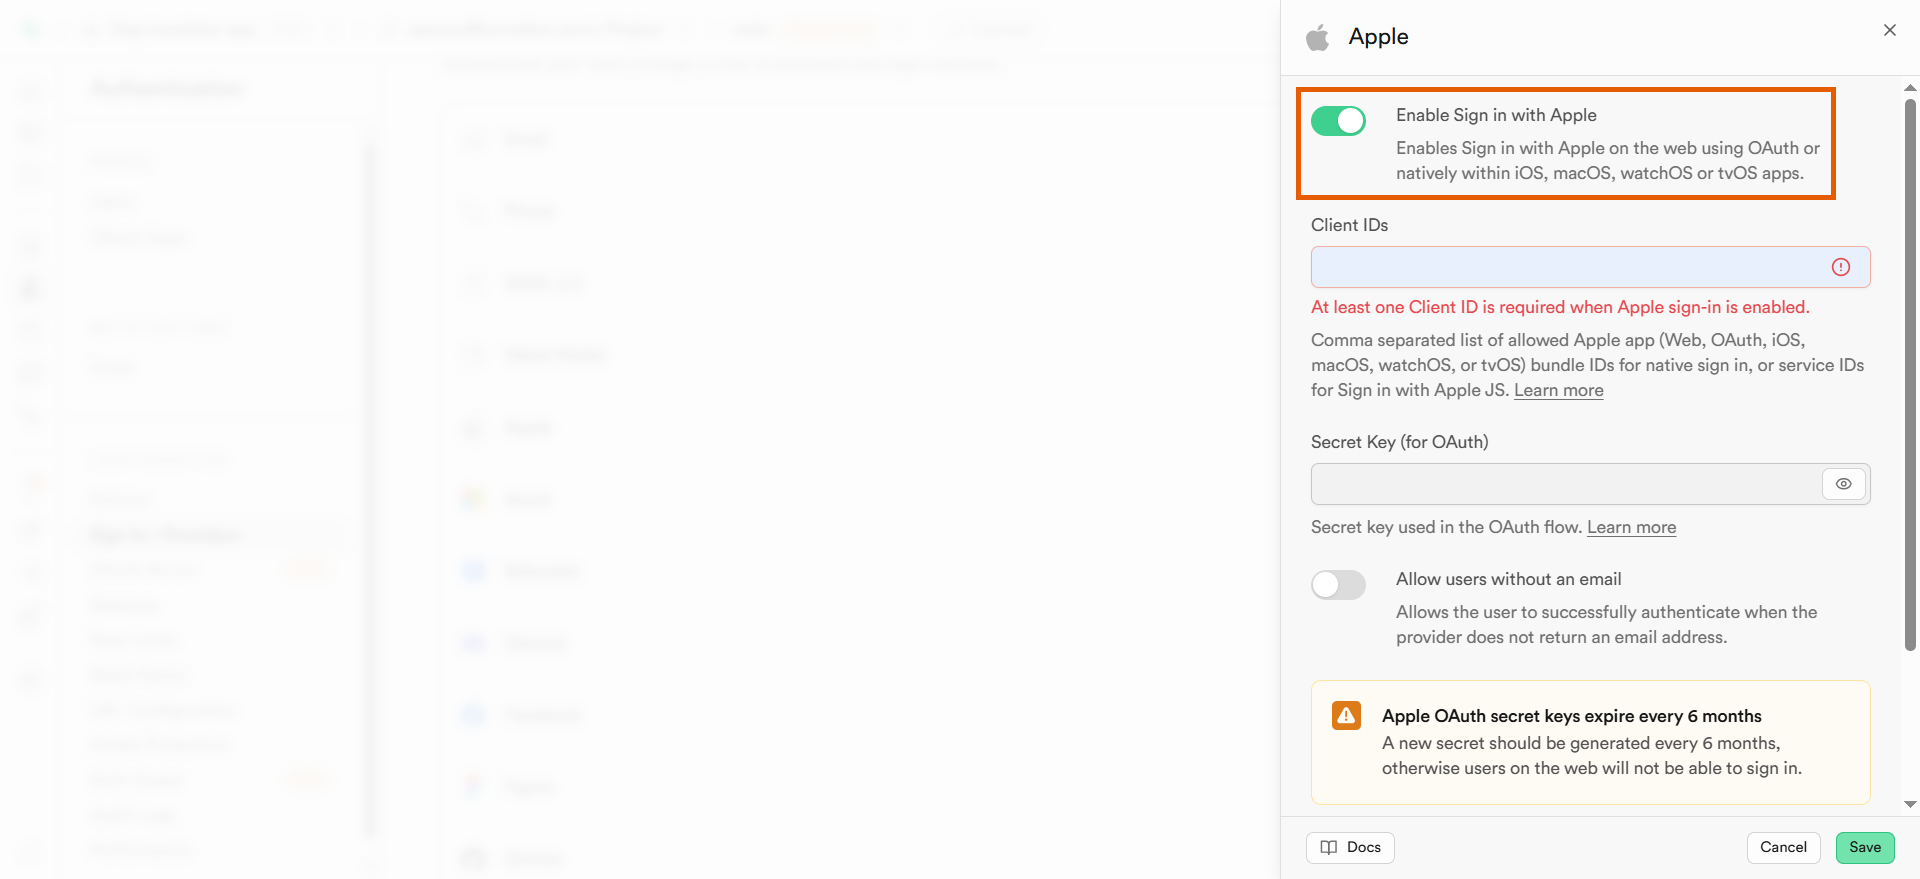 4. Enter your Apple service ID details:
* **Client IDs**: The identifier for the Service ID you created.
* **Secret Key (for OAuth)**: The contents of the key file you downloaded.
4. Enter your Apple service ID details:
* **Client IDs**: The identifier for the Service ID you created.
* **Secret Key (for OAuth)**: The contents of the key file you downloaded.
 5. Click **Save**.
6. Copy the **Callback URL (for OAuth)**.
7. Go back to configuring Web Authentication for your service ID in Apple and add one more **Return URL** with the callback URL from Supabase.
8. Go back to **Authentication > URL Configuration** in Supabase and make sure the following domains are added under **Redirect URLs**:
* Your full project URL.
* `https://app.funnelfox.com`
* Your custom domains (if any).
### 3. Connect Supabase to FunnelFox
Retrieve your project credentials from Supabase and add them to FunnelFox.
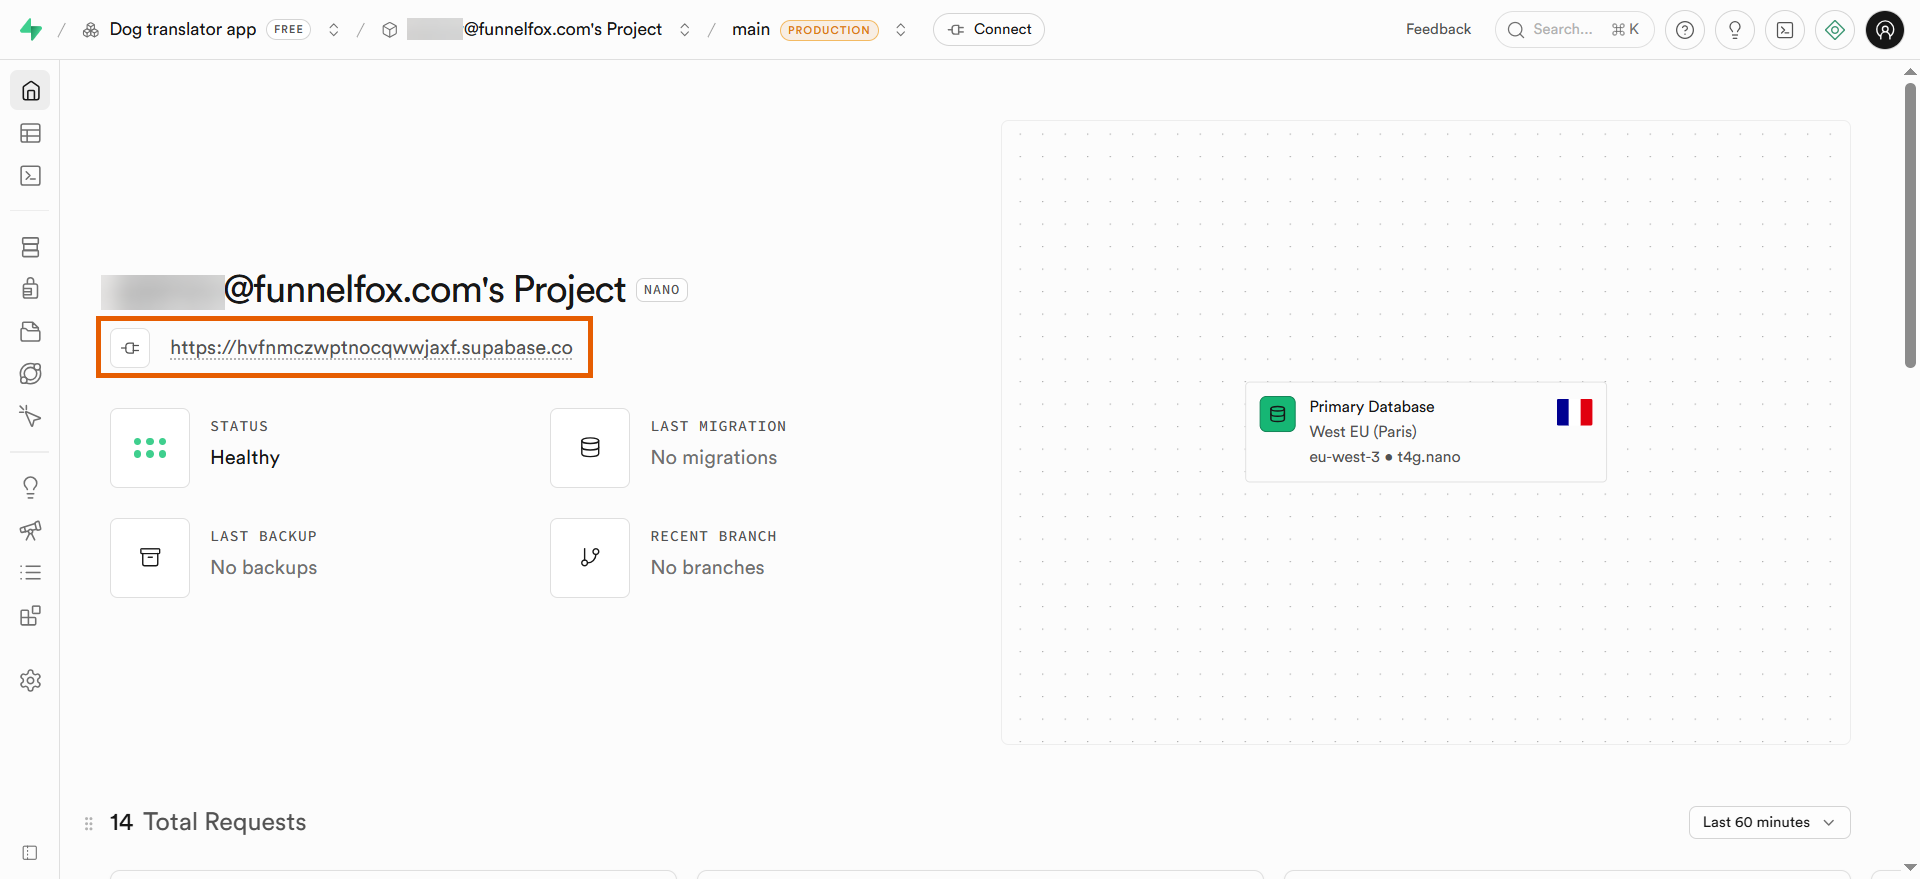
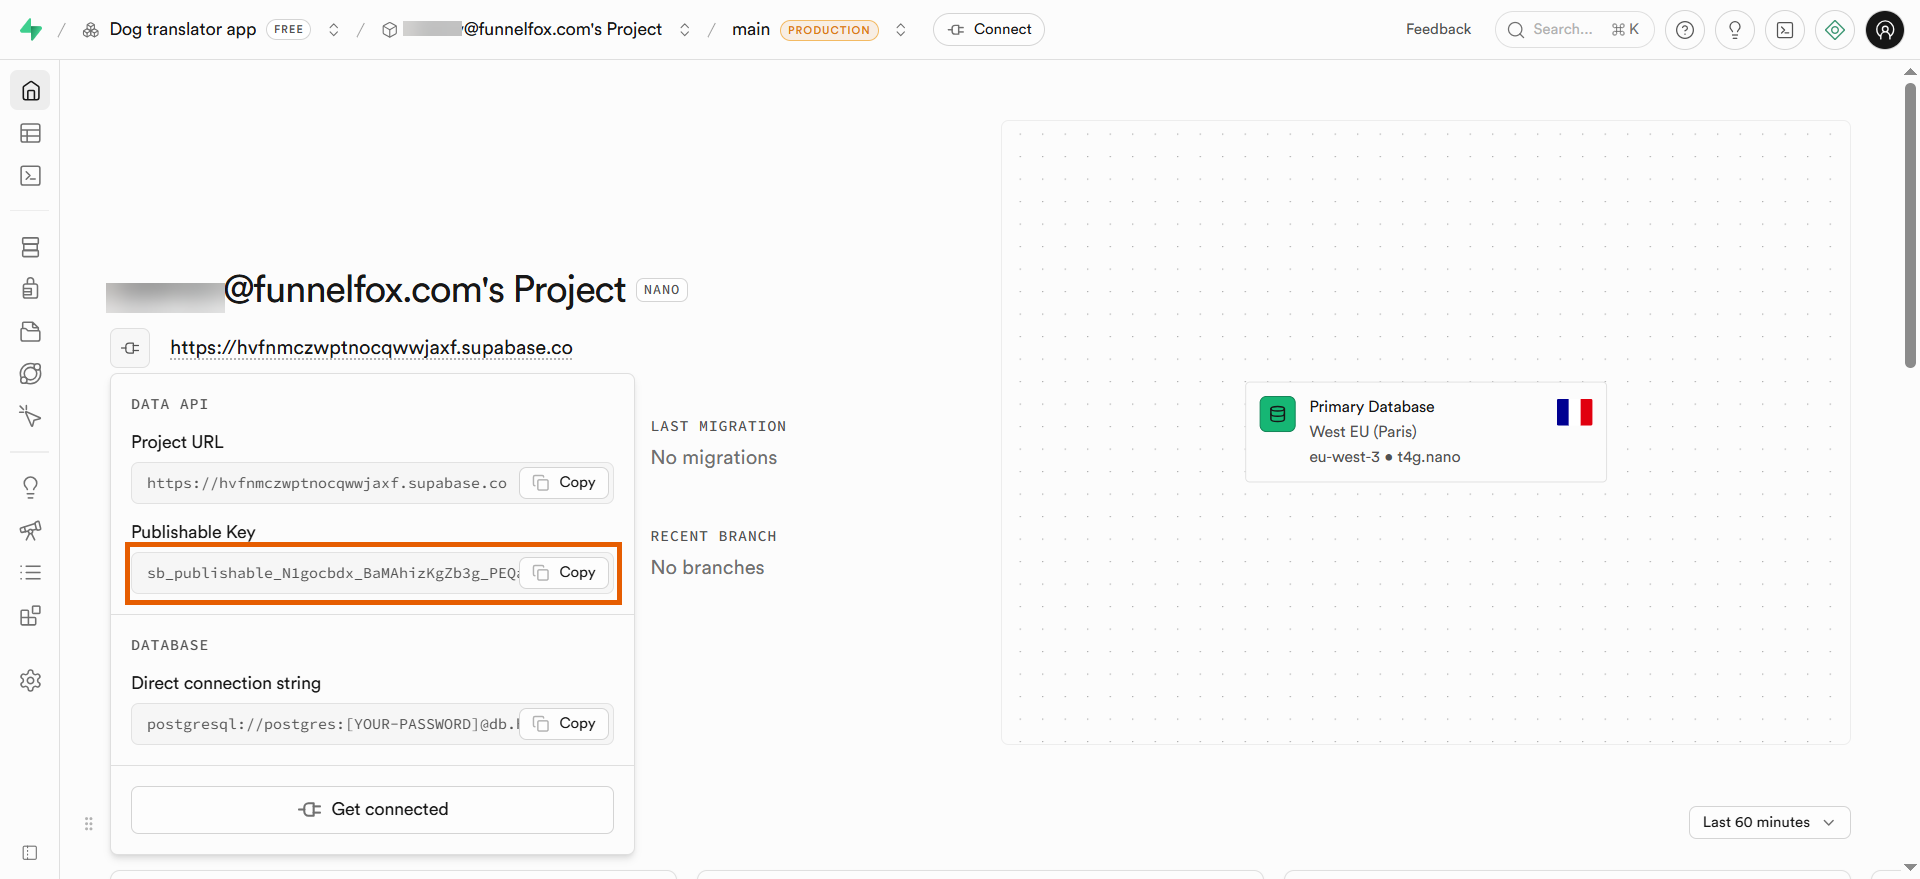
1. In your Supabase project, hover over your project URL in the top navigation. You will see your **Project URL** and **Publishable Key**.
5. Click **Save**.
6. Copy the **Callback URL (for OAuth)**.
7. Go back to configuring Web Authentication for your service ID in Apple and add one more **Return URL** with the callback URL from Supabase.
8. Go back to **Authentication > URL Configuration** in Supabase and make sure the following domains are added under **Redirect URLs**:
* Your full project URL.
* `https://app.funnelfox.com`
* Your custom domains (if any).
### 3. Connect Supabase to FunnelFox
Retrieve your project credentials from Supabase and add them to FunnelFox.
1. In your Supabase project, hover over your project URL in the top navigation. You will see your **Project URL** and **Publishable Key**.
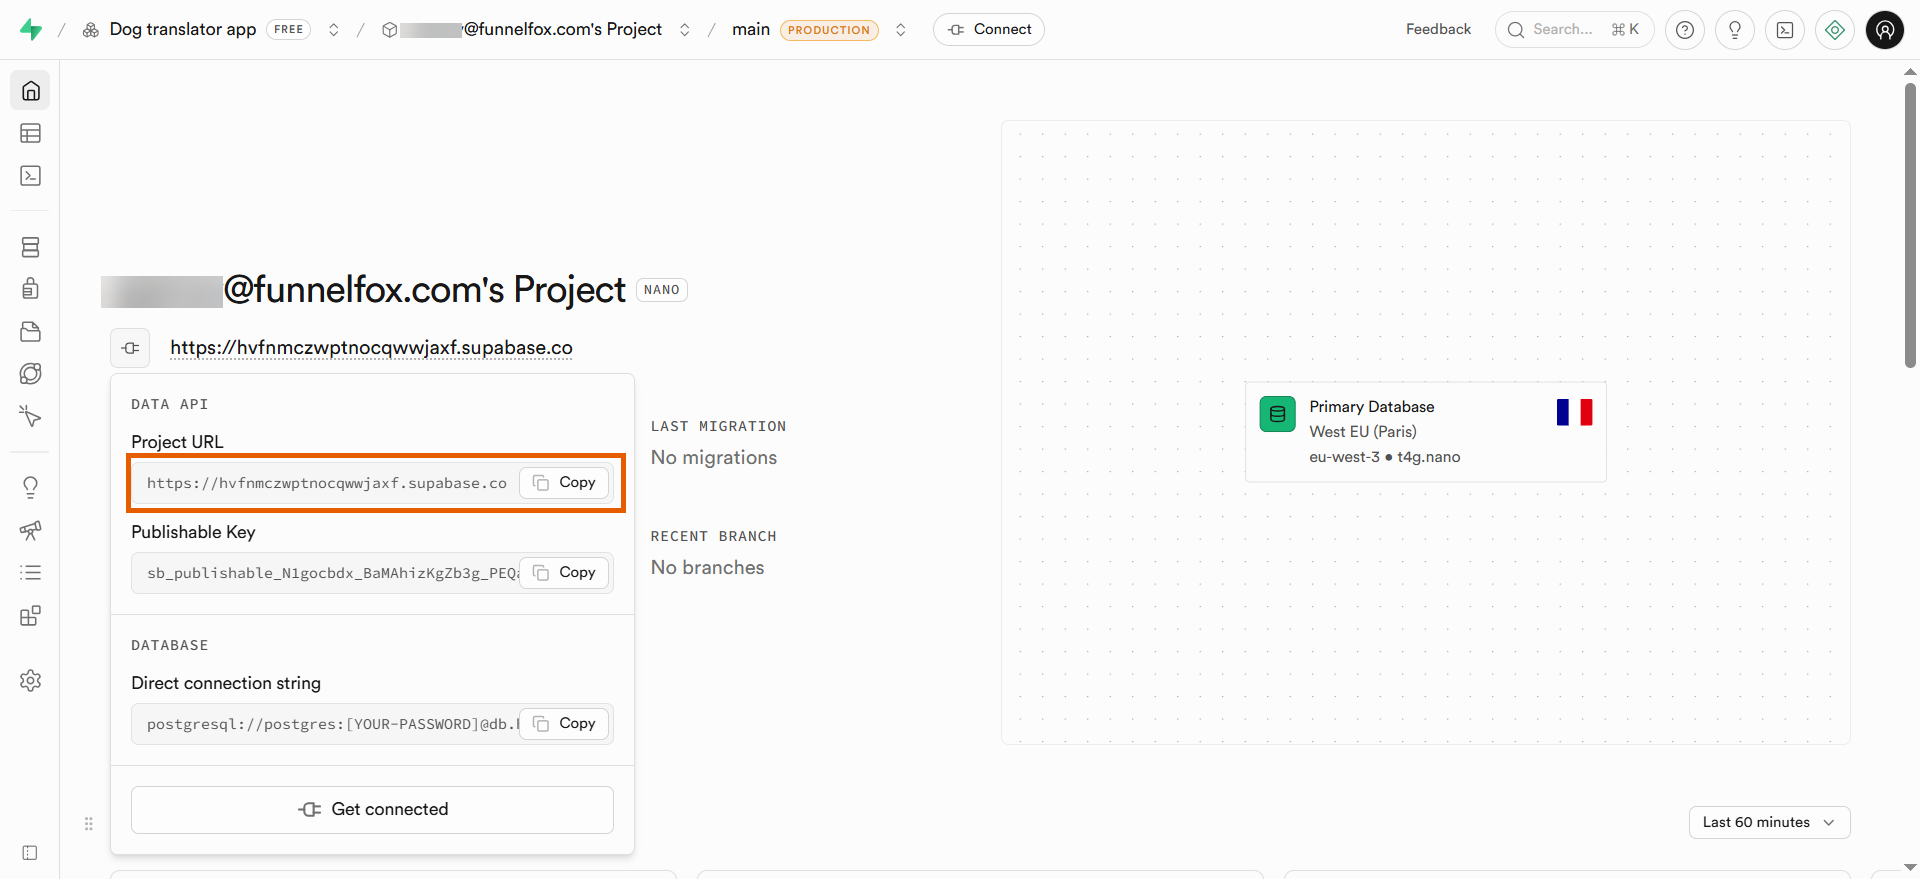
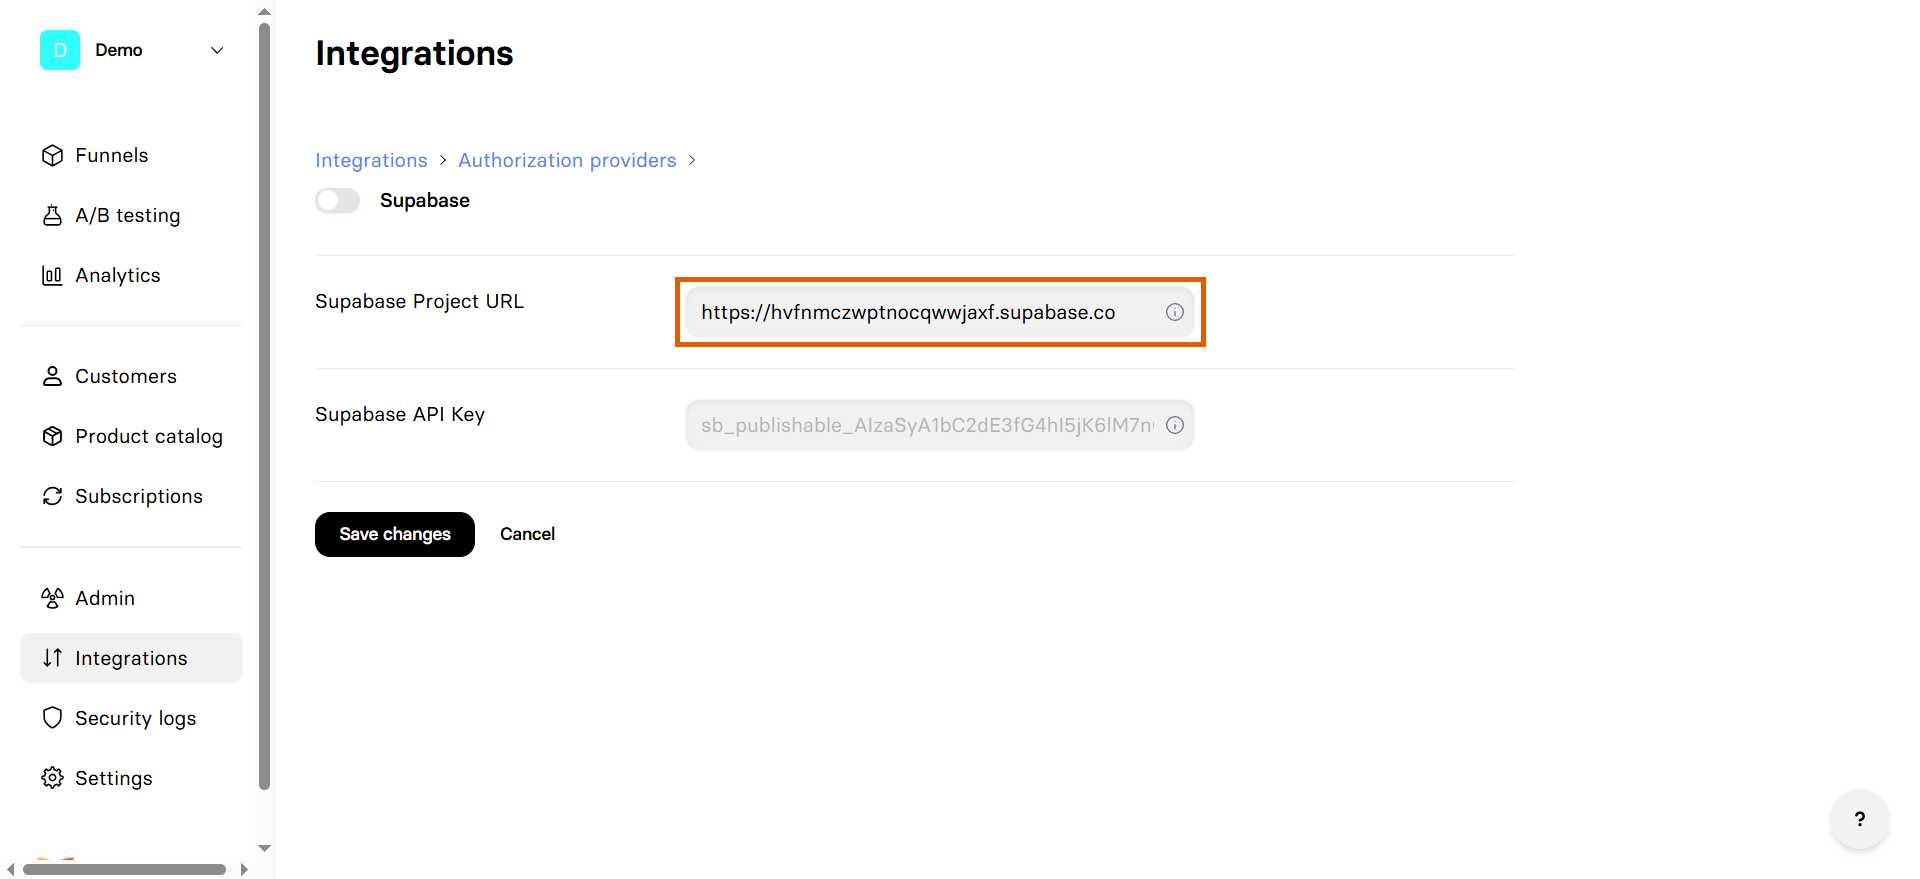
 2. Copy the **Project URL**.
 3. Go to [Integrations > Supabase](https://app.funnelfox.com/integrations/supabase) in FunnelFox.
4. Paste the URL into the **Supabase Project URL** field.
3. Go to [Integrations > Supabase](https://app.funnelfox.com/integrations/supabase) in FunnelFox.
4. Paste the URL into the **Supabase Project URL** field.
 5. Go back to your Supabase project and copy the **Publishable Key**.
 6. Paste the key into the **Supabase API Key** field in FunnelFox.
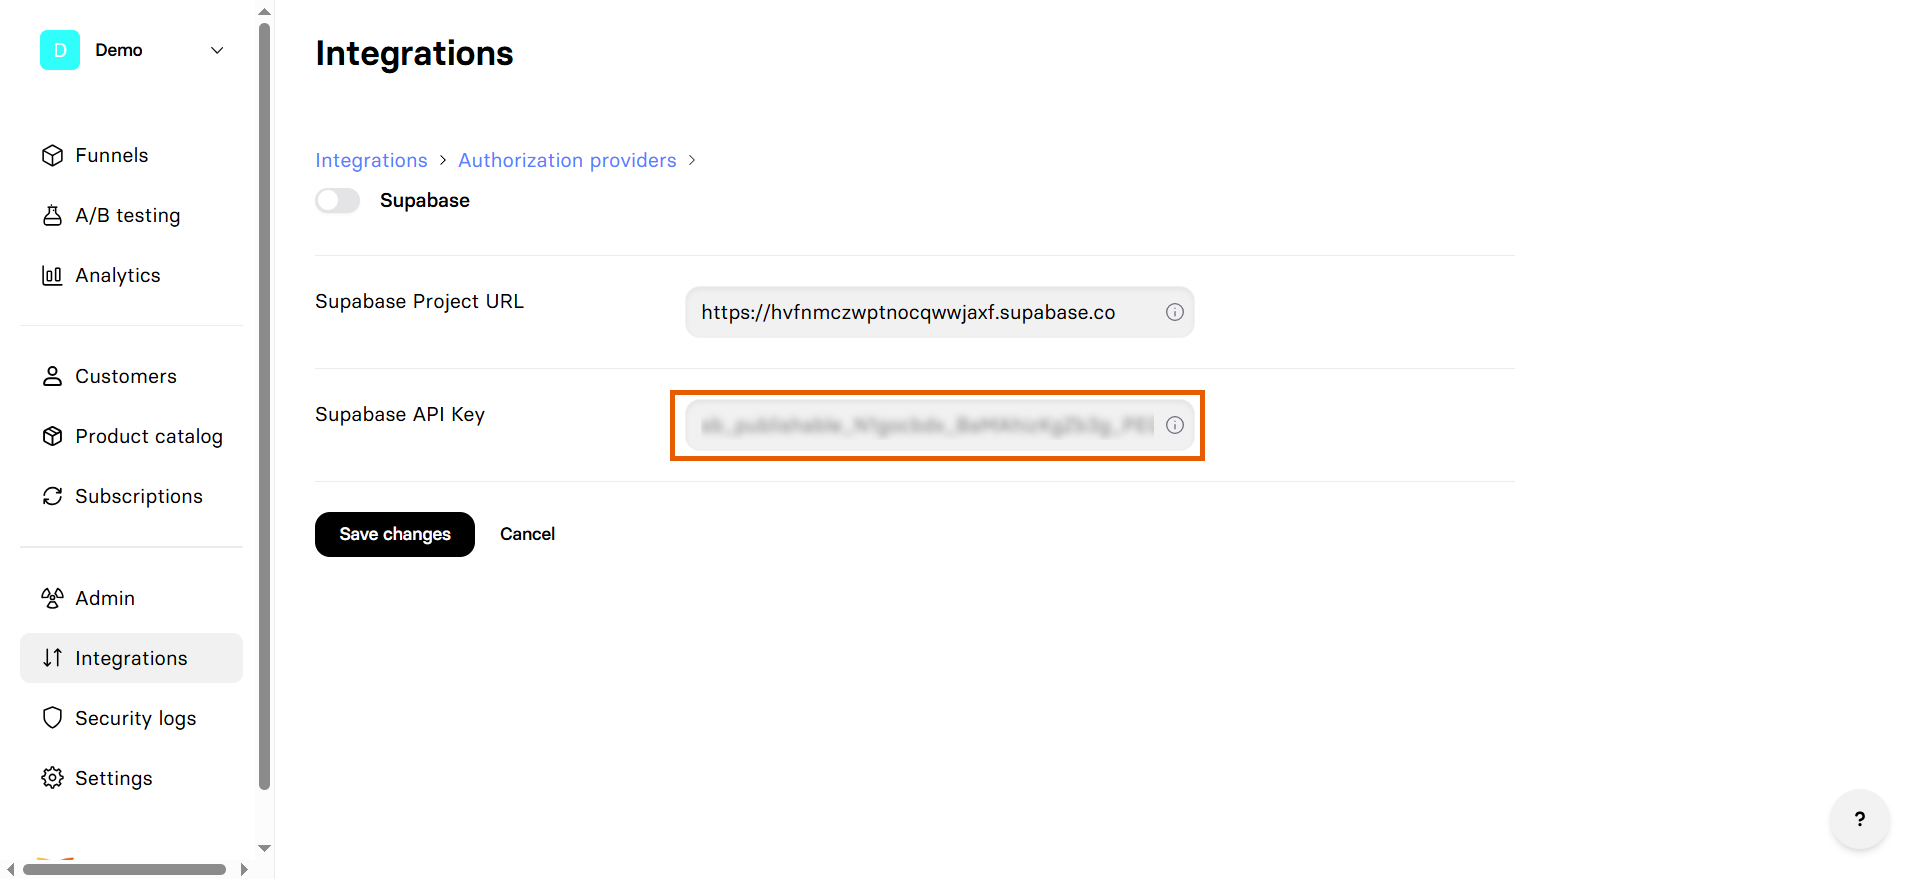 7. Click **Save changes**.
You successfully integrated Supabase! Add the authentication methods you've set up to your funnels in the Editor.
## Add authentication to funnels
Once Supabase is configured, you can add authentication flows to your funnels in the Editor: prompt [AI Chat in Editor](/agentic-solution/overview#ai-chat-in-editor) or build the screens manually on the canvas. The following authentication methods correspond to the ones you've set up in Supabase.
The same OAuth buttons serve both authentication methods: sign up and sign in.
### Email/Password authentication
Enable users to authenticate with their email address and custom password.
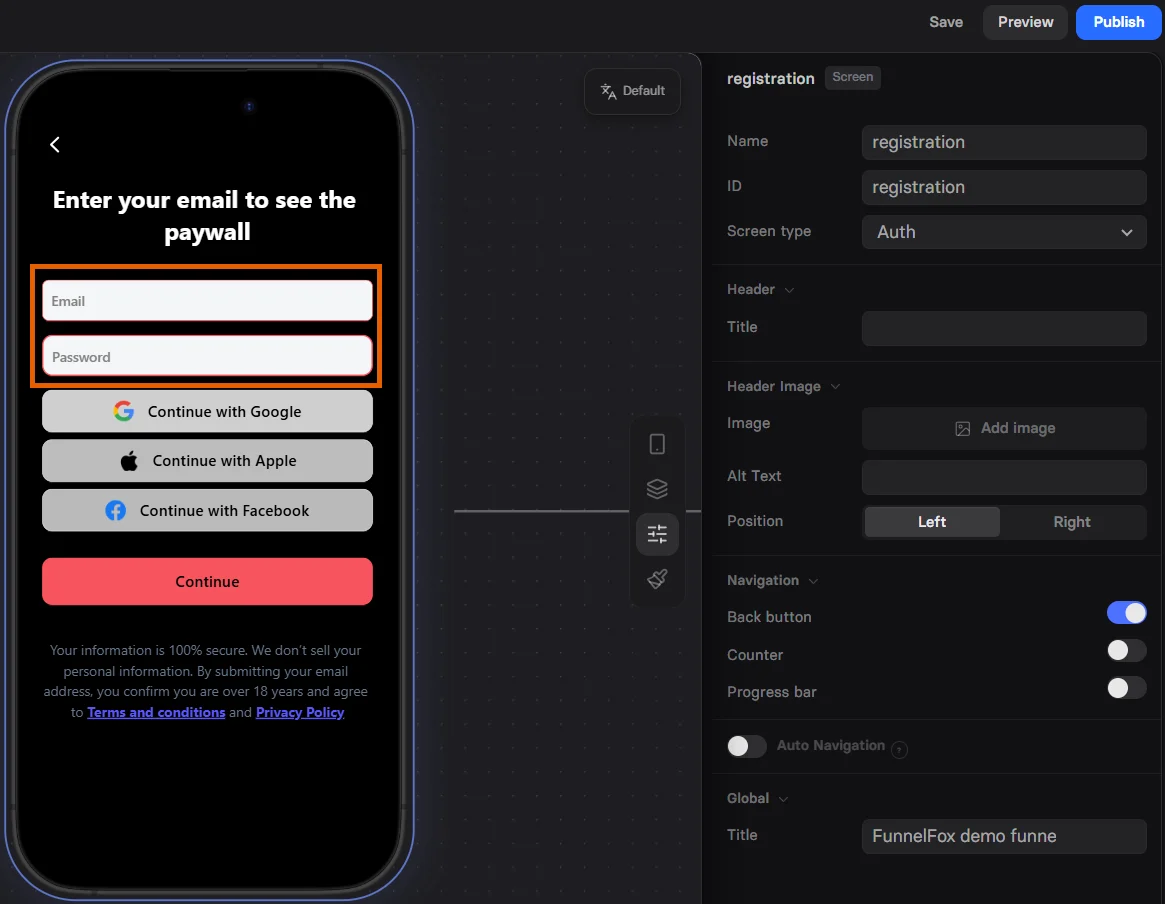
To add Email/Password authentication to your funnel, prompt the AI Chat in Editor to add a screen for user registration with both **Email** and **Password** inputs.
Or go to **Add element > Inputs** and them manually.
By default, FunnelFox generates a random password when a user submits their email in the funnel. It's important to add the Password input on the same screen to replace the previously generated password with the one provided.
7. Click **Save changes**.
You successfully integrated Supabase! Add the authentication methods you've set up to your funnels in the Editor.
## Add authentication to funnels
Once Supabase is configured, you can add authentication flows to your funnels in the Editor: prompt [AI Chat in Editor](/agentic-solution/overview#ai-chat-in-editor) or build the screens manually on the canvas. The following authentication methods correspond to the ones you've set up in Supabase.
The same OAuth buttons serve both authentication methods: sign up and sign in.
### Email/Password authentication
Enable users to authenticate with their email address and custom password.
To add Email/Password authentication to your funnel, prompt the AI Chat in Editor to add a screen for user registration with both **Email** and **Password** inputs.
Or go to **Add element > Inputs** and them manually.
By default, FunnelFox generates a random password when a user submits their email in the funnel. It's important to add the Password input on the same screen to replace the previously generated password with the one provided.
 ### OAuth authentication
Enable seamless OAuth authentication using Google or Apple accounts for a frictionless user experience.
To add OAuth authentication to your funnel:
1. In the Editor, prompt the AI Chat to add a screen for user registration with OAuth button or use the one you've already added for Email/Password.
Or click **Add element > Authentication** and select **OAuth button**.
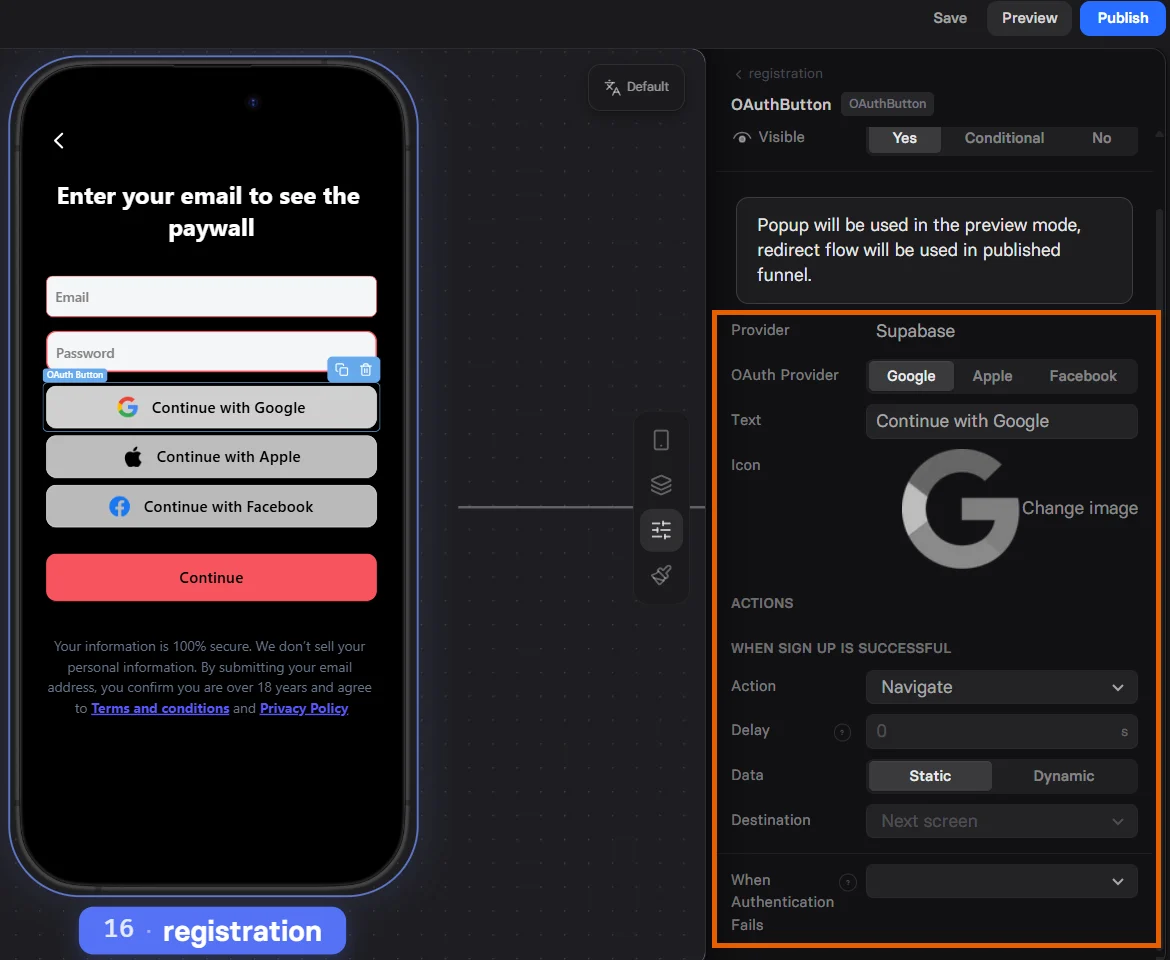
2. Go to the **Parameters** tab of the OAuth button.
3. Select OAuth provider.
4. Under **Actions**, set up user navigation for cases when authentication succeeds or fails.
Learn more about setting up [navigation actions](/editor/actions#navigate).
### OAuth authentication
Enable seamless OAuth authentication using Google or Apple accounts for a frictionless user experience.
To add OAuth authentication to your funnel:
1. In the Editor, prompt the AI Chat to add a screen for user registration with OAuth button or use the one you've already added for Email/Password.
Or click **Add element > Authentication** and select **OAuth button**.
2. Go to the **Parameters** tab of the OAuth button.
3. Select OAuth provider.
4. Under **Actions**, set up user navigation for cases when authentication succeeds or fails.
Learn more about setting up [navigation actions](/editor/actions#navigate).